


It’s happened to all of us.
You make a pass with your router, hoping for a clean edge — but your result is tearout and burning.
What gives?
The problem might not be your tool, or even your router technique (of course not).
The problem might be your straight edge bits — the long-time industry standard.
Spiral bits (the straight bit’s younger, better-looking cousin) cut faster, cleaner, and stay sharp longer than traditional bits.
They’re my go-to bits on the router and CNC for everything from shallow grooves, to full depth cuts, to edge-jointing and flush trimming.
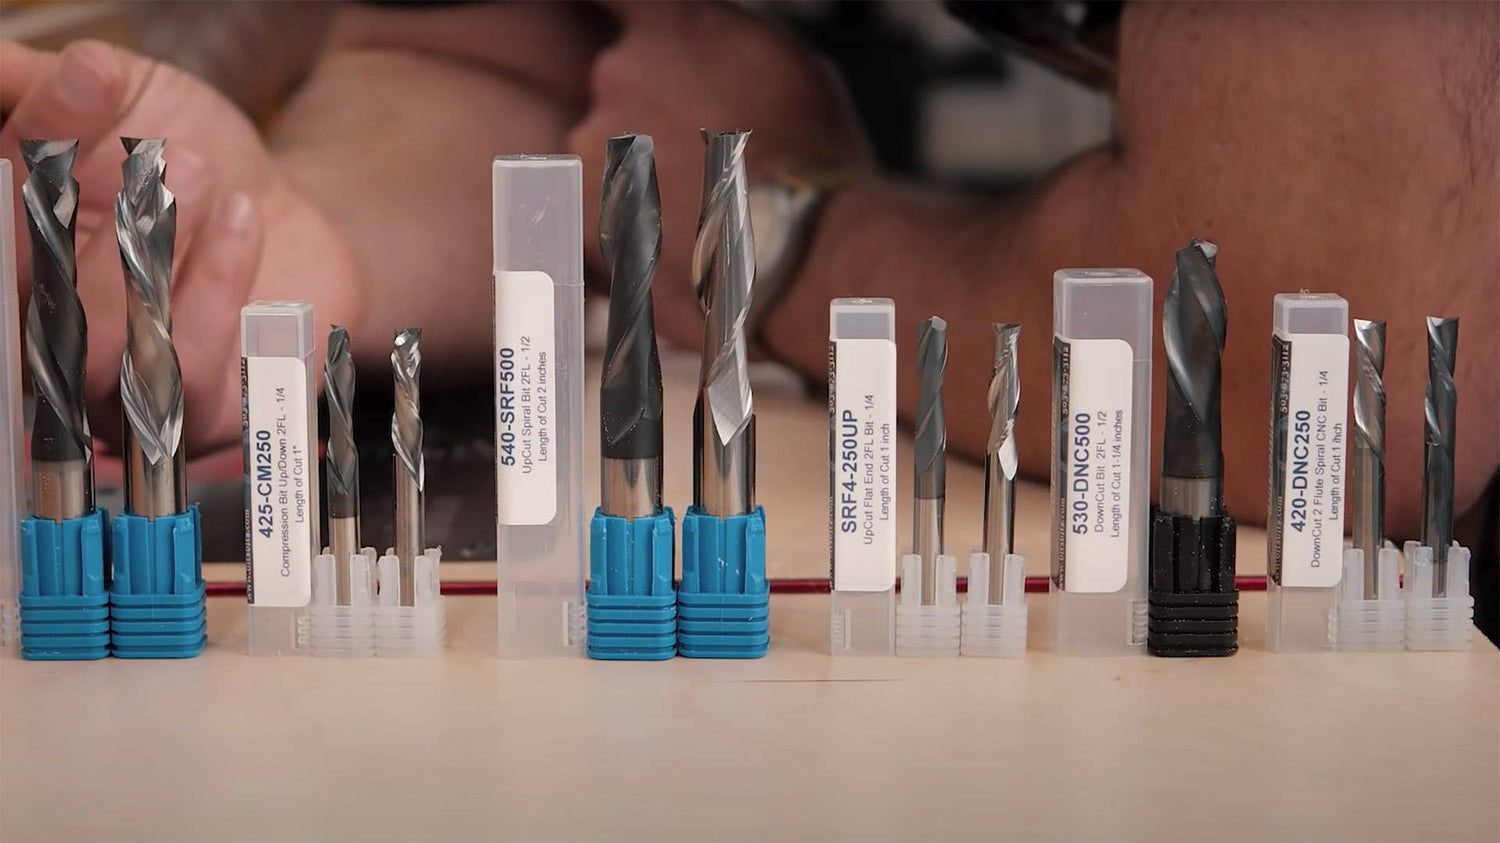
We’ve partnered with Bits&Bits to release a line of Katz-Moses Tools Astra Coated Bits. These are my favorite bits — with an added Katz-Moses twist (dad-level pun intended).
So to celebrate the launch — and help you better understand them…
I’m going to explain how spiral bits work, why I prefer them over traditional straight bits, and how to get the best results with down-cut, up-cut, and compression bits.
HOW SPIRAL BITS WORK
Spiral router bits have angled cutting edges, called flutes, that wrap around the bit in a spiral (who would’ve guessed).
The angled flutes have a lot of advantages: better chip evacuation, less heat buildup, and cleaner edges — depending on the type you use.
The 3 basic types of spiral bits are up-cut, down-cut, and compression.
- Up-cut bits: The flutes cut material and evacuate chips towards the shank
- Down-cut bits: The flutes cut material and evacuate chips away from the shank
- Compression bits: The shank side of the bit cuts down, and the tip cuts up
Spiral bits can be used on a handheld router or CNC for a range of cuts, including dados, rabbets, grooves, plunge cuts, and through cuts.
SPIRAL BITS VS STRAIGHT BITS
The big difference between straight and spiral bits is the angle of their cutting edges.
Straight bits chop wood straight on, while spiral bits cut at a shear angle.
The problem with straight bits is they cut more material with each rotation. This leads to:
- More vibration that bounces your workpiece and lowers accuracy (even when clamped)
- More tearout on the edges of your cuts — especially in plywood and other veneers (not as bad in straight grained hardwoods, but still not great)
- More heat buildup which can burn wood and dull blades more quickly
WHY SPIRAL BITS ARE BETTER
The shear cutting angle of spiral bits is way more efficient, leading to less vibration, less tearout, and less burning.
In fact, shear angles are just generally better for cutting.
It’s why you run a hand plane along a board sideways instead of straight on, why many table saw blades have angled teeth, and why segmented cutterheads are better on planers and jointers.
These days, I only use straight bits for stirring my coffee (seriously — I don’t use them).
For everything else, I’ll reach for one of my spiral bits.
DOWN-CUT VS UP-CUT BITS
Down-cut and up-cut are the most common spiral bits, differing in cutting direction and how wood chips are evacuated.
Which one should you choose?
It depends on your material, the type of cut, and which side of your board is the show face.
NOTE
When we say the cutting direction is “up” or “down,” we’re talking about the direction the blades cut in relation to the tool — not the piece of wood.
On a handheld router or CNC, down-cut bits do in fact cut “down.” But throw that same bit on a router table, and now it’s technically cutting “up.”
Just remember: down-cut bits cut away from your tool, and up-cut bits cut towards it.
ADVANTAGES OF DOWN-CUT BITS
Down-cut bits are my most used spiral bits in hardwoods.
Since they push fibers away from the tool, they create zero tearout on the toolside of your stock.
They’re great for cutting grooves with super crisp edges, especially in tearout-prone materials like highly figured wood, plywood, and other veneers.
You can also use them for through cuts, as long as you use a spoils board below your workpiece.
They can be advantageous with small parts on the CNC because they pack sawdust into the kerf, helping parts stay where they are.
DISADVANTAGES OF DOWN-CUT BITS
Down-cut bits have poor chip evacuation, since they push everything into the cut.
That means you have to go a bit slower with them or you risk burning (especially in hardwoods).
It also means they aren’t great for plunging straight down. If you need to plunge with them, it’s best to do it while moving, like ramping on the CNC.
And while they give you a clean edge on the side facing your motor, the opposite side will be more liable to tear out.
SAFETY NOTE:
Be aware that down-cut bits will push your motor away from the stock.
This isn’t a problem on a CNC, but something to be aware of when using a handheld router or router table.
Just make sure you have a solid grip on your router or workpiece.
ADVANTAGES OF UP-CUT BITS
I don’t use up-cut bits as much as my down-cut bits, but they’re still super useful in certain situations.
Up-cut bits have excellent chip evacuation, which lets you cut faster and avoid burning wood.
If I’m cutting a groove or dado in straight grained hardwood like walnut or maple (which are less prone to tearout), I’ll use my up-cut bit.
They’re also really good for plunging, since they pull the woodchips straight out of the cut like a drill bit.
You can use them like a drill press and get a clean edge on the opposite side of your workpiece from the tool.
That makes them great for rough cutting a mortise from the connecting side of your workpiece (not the show face).
The plunging ability lets you quickly hog out material. And for through mortises, you’ll get a clean edge on the show face for exposed tenons.
Since they pull the workpiece into the motor, up-cut bits are also a little safer to use.
DISADVANTAGES OF UP-CUT BITS
Up-cut bits cause a lot of tearout on the tool-side of a cut.
The key is to make sure you use them on the right materials.
For any material that’s liable to chip out — like highly figured wood, plywood, and other veneers — you’re better off using a down-cut bit (or compression, but we’ll get to those in a minute).
But if you’re working with a straight-grained hardwood that’s more tearout resistant, up-cut bits are the way to go.
HOW TO TELL THE DIFFERENCE BETWEEN DOWN-CUT AND UP-CUT BITS
You know those spinning candy cane looking things outside old barber shops?
As they spin, the lines appear to move either up and down.
The same is true for your bits.
If you ever lose track of whether a bit is a down-cut or up-cut, here's what to do.
- Hold the bit by the shank with the tip pointing down (this is important)
- Rotate the bit clockwise, the way a router spins
- If the flutes appear to move down, it’s a down-cut bit
If the flutes appear to move up, it’s an up-cut bit
COMPRESSION BITS
Compression router bits are a combination of down-cut and up-cut bits.
The tip and first ⅛ – ⅝ inch is an up-cut, while the rest of the bit is a down-cut.
Now that Bits&Bits and I have released a new Short Flute version, this has become my absolute go-to bit for all through cuts — especially on the CNC.
ADVANTAGES OF COMPRESSION BITS
When making through cuts, compression bits give you a clean edge on both sides of your cut.
This makes them especially useful for plywood, melamine, and other veneers prone to tearout.
Whenever I need to cut a dado, groove, or plunge a hole through a piece of plywood, I reach for my compression bit.
You can run them about 50% faster on the CNC. We have a video coming out soon about feeds and speeds, but for now we have recommended settings in the description of all out bits
DISADVANTAGES OF COMPRESSION BITS
For a compression bit to work as intended, your first pass needs to be deeper than the up-cut portion of the bit.
For example, if you have a compression bit with a 1/4" up-cut portion, then your first pass needs to be at least .05" deeper than 1/4".
The short flute version we have comes in 1/4", 3/8" and 1/2" widths. The new KMT compression bits are the shortest flute versions on the market — which makes them much more usable in a handheld router as well as a CNC.
Having your compression bit set too high can give you the same tearout on the tool-side of your stock as an up-cut bit.
Compression bits can be problematic for small parts on the CNC, as the up-cut portion can pull up on small tabs and snap them off. Make sure to thicken up or add extra tabs in your CAM file.
SPIRAL FLUSH TRIM BITS
My go-to bit for flush trimming workpieces to templates is a combination bit with both a top and bottom bearing.
It lets you quickly switch the orientation of your workpiece so you can work with grain direction without having to change your bit or make dangerous climb cuts (here’s a video all about template routing).
Just remember that you should use the bit that cuts away from your show face (assuming you don’t have a compression flush trim bit).
On a router table, that means a down-cut bit when the show face is facing down towards the router and an up-cut bit when the show face is facing up towards you.
Do the opposite with a handheld router.
Also, always remove as much material as possible before taking it to your router.
QUICK LIST: WHICH SPIRAL BIT TO USE
Here’s a rough list to help you decide which bit to use in which situation.
When in doubt, try your bits out on a test piece first.
DOWN-CUT BITS
✓ Grooves in tearout-prone materials like highly figured wood, plywood, and other veneers
✓ For clean edge on the tool-side of your stock
✓ Cutting small parts on the CNC
UP-CUT BITS
✓ Grooves in straight grained hardwoods like maple, walnut, or oak
✓ For clean edges on opposite side of your stock from the tool
✓ Plunge cutting
COMPRESSION BITS
✓ Through cuts in harwoods, softwoods, plywood, melamine, and other veneers
MY FAVORITE SPIRAL BITS
I’ve been using Bits&Bits’ bits (seeing double?) for years — and we’ve recently partnered with them to create a line of my favorite router bits.
These are the bits I use myself, and what I believe every woodworker should have.
In addition to ¼, ⅜, and ½ inch spiral bits in up-cut, down-cut, and short flute compression — we have a brand new type of ¼ inch flush trim bit.
In the past, good ¼ inch spiral bits were really hard to find. It’s tough to make a bearing that small capable of spinning at 12k-24k RPMs.
In our new lineup, we have ¼ inch up-cut, down-cut, and compression bits (as well as a 3 pack of all of them) that solve this issue.
They're the best ¼ inch bits on the market — and capable of flush trimming tight curves and angles.
All of the router bits we sell (1/4 and 1/2 inch) are Astra Coated. This is Bits&Bits proprietary heat and lubrication coating that extends tool life 2–4x longer than uncoated bits.
Once I started using Astra Coated bits, my consumables cost dropped by 68% in our production shop (even though they cost more up front).
As I always preach, investing in high-quality consumables will cost you significantly less time and money down the line.
UPGRADE YOUR WOODWORKING WITH SPIRAL BITS
When you’re after the best results your router or CNC can deliver, spiral bits are the way to go.
With cleaner edges, faster cutting, and less burning — they’ll make your time in the shop a lot more enjoyable.
Already converted to spiral router bits? Tell us why in the comments below!
Be sure to follow us on Instagram @katzmosestools and check out my YouTube channel…
And as always, STAY SAFE IN THE SHOP!

7 comments
Marius Botha
What router bit did i need for a mortise lock in a wooden door for deep cuts , please let me buy the right one thank you .
What router bit did i need for a mortise lock in a wooden door for deep cuts , please let me buy the right one thank you .
Gary Frey
Wow ! What great information on the proper way to use a router, and also advice on what bits to use, and how to use them. Much appreciated !
Wow ! What great information on the proper way to use a router, and also advice on what bits to use, and how to use them. Much appreciated !
Scott Mills
I am new to woodworking. Which router bit would you recommend for jointing 3/4" stock to be glued up for raised panels?
I am new to woodworking. Which router bit would you recommend for jointing 3/4" stock to be glued up for raised panels?
Richard Masterson
As always, your instructions are detailed, well thoughtout and practical.
I am a member of The Villages Woodworkers Club [TVWC] and we recommend new & experienced member to review your videos & blogs often, especially if a member is unfamiliar or has not recently used the equipment.
This makes a huge difference because this also shows how to safely use equipment and the proper methods to use for all components.
It’s easy to see the members that subscribe, we all wear your aprons…
Thank you.
Mathieu Ouellet
Very informative. Thank you for all that you do. I love reading your blogs and watching your videos.
Very informative. Thank you for all that you do. I love reading your blogs and watching your videos.
Bill Killian
A lot of great information in this blog, thanks. I’ll need to read it a few more times to make sure it all sinks in.
A lot of great information in this blog, thanks. I’ll need to read it a few more times to make sure it all sinks in.
Karen
Appreciate your advice on bits! UFor pocketing a large area of hardwood that needs to be smooth and flat on a CNC, which bit would you recommend? Appreciate also any tip on cherry, which seems to tear more easily than maple/walnut. Thanks!
Appreciate your advice on bits! UFor pocketing a large area of hardwood that needs to be smooth and flat on a CNC, which bit would you recommend? Appreciate also any tip on cherry, which seems to tear more easily than maple/walnut. Thanks!