


Buttery-smooth wood surfaces ready for finish:
That’s what a well-sharpened card scraper can give you.
But when I first started woodworking, burnishing that perfect hook was easier said than done.
Now I’ve mastered the process. And I keep a card scraper (often called a cabinet scraper) in my apron at all times.
Regardless of your experience level, you should too.
To help you succeed where I struggled, I’m going to walk you through the steps for sharpening a card scraper — and give you a few tips for success.
Ready for ultra-thin shavings with zero tearout, and wood so smooth it slides through your fingers like a bar of soap?
Read on, my friend.
TOOLS FOR SHARPENING A CARD SCRAPER
-
Burnisher: A burnishing rod is just a round piece of steel harder than your card scraper (an old screwdriver can work in a pinch). We sell a super fast-working, rough carbide burnishing rod from Wood by Wright.
-
File: Not essential, but it speeds up the process. I fashioned a jig that’s a square piece of stock with a kerf that holds the file at 90°.
-
Sharpening stones (any higher grit is fine, just not coarse): I prefer diamond stones since the top edge of a card scraper can leave grooves in waterstones or tear sandpaper
-
Vise: For holding your card scraper upright.
-
Card Scraper Vise and Honing guide (optional): This makes the whole process a lot easier. I have free plans for a sharpening jig, and a video showing how to build and use it.
THE “SCIENCE” OF CARD SCRAPER SHARPENING
Unlike with chisels or hand plane blades, sharpening a card scraper isn’t about creating a razor sharp edge.
You want the edges to have a steel “hook,” or curl — which is a burr that’s been folded over with a burnisher.
It’s almost too small to see — but this hook makes ultra thin shavings with no tearout, regardless of grain direction or wood species.
There are 3 basic steps to sharpening a hook onto a card scraper:
- Squaring the edge
- Pulling the edges up, or elongating the burr
- Rolling the edges over, or folding the burr into a hook
Squaring the edge isn't necessary every time you sharpen: you can roll over the burr 4 or so times before needing to square the whole thing again.
But if you’re starting from scratch, follow this entire process for the best results.
HOW TO SHARPEN A CARD SCRAPER
I’m going to walk you through the sharpening process without using any jigs.
If you want a foolproof system, this video explains how to build a simple and inexpensive sharpening jig (and here are the free plans).
NOTE:
I’m going to explain how to sharpen a rectangular card scraper — which is what I use 99% of the time.
You can follow these same steps for sharpening concave or convex edges. Just rotate your card scraper as you burnish the hooks.
Also, note that a rectangular card scraper has 4 cutting edges. Repeat these steps as necessary to make sure they’re all sharpened.
STEP 1: SQUARE THE EDGE
Again, you don’t need to do this every time you sharpen your card scraper.
But when you do, take the time to get it nicely polished.
The rougher you leave it, the more failure points will be in the burr — and the more likely your hook will break.
Add a little oil to your card scraper edges, and start by squaring the top.
I file until there’s a fresh clean surface and I can feel the beginnings of a burr on each side.
Then I file the sides (making sure to do so at 90°) until the burrs are gone.
You can skip the file and just use a sharpening stone — but if you do use a file, don’t skip the sharpening stones. The file leaves deep scratches you need to clean up.
TIP:
Give the corners of the card scraper a light roundover.
This keeps them from digging into your work down the road.
Now polish all 3 edges on a sharpening stone. I prefer a diamond stone because the top edge of a card scraper can create grooves in your waterstones.
Matt Estlea tip: If you only have waterstones, sharpen on the edge of the stone instead of the face. It’ll save you from marring the faces you need flat for sharpening chisels or planes.
You can use a square block of wood to keep your card scraper at 90° when polishing the top edge.
Once the top’s nice and shiny, polish the edges to get rid of any burr. Just make sure to keep it flat on the stone.
Repeat this step on both sides of the card scraper.
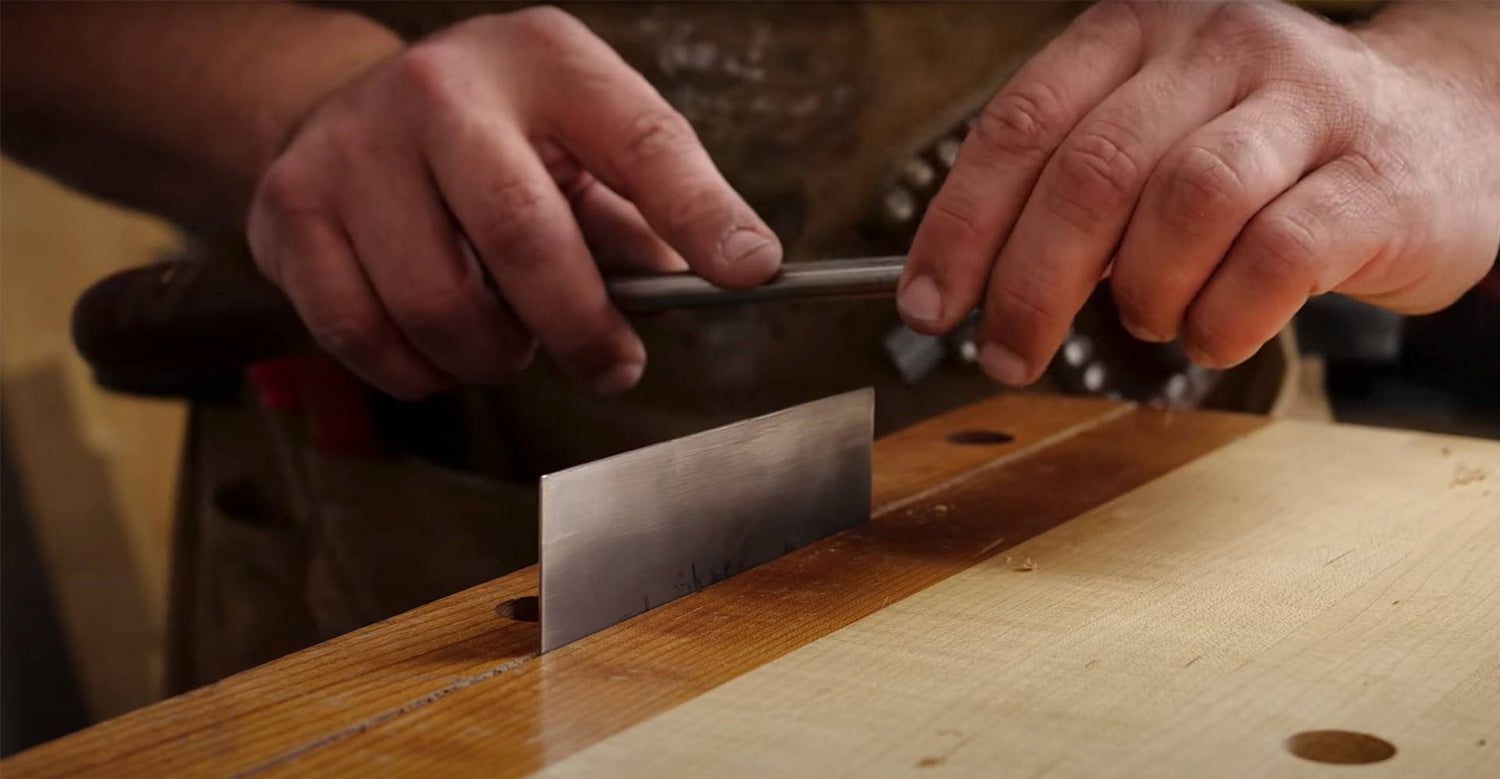
STEP 2: ELONGATE THE BURRS
Time to grab your burnisher.
Set the card scraper flat on your bench, about ⅛ inch (3 mm) from the edge. Hold it in place with one hand.
Now hold the burnisher at around 5°-15° to the card scraper.
The exact angle isn’t super important. What matters is that you pick an angle and stick to it. Lock that wrist.
Using light pressure (about what it takes to push an elevator button), slide the burnisher back and forth over the edge. About 10 times total will do.
It’s ok to hit the corners. You should hear a rhythmic sound of ka-slink-ka with each pass (onomatopoeia is tricky).
Repeat this for all 4 edges.
TIP:
Use light pressure with the burnisher, both during this step and the next.
When I first started, I pushed too hard and didn’t get good results.
The pressure you would push a crosswalk button with is about perfect. Light pressure is key to good results.
STEP 3: FOLD THE BURR
This is the part people get hung up on, but it’s actually pretty easy.
Place the card scraper in your vise.
I like to hold my burnishing rod in two hands at this point so I can really lock my wrists and maintain a consistent angle.
Again, anywhere from 5°-15° is fine — but consistency is key.
Using LIGHT PRESSURE, run the burnisher back and forth over one edge.
Do this around 6-8 times.
If you run your fingers against the edge, you should be able to feel the hook. You can even hear it catch on your fingernails (and whisper to you in the night).
Repeat this step for all 4 edges.
TIP:
Use a sharpie to draw little arrows pointing to the newly sharpened edges of your card scraper.
Once the sharpie fades, you’ll know it’s time to resharpen. It’s not an exact science — but it works.
HOW TO KNOW IF YOUR CARD SCRAPER’S SHARP
Time to test your edge.
A well-sharpened sharp card scraper should create wood shavings, not dust.
You want to see ultra-thin shavings, almost like a hand plane makes.
If you’re getting dust, adjust the angle at which you’re holding the card scraper.
If you get dust no matter the angle, you don’t have a good hook on the edge — probably the result of pushing too hard with the burnisher.
Try again until you’re getting thin, curly shavings.
Once you’re there, you can start making crystal clear surfaces ready for finishing.
GET HOOKED ON CARD SCRAPERS
Once you’ve mastered the sharpening process, your card scraper will become an integral part of your workflow.
Take one pass with a freshly folded burr and I promise — you’ll be hooked.
Got any of your own card scraper sharpening tips? Let us know in the comments below!
Be sure to follow us on Instagram @katzmosestools and check out my YouTube channel…
And as always, STAY SAFE IN THE SHOP!
10 comments
Cheryl Gould
I have a thick scraper that won’t make a burr but it’s easy to make a burr on the English card scraper set. Apparently the kind of metal matters.
I have a thick scraper that won’t make a burr but it’s easy to make a burr on the English card scraper set. Apparently the kind of metal matters.
Dave Wood
Do all card scrapers come in the same thickness. I can’t get a curl of wood on my scraper no matter how many times I sharpen it.
The card is by my definition pretty thick. Is this why I don’t get a good cutting edge
Do all card scrapers come in the same thickness. I can’t get a curl of wood on my scraper no matter how many times I sharpen it.
The card is by my definition pretty thick. Is this why I don’t get a good cutting edge
Anonymous
Don’t be afraid of the gooseneck scraper. the sharpening steps are the same, The good news is that you only need to sharpen the radius that you need, (a small area) instead of the whole thing. Same with the concave scrapers.
Don’t be afraid of the gooseneck scraper. the sharpening steps are the same, The good news is that you only need to sharpen the radius that you need, (a small area) instead of the whole thing. Same with the concave scrapers.
Anonymous
I read somewhere that using a flat pice of wood, like the piece you use for holding the edge at 90 degrees, on top of the the scraper while polishing the faces on the stones helps to place even pressure on the scraper, rather than the uneven pressure from fingers.
I read somewhere that using a flat pice of wood, like the piece you use for holding the edge at 90 degrees, on top of the the scraper while polishing the faces on the stones helps to place even pressure on the scraper, rather than the uneven pressure from fingers.
Mark
I like the statement about light pressure. It really sank in when I looked at (and bought) the Veritas carbide burnishing tool. It’s so small, you can only hold it between thumb and forefinger. It’s pretty impossible to apply heavy pressure with just those digits.
Once I started getting great edges on my straight edges, I started applying the same principles to curved scrapers and started making a lot of different shapes from an old hand saw plate. You just follow the same process but you have a exercise a little care due to the curved edges. I end up rocking the curve on my diamond stones setup against a 90 reference surface.
Richard
Everyone shows how to sharpen straight scrapers; how does one sharpen the curved one?
Everyone shows how to sharpen straight scrapers; how does one sharpen the curved one?
Patrick Barnes
I have tried for years to get a card scraper sharpened correctly with little success! And I am close to 77. I even got the burnisher Matt E showed in his vid. What finally clued to me in to frustration was reading somewhere that card scrapers don’t work very well on softer woods like pine and that’s mostly what I have access to here in S. Texas. I tried one of mine on some vintage (80 yrs old or so) white oak and it worked well. Oh well. Any help with this matter would be appreciated.
I have tried for years to get a card scraper sharpened correctly with little success! And I am close to 77. I even got the burnisher Matt E showed in his vid. What finally clued to me in to frustration was reading somewhere that card scrapers don’t work very well on softer woods like pine and that’s mostly what I have access to here in S. Texas. I tried one of mine on some vintage (80 yrs old or so) white oak and it worked well. Oh well. Any help with this matter would be appreciated.
Mike Curtin
I’m in the same boat as James Powell. I will try again with light pressure, maybe that will be the magic.
I’m in the same boat as James Powell. I will try again with light pressure, maybe that will be the magic.
James Powell
I have tried over and over, I can not get this to work. Every time I try this I only get dust, no curls. Some magic I am missing on this procedure.
I have tried over and over, I can not get this to work. Every time I try this I only get dust, no curls. Some magic I am missing on this procedure.
Anonymous
Nice clean explanation. Good job 👍
Nice clean explanation. Good job 👍