


If you struggle to make straight cuts on your bandsaw, it's time for a tune-up.
Drifting blades make quality cuts nearly impossible… meaning lots of frustration.
And a poorly setup bandsaw won’t only affect straight cuts — it’ll hinder your accuracy for curved cuts as well.
But tuning your bandsaw for optimal performance is actually really simple.
In this blog, I’ve boiled down bandsaw setup to 5 simple steps.
Master this process and your bandsaw will be one of your favorite tools in the shop.
Side Note: If you follow all these steps and your bandsaw blade is still drifting, it means the blade is dull and needs replacing.
1. ADJUST BLADE TRACKING
Blade tracking refers to where on the wheels your bandsaw blade sits. And getting it right is the first step of bandsaw setup.
All you really need to worry about here is the top wheel (as long as the blade is fully on the bottom wheel, you’re good).
You’ll notice that the wheel is crowned, meaning it has a sort of concave curve where the blade sits.
Your goal is to get the deepest part of the blade gullets (the gaps between the teeth) to sit right in the center of the wheel.
This places the back of the gullets at the highest point of the crown and eliminates any pivot points for the blade, helping you achieve a straight track.
Remember, you can ONLY adjust the blade tracking while the wheels are spinning. Give them a spin as you adjust the tracking knob (which changes the tilt of the top wheel).
Once the back of the gullets are centered, you’re ready for step two.
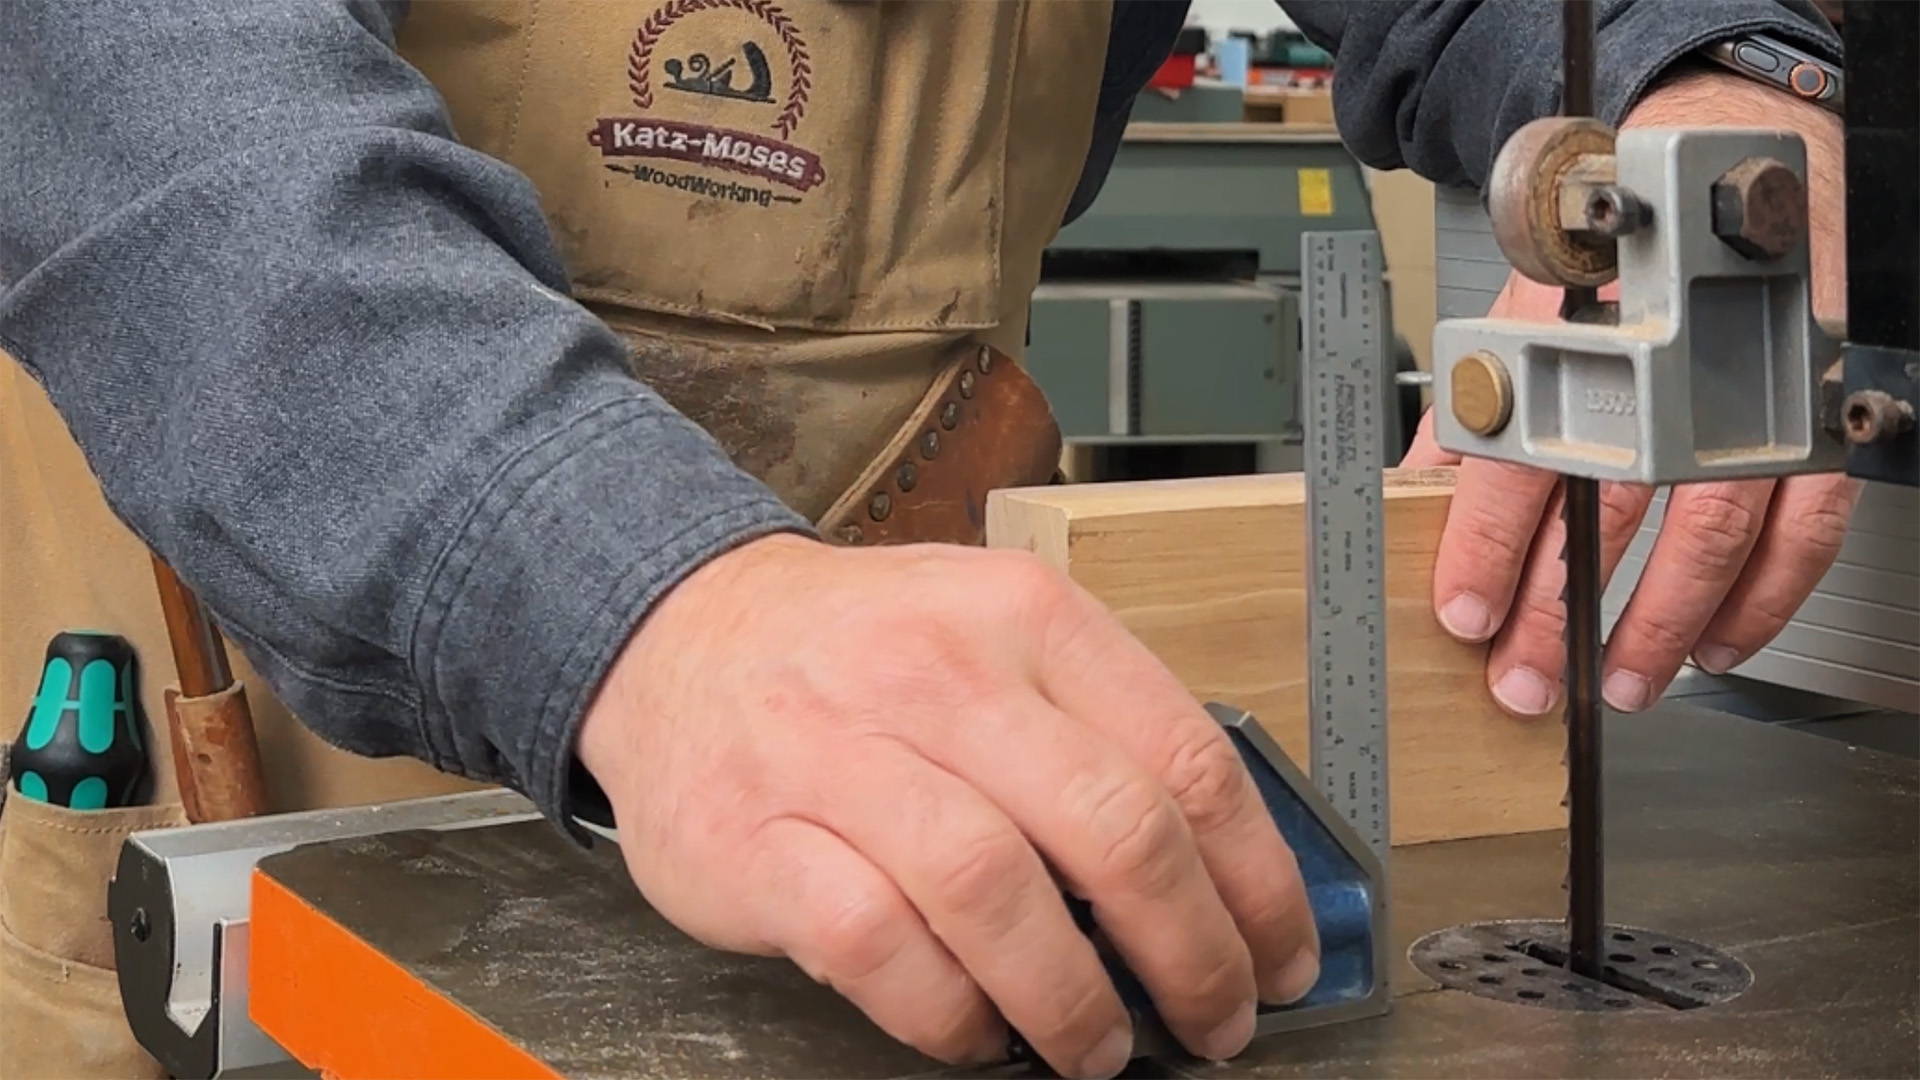
2. TENSION THE BLADE
Proper blade tension is hands down the MOST important part of bandsaw tune up. And it’s amazing how many people get it wrong (I did for years).
Contrary to popular belief, your bandsaw blade shouldn’t be SUPER tight. You actually want to allow for a bit of deflection.
Set a square or ruler in front of your blade. Now use a finger to push the blade to the side.
You should be able to gently push it from around ¼” to a ½” max.
If you can’t push the blade that far without your finger turning white, loosen the tension a bit.
Another technique is to listen for a deep bass note when you pluck the blade.
Once you’ve got the tension right, double check the tracking on the top wheel as adjusting the tension can sometimes cause it to change.
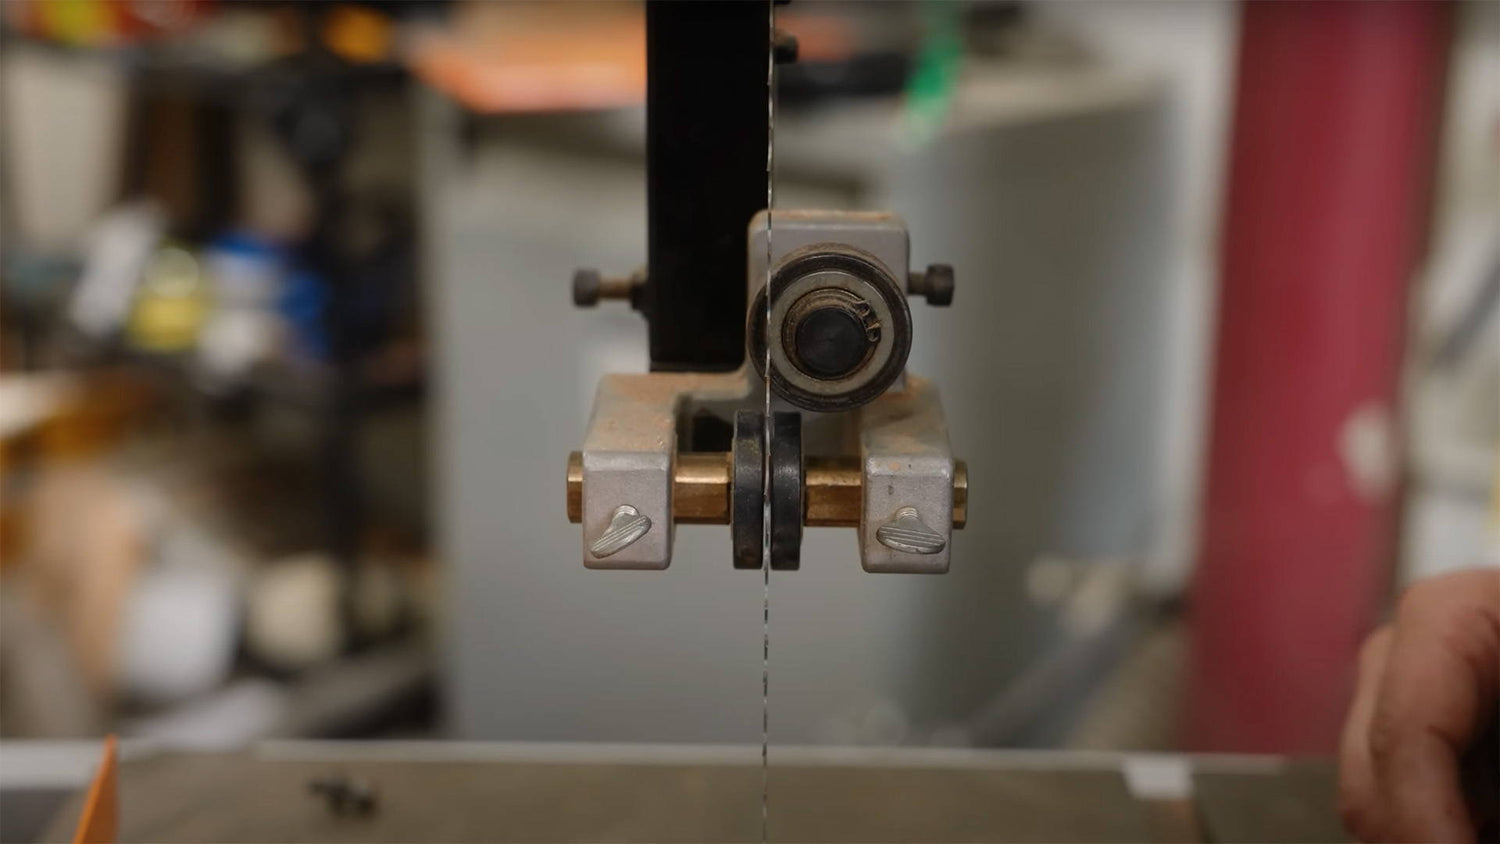
3. SET GUIDES
Some people stress about where to set the blade guides. But it’s one of the easiest parts of bandsaw setup.
Start with upper side guides (the ones on either side of the blade).
First, you need to set their forward position. The front of the guides should sit right behind the blade’s gullets — about 1/32” to 1/16” back.
(If the guides are set past the gullets, they can damage the set of the teeth).
Now you’ll set their lateral position, meaning how close they are to the blade.
Push one of the bearings so it touches the side of the blade. Now use a finger to give the opposite side of the blade a light tap or two.
It should move the bearing just a hair’s width from the blade. Lock it down there, and repeat for the other side bearing. (Another technique is to leave the space of a business card between the bearing and blade).
To set the back (or thrust) bearing, again push it forward until it touches the back of the blade. Now give the front of the blade a light tap to push the bearing back.
Repeat this process for the lower bearings beneath the bandsaw table.
Once they’re all locked down, perform the following test.
Spin the wheels of the bandsaw. As you do, none of the bearings should move. If they do, you need to back them off.
But with very light finger pressure on the front or sides of the blade, you should be able to spin the bearings. If they don’t, you need to move them closer to the blade.
4. SQUARE TABLE TO BLADE
Obviously to get square cuts, the blade needs to be square to your bandsaw table. And there’s a super easy and accurate way to test this.
Grab a piece of scrap that’s around 4” or so wide and has two straight and parallel edges.
Place the board on its edge so the faces are vertical. Then turn on your bandsaw and push the face into the blade, making sure the bottom edge stays flat.
Don’t make a through cut. All you need to do is cut a shallow kerf.
Now flip this board around onto the opposite edge. Slide it behind the back of the blade.
If the blade slides into the kerf without bending, your table and blade are square.
If the back of the blade doesn’t line up with the kerf, you need to adjust the table.
Of course, you could also use a square. But it can be tricky when only a small square will fit underneath the guides.
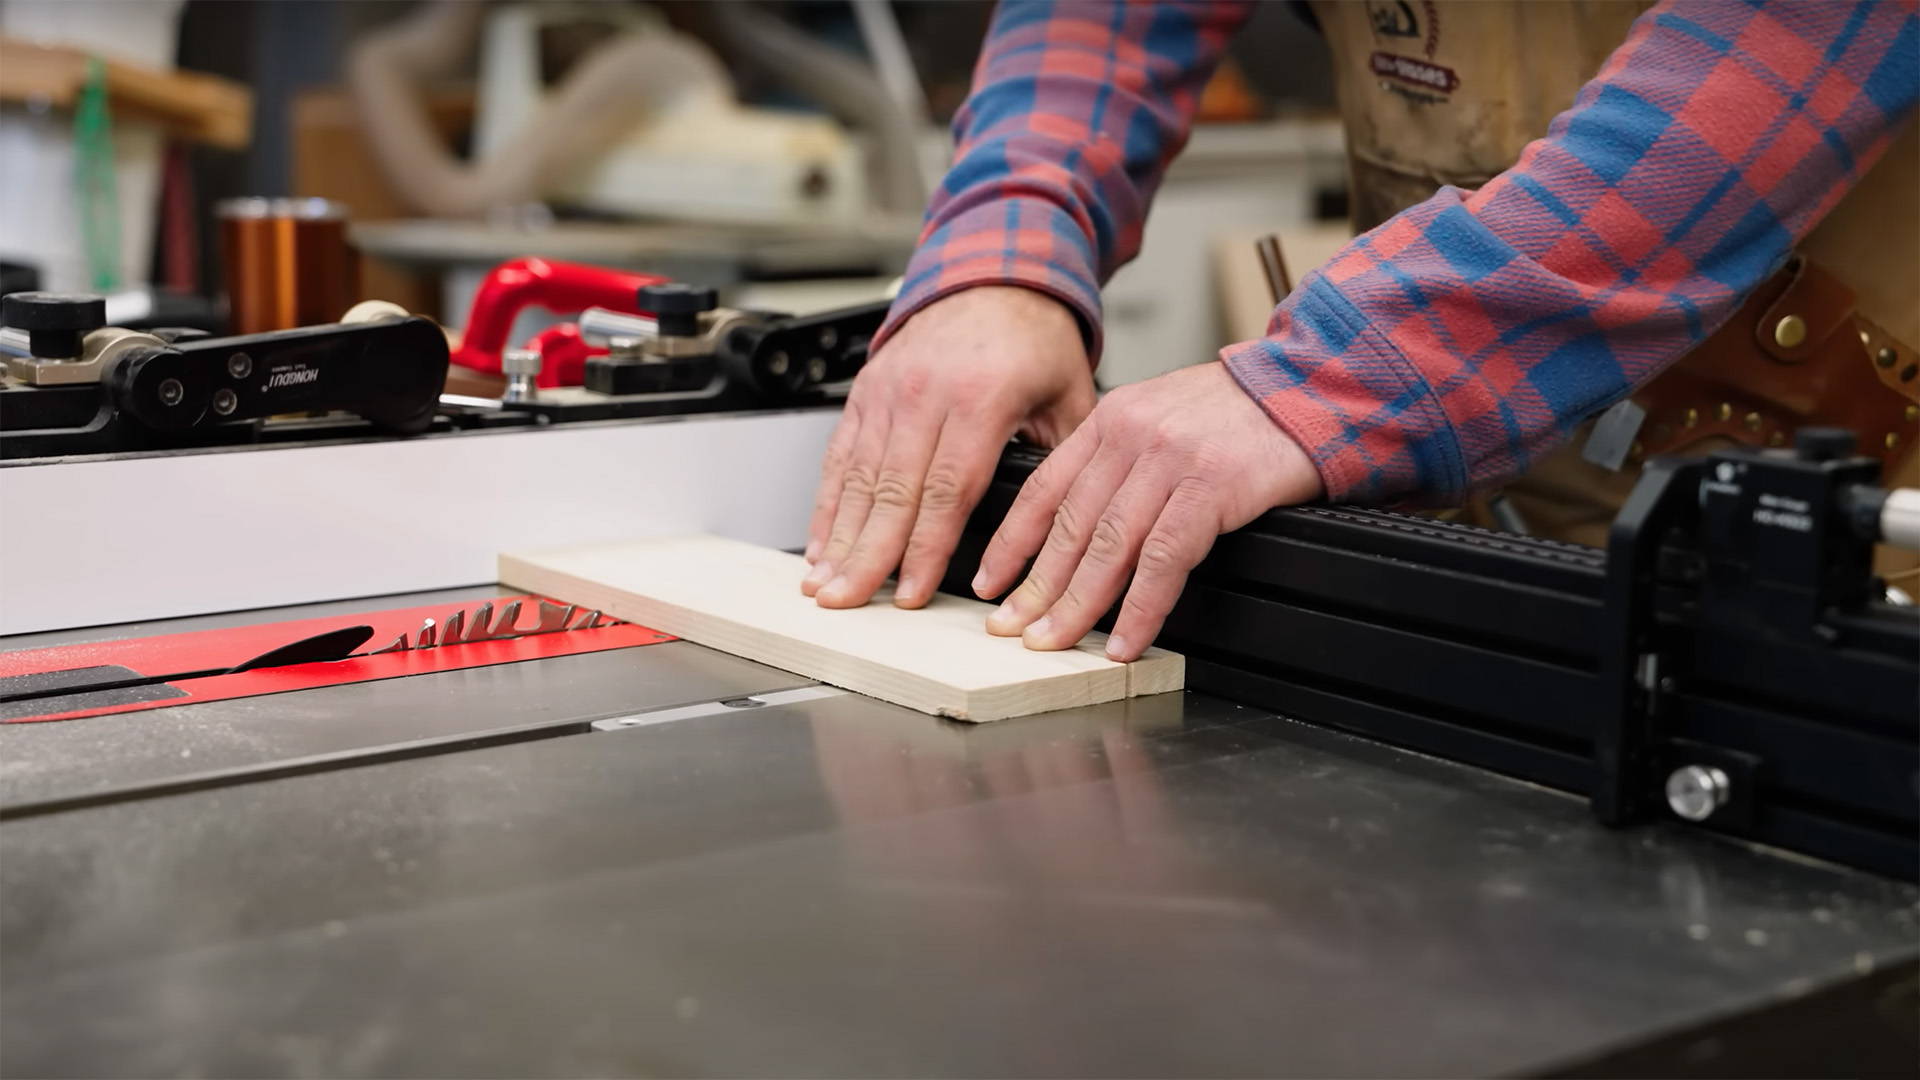
5. SQUARE FENCE TO BLADE
If you plan on resawing or making straight cuts, the last step of bandsaw tuneup will be squaring your fence to the blade.
This is easy enough to do with a straight edge.
Set your straight edge flat against the side of the blade. Make sure it touches the blade BETWEEN two teeth so it isn’t pushed away by the tooth set.
Now bring your fence up to the straight edge and adjust it until they’re perfectly parallel.
(You can even make your own fence alignment gauges. Cut a strip of wood and plane it to a specific dimension, say ¼”. Then just cut a groove to fit around the teeth. Set it against the blade, push the fence against it, and you’ll get perfect ¼” thick cuts.)
BONUS TIP: DE-TENSION YOUR BANDSAW WHEN FINISHED
Last but definitely not least, don’t forget to de-tension your bandsaw blade at the end of the day.
Temperature changes from day to night cause the blade to expand and contract.
And if you leave the blade tensioned overnight consistently, it can eventually dull the blade.
(I’ve actually experienced it myself. The laziness doesn’t pay off).
Just loosen it up slightly when you close up shop for the day, then re-tension it when it’s time to do some sawing.
SET YOUR BANDSAW UP FOR SUCCESS
A well-tuned bandsaw is an absolute joy to use.
And with the 5 step process listed above, you’ll have no problem setting up your bandsaw for optimal performance.
Here’s to drift-free and accurate cuts.
Want to cut mesmerizing “woven wood” patterns on the bandsaw? Read this.
Got any of your own tips for bandsaw setup? Let us know in the comments below!
Follow us on Instagram @katzmosestools, on TikTok @katzmoseswoodworking, and check out my YouTube channel for more great woodworking content...
And as always, STAY SAFE IN THE SHOP!
2 comments
Bob Waas
Awesome info as usual, thank you Jonathan for all you do to help us out here. I bought a new bandsaw that takes a 100" blade which I had trouble sourcing. Finally found them on Supercut Bandsaw, wondering if those blades will be supported in the app upgrade.
Awesome info as usual, thank you Jonathan for all you do to help us out here. I bought a new bandsaw that takes a 100" blade which I had trouble sourcing. Finally found them on Supercut Bandsaw, wondering if those blades will be supported in the app upgrade.
Jay Simmons
I find that I can do a better job of adjusting the lower blade guides if I remove the table. So I now begin this process by removing the table and vacuuming all the dust out. I had eliminated drift from my bandsaw the first time I followed these step several years. Then after several weeks of all kinds of cutting, I tried resawing some maple. Terrible drift, so I ran through these steps and still had drift. Luckily I had some new blades in the shop and installed one and ran through the set up steps. No drift, so whenever I get drift now I double check that the set up hasn’t drifted in some way and if still ok, I change the blade. Drift gone.
I find that I can do a better job of adjusting the lower blade guides if I remove the table. So I now begin this process by removing the table and vacuuming all the dust out. I had eliminated drift from my bandsaw the first time I followed these step several years. Then after several weeks of all kinds of cutting, I tried resawing some maple. Terrible drift, so I ran through these steps and still had drift. Luckily I had some new blades in the shop and installed one and ran through the set up steps. No drift, so whenever I get drift now I double check that the set up hasn’t drifted in some way and if still ok, I change the blade. Drift gone.