


The biggest game-changer in my accuracy as a woodworker came when I started using marking knives for layout.
Along with my square, I consider my marking knife the most important tool in my shop.
They make cutting fine joinery so much easier and more accurate — especially if you’re relatively new to the craft.
But like any tool, you need to follow certain techniques to get good results.
So today, I’m giving you 10 Marking Knife Tips and Techniques you can use to level up the accuracy of your woodworking…
And take your joinery from “meh” to “a-meh-zing.”
Looking for a sturdy, affordable marking knife? Check out this double-bevel knife in our store!
TABLE OF CONTENTS
- Choose the Right Marking Knife
- Cut at the Correct Angle
- Set Your Knife Before Your Square
- Start Light and Make Multiple Passes
- Wrap Shoulder Lines Accurately
- Use Knife Lines to Set Up Power Tool Cuts
- Make Knife Walls for Hand Sawing
- Sever Fibers in Shouldered Joinery
- Set Exact Hole Locations
- Hide Your Marking Knife Lines (or Don’t)
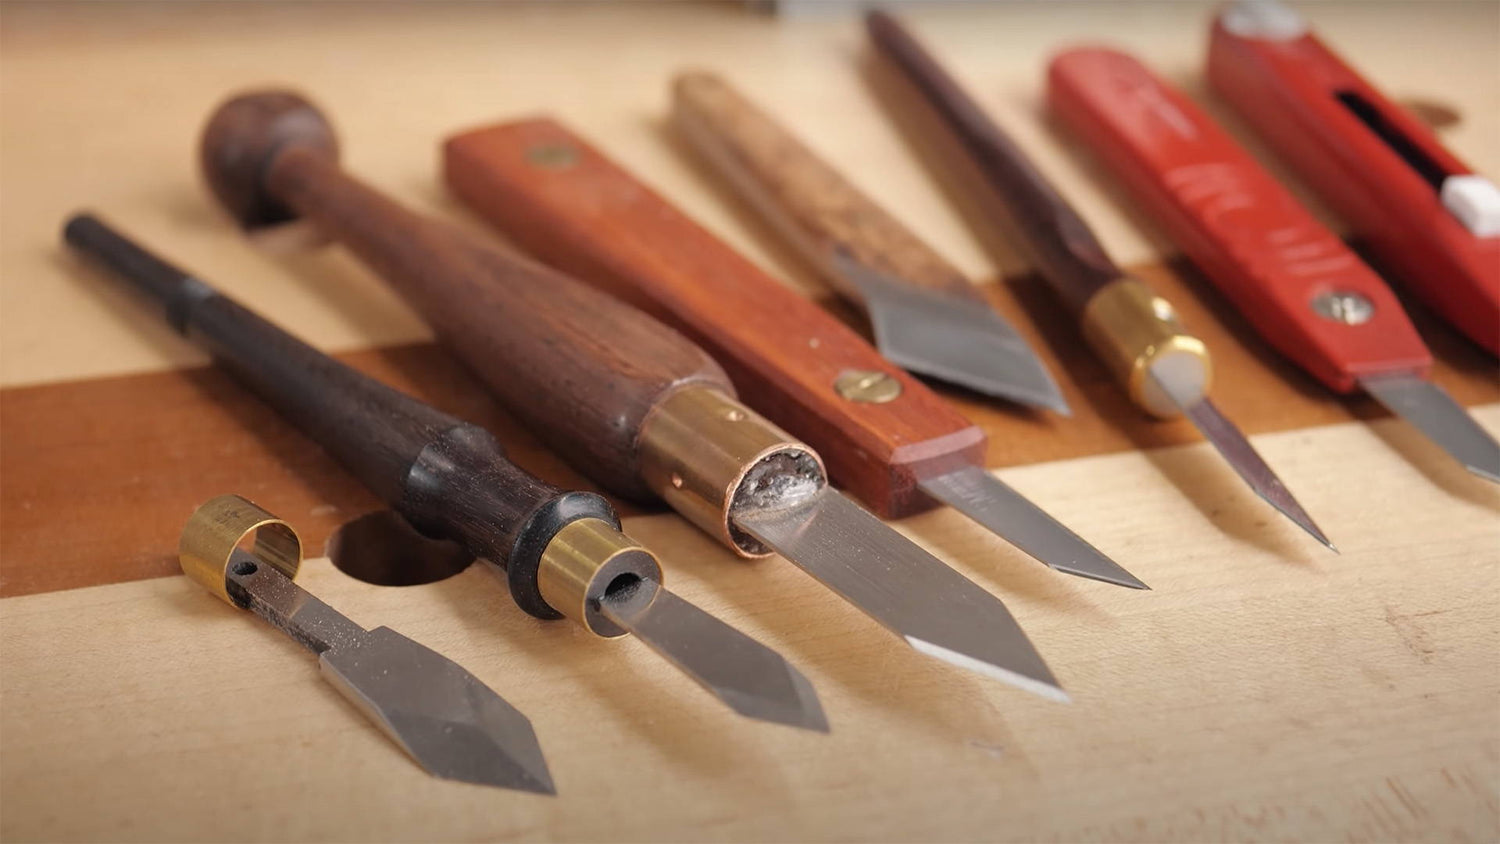
1. CHOOSE THE RIGHT MARKING KNIFE
You can get by with any marking knife. But different blade styles are better suited to different operations.
For fine joinery, the most important thing is a thin blade.
If you’re doing dovetails with really narrow pins, the blade needs to be thin enough to fit between the end grain of the tails.
But if you’re cutting a tenon, a thicker blade can be helpful for gouging a really deep line.
Again, you can make any marking knife work. But if you have options, pick the right one for the job.
2. CUT AT THE CORRECT ANGLE
The style of your marking knife blade determines how you should hold it when scribing lines.
A lot of marking knives have a flat back on one side. For these, you want to keep that back as flat against your reference edge as possible.
If you’re using a square, keep the edge of the blade at 90°, flat against the edge. If you angle the blade too far to one side, you can end up over or undercutting your line.
This is especially important if you’re tracing inlays (like butterfly keys) or transferring tails to a pin board for dovetails.
Keep the flat part of the blade flat against the reference edge. Otherwise, you can cut a strip off the bottom of your inlay — or even ride up the edge.
Plus, undercut lines lead to joinery that’s too tight to fit.
On blades with a bevel on both sides (like a razor blade), I hold the marking knife at a really high angle.
The key is to use just the tip (stop it) so the blade’s bevel doesn’t push it away from the reference edge.
3. SET YOUR KNIFE BEFORE YOUR SQUARE
This is one of those tips that seem obvious to some, but can also be a total eye-opener to beginners.
Your square and marking knife are often used together (that’s why I have convenient leather holsters for each of them on my woodworking apron).
But contrary to common instinct, it's better to set your knife in position first — then slide the square up to it.
Say you’re using a tape measure. Set your marking knife in the corner of the board at your measurement and make a little notch.
Get the tape measure out of the way, set the knife back in the notch (can’t do that with a pencil), slide your square up against the blade, and mark your line.
This guarantees your square will be in the exact right position — no eye-balling required.
4. START LIGHT AND MAKE MULTIPLE PASSES
When you go to mark your line, don’t try to make a deep cut right away.
You need to finesse the grain. Let it warm up to you. Buy it a couple drinks and nod as it tells you about its ex.
Start with a very light first pass — lighter than you think. Then follow up with more passes, putting subsequently more pressure each time.
Make two passes at a minimum. But three or four is better.
This is especially important when marking a line that runs with the grain.
Wood fibers are strong. And if you push too hard on your first pass, the marking knife blade can end up following the grain instead of your square.
Lighter initial passes help you sever the grain incrementally — so your blade cuts with your square, not the grain.
5. WRAP SHOULDER LINES ACCURATELY
One of the huge advantages of a marking knife is being able to find your lines again — which is critical when wrapping lines around a board.
You'll need to wrap lines for joinery like tenons and dovetails. Here’s how to do it.
Start by marking your line with a square and marking knife on one side. Then rotate the board to the adjacent side.
Place the tip of your marking knife blade in the end of the first line you marked. Slide your square up to it.
Make sure the blade is flat against the square and mark that line. Repeat these steps two more times all the way around the board.
As long as your board is milled square, the last and first lines you marked should line up perfectly.
If your board isn’t super square, mark a first line on one face, use that as a reference for marking square lines on the edges, then connect those two lines with a straight edge on the opposite face.
6. USE KNIFE LINES TO SET UP POWER TOOL CUTS
If you use power tools, marking knives are fantastic for lining up cuts right on the money.
Say you need to rip a board to an exact width on the table saw.
Mark your line on the end grain edge that will move forward into the blade.
Then find a tooth on your table saw blade that’s set towards the fence.
Adjust your fence until the tip of that tooth clicks into the marking knife line. Some fences shift slightly when you lock them down, so be sure to check before cutting.
Once it’s all perfectly lined up and locked down, you’re ready to cut.
Follow this same principle to get super accurate cuts on the bandsaw, router, and miter sas. Just remember to pay attention to the tooth set.
7. MAKE KNIFE WALLS FOR HAND SAWING
Cutting square with a hand saw is tricky. But a marking knife line makes it a whole lot easier.
Start by cutting a deep marking knife line. Then grab your biggest, sharpest chisel.
Dig the tip of the chisel into the waste side of the line, about a centimeter away from it. You just want to make a shallow cut towards the marking knife line.
As long as you don’t go too deep, the waste will pop out right at your line. Do this across the whole line until you have a shallow channel. This is what we call a knife wall.
Now set your hand saw in this channel and start making the cut. The shallow groove helps guide the saw to keep it square and right on your line.
8. SEVER FIBERS IN SHOULDERED JOINERY
If you use router planes or rabbeting planes to dial in joinery, a marking knife is your best friend — especially when cutting across the grain.
Say you’re cleaning up a dado with a router plane. As you cut deeper, the blade can get under fibers but not cut their ends. It ends up binding and can potentially lead to tear out.
Use your marking knife to sever the ends of the fibers before going in with the router plane. Keep it flat against the walls of the dado and drag it along the bottom.
Now when you go through with the router plane, the fibers should come right out (this is why some rabbeting planes have a nicker in front of the blade).
Follow the same technique when trimming up the cheeks of tenons or lap joints.
9. SET EXACT HOLE LOCATIONS
A marking knife and center punch are all you need to mark super accurate drilling locations.
A while back I made a maple end grain cutting board and wanted to put rubber feet on it to keep it from sliding on my countertop.
I set my square to the distance I wanted them from the edge then marked two intersecting lines at each corner.
Then I grabbed my center punch (you can also use an awl) and centered it on the exact point where the two lines intersected.
Just like that, I set myself up for four feet in the exact same position relative to the corners.
10. HIDE YOUR MARKING KNIFE LINES (OR DON’T)
The only downside to marking knives is it can be tricky to get rid of the lines as you finish a project.
This isn’t an issue on joinery where you cut across the entire line. Obviously, it’ll be gone.
But on joints like dovetails it’s a different story.
Some people choose to leave marking knife lines on their furniture. I don’t personally, but on something like drawers it’s probably not a big deal.
But if you absolutely need to get rid of them, card scrapers are well suited to the job.
They let you take super fine localized shavings without having to plane or sand down the rest of the face.
Alternatively, you can plan ahead.
On dovetails, start by mocking up your layout with pencil lines. This will let you see exactly what edges will be cut and which will stay.
Then use your marking knife to mark lines only on the areas that’ll be cut away. You still get all the benefits of using a marking knife — but without worrying about clean up later on.
MAKE YOUR MARK
When I was a new woodworker, the biggest change in my level of accuracy came when I started using a marking knife for layout.
And as long as you heed the advice above, I promise it can do the same for you.
What are your thoughts on marking knives and other layout tools? Any tips of your own? Let us know in the comments below!
Follow us on Instagram @katzmosestools, on TikTok @katzmoseswoodworking, and check out my YouTube channel for more great woodworking content...
And as always, STAY SAFE IN THE SHOP!
7 comments
Scott
When choosing a knife, it helps to know that a single-bevel knife can be right- or left-handed, depending on which side the bevel is on. A double bevel knife is more easily used by either dominant hand.
When choosing a knife, it helps to know that a single-bevel knife can be right- or left-handed, depending on which side the bevel is on. A double bevel knife is more easily used by either dominant hand.
Don
Instructions on sharpening the marking knife would be helpful.
Instructions on sharpening the marking knife would be helpful.
Tim Benton
Thank you for the information. I am going to build a drill press cabinet/ mobile work bench /outfeed table with two foldable side wings, my first big project. There’s a lot of joinery that has to match up, and the information is going to be so helpful.
Thank you for the information. I am going to build a drill press cabinet/ mobile work bench /outfeed table with two foldable side wings, my first big project. There’s a lot of joinery that has to match up, and the information is going to be so helpful.
John McBratney & Diana McBratney
Hi Jonathon, I have two good marking knives, one similar to the Czech one you showed in your blog, the other is a Japanese knife. It has a wider blade, nice and thin, sharpened on one side only and it lives in its own wooden cover that matches the handle. Both excellent tools.
I find the double bevel easier in marking dovetail pins as you need to reverse the knife orientation. The bigger Japanese tool is good for larger wider timber marking.
Years ago before I had either if the above I used one blade one of my pen knives, I have something of a collection of pen (Pocket) knives, although sadly one is not allowed to carry such knives in public any more. Nuisance as I have carried a pocket knife since I was at school, I was known as the boy who could sharper pencils. I later years I have always had a Swiss Army knife on my belt. I actually own a genuine Swiss Army knife as issued to Swiss soldiers, my Swiss engineer friend gave it to me having bought it in the Swiss Army store. He was a Colonel in the Swiss Army, head of the Army Communications Branch.
Bit of trivia
Cheers
John
Jonathan Charm
J -
Possible correction needed from your instructions above
Making a knife wall for hand sawing with a marking knife and chisel
Cutting square with a hand saw is tricky. But a marking knife line makes it a whole lot easier.
Start by cutting a deep marking knife line. Then grab your biggest, sharpest chisel.
Dig the tip of the chisel into the waste side of the line, about a CENTIMETER away from it.
You just want to make a shallow cut towards the marking knife line.
As long as you don’t go too deep, the waste will pop out right at your line. Do this across the whole line until you have a shallow channel. This is what we call a knife wall.
*From the photo, it looks like you mean to say a millimeter, not a centimeter
Wiley Cotton
It would have been nice to have a couple of tips on sharpening the marking knives.
It would have been nice to have a couple of tips on sharpening the marking knives.
Charlie Mastro
I’ve always made my own.
I’ve always made my own.