Woodworkers can get hung up on accuracy, trying to chase the fourth decimal place on their calipers.
First off, that’s overkill.
I always say “woodworking isn’t machining,” so don’t go crazy trying to stick to ultra small tolerances.
But secondly, the most important thing about using calipers isn’t the amount of decimal points you measure to...
The important thing is whether you know how to use calipers correctly, and all the ways they can be used — which I’m tackling in this post.
Because although they’re simple…
It’s easy to get inaccurate measurements from calipers if you don’t follow the rules below.
CALIPER PARTS AND THE 4 WAYS THEY MEASURE
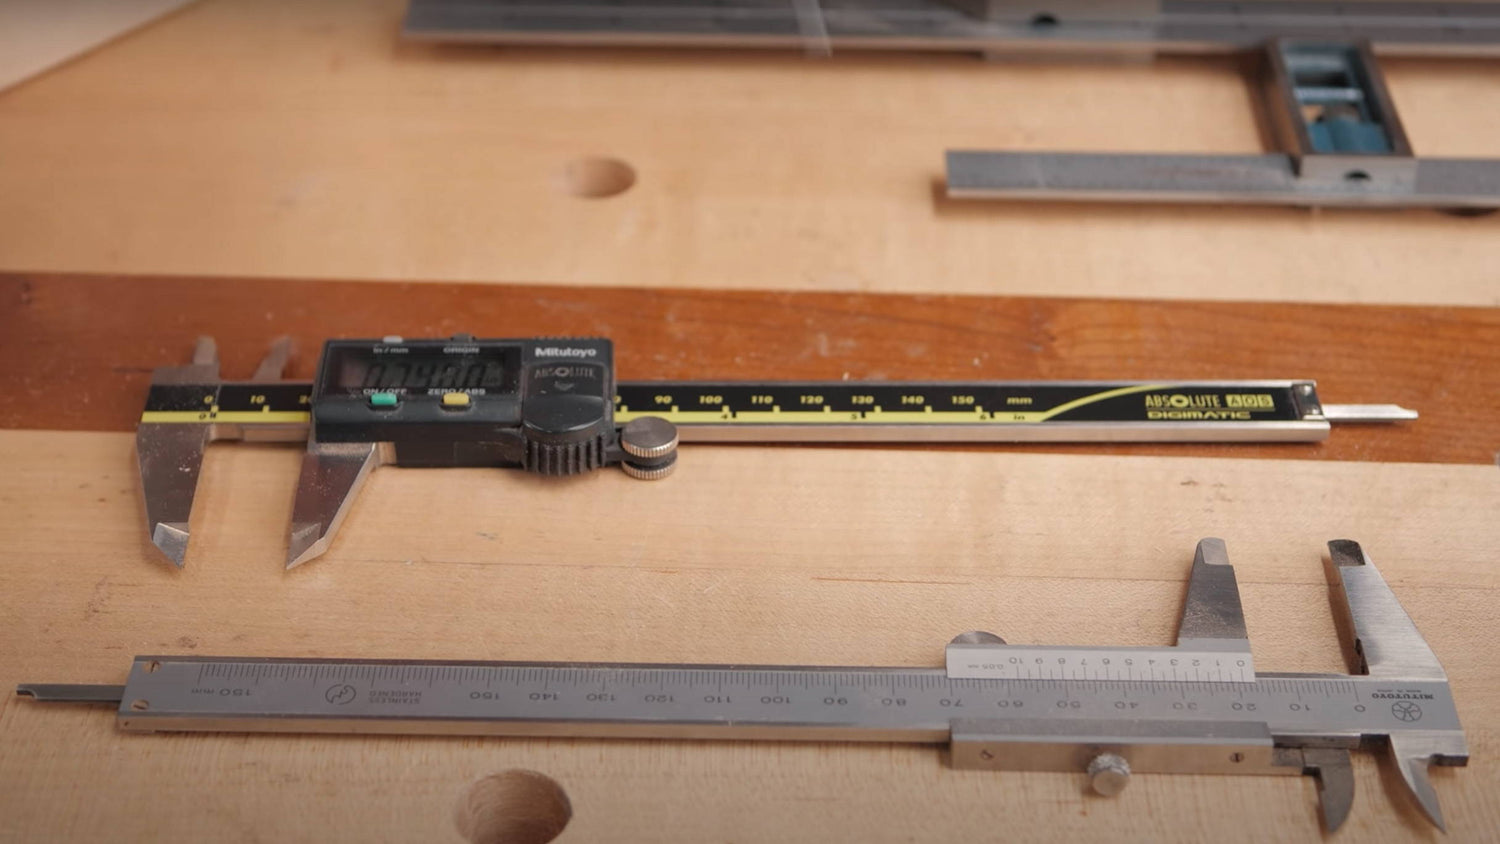
While there are different types of calipers, they all generally have the same components (usually the only difference is how the measurement is displayed).
The coolest thing about them is that when you take one measurement, that same measurement is expressed in 3 other ways.
I’ll explain that below, so let's get into the different parts and what they’re for.
LOWER JAWS (THE BIG ONES)
The lower jaws are the biggest, longest jaws on your calipers.
They have two flat surfaces that face each other and come together at a point.
Use the lower jaws for taking outside measurements, where the jaws enclose on both sides of an object.
Common uses include finding the thickness of boards and tenons, or the diameter of round objects like dowels or metal rods.
UPPERS JAWS (THE SMALL ONES)
The upper jaws are the shorter and smaller set.
They overlap when the calipers are fully closed. As you slide them apart, their flat edges face away from each other.
The upper jaws are ideal for taking inside measurements, where you’re measuring the space between two surfaces.
You might use them for precisely measuring the width of a mortise or groove, or even to set the spacing between a stop block and table saw blade.
DEPTH ROD
The depth rod is the thin metal rod that comes out the bottom of the caliper beam.
As you probably guessed, it’s used to measure depth (gold star, bud).
Forstner bit holes, mortises, kerfs, the vapidity of elevator small talk — you name it.
The small size of the depth rod makes it ideal for super narrow holes where the reference edge won’t work (see below).
REFERENCE EDGE
The reference edge is a lesser known caliper measurement — but it might be my favorite.
It’s a small shelf on the backside of the lower jaws, and measures from that shelf to the end of the calipers.
Not every set of calipers has a reference edge, so be sure to test it out before you trust it.
Most modern calipers do, however. And they’re useful for everything from setting up marking gauges and squares to setting cutting depths on your power tools.
I like to think of it as a height gauge.
THUMB SCREW
This circular screw lets you open and close the caliper jaws with your thumbs.
I find it’s most useful for making super fine adjustments.
If you need to open the caliper jaws quickly, the thumb screw ain’t the way to go.
LOCKING KNOB
The locking knob is on the opposite side from the thumb screw and locks the calipers down in a certain position.
It’s best to engage it while you’re still referencing whatever you’re measuring.
For example, if you're measuring the thickness of a board, lock it down while the jaws are still tight around the board.
That way, you won’t accidentally bump it out of position as you remove the calipers.
BEAM
This is just the straight ruler-looking bit the calipers slide on.
Laser versions can be found atop shark heads.
As I said before, what makes calipers so useful is how they express a single measurement in multiple ways.
So if you set the lower jaws to 2”, the upper jaws, depth rod, and reference edge will all be at 2” as well.
TIPS FOR USING CALIPERS ACCURATELY
Calipers can go a long way in improving your woodworking accuracy — but only if you use them correctly.
Here’s a few things to keep in mind whenever you’re taking measurements.
MAKE SURE THE JAWS ARE CLEAN
Most calipers can measure accurately all the way down to a thousandth (0.001) of an inch.
But that means even the smallest bit of debris or dust on the reference edges of the jaws can lead to an inaccurate measurement.
Before using your calipers, quickly check to make sure there’s no sawdust or other gunk keeping them from fully closing.
A quick wipe with your fingertip should take care of it.
DON’T FORGET TO CHECK ZERO
If you use digital or dial calipers, they need to be zeroed out correctly to give accurate readings.
Do this by first closing the calipers all the way (remember to check that the jaws are clean).
On digital calipers, just press the “zero” button.
On dial calipers, rotate the dial until the arrow sits perfectly on “0”.
TIP: USING ZERO TO FIND DISCREPANCIES
The zero function is also a great way to measure discrepancies between boards meant to be identical.
For example, say you have two boards that need to be the same thickness. Use the lower jaws to measure the thickness of one board, then tighten the lock knob.
Now press the “zero” button to zero out the calipers.
When you go to measure the second piece, the caliper reading will tell you how much thicker or thinner it is than the first board (positive number = thicker, negative number = thinner).
DON’T OVER TIGHTEN
To get the most accurate reading, don’t over tighten the caliper jaws, or push too hard on the depth rod or reference edge.
Putting a lot of pressure on the calipers will lead to a smaller measurement than is actually true.
Seriously. You can even get a caliper to read in the negatives by squeezing the jaws together too tightly.
Adjust the calipers until they’re stopped by another surface, then lock it down.
There’s no need to push, whether it’s on the jaws or the depth rod. The pressure you can put with just your thumb on the thumb screw is enough.
MAKE SURE THE REFERENCE EDGES ARE SQUARE
To get an accurate measurement with calipers, your reference edges need to be square to the surface you’re referencing.
And the surface to pay attention to depends on what part of the calipers you’re measuring with.
For example, if you’re using the lower jaws to measure the thickness of a board, both inside edges need to be FLAT against the board.
If they tilt one way or the other, your measurement will be off. That’s why it’s better to use as much of the jaws as possible.
“Just the tip” doesn’t work (but we all know that).
Similarly, the beam of the calipers should be square to whatever you’re measuring. I’ll sometimes set my calipers flat on my workbench and measure thickness that way to ensure squareness.
For the upper jaws, squareness is critical to accurate inside measurements. If you’re measuring the width of a dado, both sides of the jaws should be flat against the dado walls.
As for the depth rod and reference edge, just make sure the surface holding the calipers in place is perfectly flat.
MEASURE LIKE A MASTER
Calipers are simple and easy to use tools that are absolutely worth adding to your woodworking arsenal.
Don’t let them become a point of obsession (remember, woodworking isn’t machining)...
But they can help you get to that next level of accuracy where your projects come together exactly how you intended.
Want more tips on precision? Here are some simple techniques to instantly improve your woodworking accuracy.
Have more tips on proper caliper use? Let us know in the comments below!


6 comments
Jim A. Paschis
About safety with a router, specifically bits with bearings. I had need to remove the bottom bearing for a very shallow indentation. Well to my surprise the Allen wrench torque was maybe four foot-ounces for unfastening! This might have been a result of wear on the washer and the bearing. I immediately checked all other bearings for tightness, of course to save the bearings from dislodging on a future cut.
About safety with a router, specifically bits with bearings. I had need to remove the bottom bearing for a very shallow indentation. Well to my surprise the Allen wrench torque was maybe four foot-ounces for unfastening! This might have been a result of wear on the washer and the bearing. I immediately checked all other bearings for tightness, of course to save the bearings from dislodging on a future cut.
Howard Hardy
I appreciate the little bits of subtle humor. Life is too short to not have a little giggle. But, you cant please everybody, so often not worth trying to. I spent a career working in the fire service, EMS and law enforcement. Our humor is a defense mechanism to survive some of the horrors we deal with on the job, and I wouldnt share our dark humor with anybody on in those lines of work. I like to giggle a little a little while I also learn.
I appreciate the little bits of subtle humor. Life is too short to not have a little giggle. But, you cant please everybody, so often not worth trying to. I spent a career working in the fire service, EMS and law enforcement. Our humor is a defense mechanism to survive some of the horrors we deal with on the job, and I wouldnt share our dark humor with anybody on in those lines of work. I like to giggle a little a little while I also learn.
John H
100% agree with Kate. The jokes are lame and offset all the good you do.
Just. Not. Worth. It.
100% agree with Kate. The jokes are lame and offset all the good you do.
Just. Not. Worth. It.
Kate Behrens
Thanks for your skillful “how to” articles about woodworking. But your regular inclusion of sexual references is super jarring to me. Like I am reading along, taking it all in, and all of a sudden you are talking about how to use a penis. You gotta know that for many folks that’s an intrusive, possibly traumatic, image. Like slipping a bit of porn into a Zoom call, it’s just creepy.
Yours for being a caring human,
Kate
Allen Long
It is best not to use the thumb wheel to adjust the jaws. This is one of the most likely to over-tighten the jaws which will give you a smaller measurement by flexing the beam. It is best to close the jaws themselves by hand. This tip came from a college machining class.
It is best not to use the thumb wheel to adjust the jaws. This is one of the most likely to over-tighten the jaws which will give you a smaller measurement by flexing the beam. It is best to close the jaws themselves by hand. This tip came from a college machining class.
Michael Bennett
There’s one important concept you left out of your post on calipers. That’s how to read the vernier. Many people will pick up a vernier caliper at a garage sale, often at a ridiculously low price, but not know how to read it correctly. I have several of them, but luckily I took Physics in high school and was taught to use a slide rule, which uses vernier scales as well. And no… I’m not that old. I just had an old-fashioned teacher. We weren’t allowed to use calculators during the first semester.
There’s one important concept you left out of your post on calipers. That’s how to read the vernier. Many people will pick up a vernier caliper at a garage sale, often at a ridiculously low price, but not know how to read it correctly. I have several of them, but luckily I took Physics in high school and was taught to use a slide rule, which uses vernier scales as well. And no… I’m not that old. I just had an old-fashioned teacher. We weren’t allowed to use calculators during the first semester.