


Coping saws are like bottles of whiskey:
The cheap ones will do the job — but they’ll leave you feeling rough around the edges.
Most coping saws (a la Home Depot) don't create enough blade tension…
A problem when cutting tight curves, clearing waste in dovetails, or cutting other joinery.
That’s why I recommend either investing money in a good one — or investing time in building your own (more on that later).
But as they say, the bad woodworker blames his tools.
So I’m going to tell you everything you need to know to master the humble coping saw — and make it work for you.
WHAT IS A COPING SAW?
A coping saw consists of a C-shaped frame that holds a blade at high tension.
The blades are between 6 and 6 ½ inches long, and have pins at the ends that hook into the slots of the frame.
You adjust the tension by twisting the handle of the saw. Some have a knob screw on the frame for further tightening the blade.
Again, tension is critical for accuracy — but coping saw blades also need to rotate to accommodate cutting curves.
WHAT ARE COPING SAWS USED FOR?
Coping saws are used in finish carpentry and trim work for “coping” molding — where inside corners are joined by cutting the relief of one into the end of the other.
Hence the name “coping” saw.
In woodworking, coping saws are typically used for cutting fine curves and clearing waste in joinery.
The wide throat (the space between the blade and the back of the frame) lets you cut far past the edge of a board, and the thin blade lets you quickly change cutting direction.
COPING SAW VS FRET SAW: WHAT’S THE DIFFERENCE?
The first difference between coping and fret saws is how the blade’s attached:
- Coping saws: The blades have built in pins at either end that hook into slots in the frame.
- Fret saws: The blades have no pins and are attached by clamps built into the frame. Scroll saw blades can also be used on fret saws.
But more important is the difference in how they’re used.
Fret saws have deeper throats and daintier blades, making them ideal for jewelers and high-detail work (like marquetry or fretwork).
Their blades are usually sold by gauge (2/0, 3/0) instead of teeth per inch (TPI).
Coping saws are wider and shorter, and much more common in carpentry
You can definitely have both — but coping saws do pretty much everything I need in the woodshop.
They saw faster, and are more reliable for cutting straight lines.
8 TIPS TO MASTER YOUR COPING SAW
Want to be a coping saw jedi?
Here’s everything you need to know to become Coping Saw Kenobi.
1. CHOOSE THE RIGHT BLADE
Coping saw blades for cutting wood differ by their teeth per inch (TPI).
The typical numbers you’ll see are between 5 and 20 TPI.
- Lower TPI = faster and more aggressive cutting
- Higher TPI = slower and finer cutting
If you’re rough cutting a line that’ll be pared down with a chisel later, 5 to 15 TPI is fine.
But if you’re making a delicate cut with sharp curves that needs to be precise — opt for 20 TPI or higher.
The thickness of your stock also makes a difference.
The thicker your material, the lower TPI you should use.
If you’re cutting through a really chunky board, consider using a skip tooth blade that has extra big gullets for clearing out sawdust.
2. ORIENT THE BLADE TEETH IN THE RIGHT DIRECTION
This is one of those topics hot-headed woodworkers love to debate in online forums.
For the most part, the right blade direction is whatever works for you.
Are you a Western saw aficionado and always cut on the push stroke?
Set up your saw blade so the teeth face away from the handle.
Do you use Japanese saws and prefer cutting on the pull stroke?
Attach your blade with the teeth pointed towards the handle.
The right way is whatever you feel more comfortable with.
That said, there are a couple instances where cutting on the push or pull stroke makes a difference:
A) TEAROUT AND YOUR SHOW FACE
Tearout occurs where the saw teeth exit a board.
For example, if the blade teeth are facing the handle (cutting on the pull stroke), this can cause tearout on the side facing you.
If your blade is set up to cut on the push stroke, tearout will be on the face you’re not seeing.
The thin blades on coping saws don’t usually cause a lot of tearout — but if the stakes are high, keep this in mind.
B) USING A BIRD’S MOUTH
I’ll discuss this jig further down, but you want your coping saw to cut on the pull stroke (teeth facing the handle) when using a bird’s mouth.
That way, the saw pulls your workpiece into the jig and keeps it stable as you cut.
3. TEST THE BLADE TENSION
How do you know if a coping saw blade has enough tension?
Pluck it like a guitar string.
If you get a short, staccato, high-pitch note, you’ve got good tension.
But if it makes a flabby twang… tighten that sucker up by twisting the handle or turning the knob screw.
Good blade tension is critical for a coping saw to work well — and it’s the reason most coping saws on the market are no bueno.
4. USE THE FULL LENGTH OF THE SAW BLADE
People often make really quick and short strokes when using a coping saw.
But this uses only a few teeth — which clogs them with sawdust and bogs down your cut.
Instead, use the full length of the blade as you cut.
You’ll cut faster — and exert less effort.
Remember: Let the saw do the work.
5. KEEP SAWING WHILE CUTTING CURVES
The most useful part of coping saws is their ability to cut curves.
But you can only cut curves while you’re actively sawing.
This is where cutting direction comes into play.
If you’re cutting on the pull stroke — turn the blade on the pull stroke. Vise versa if you're cutting on the push stroke.
Trying to saw a curve on the non-cutting stroke can break your blade.
It might feel odd at first. But with a bit of practice, you’ll have no problem turning the blade on the cut stroke.
BONUS TIP:
Adjust your sawing speed while cutting curves.
If you’re cutting a sharp curve, cut faster to match the “speed” of the turn.
We call this “strokes per minute” — but don’t bring it up in polite company.
6. USE A BIRD’S MOUTH FOR INTRICATE CUTS
Sometimes called a V-board or a jeweler’s bench pin, this jig has a long history in woodworking.
It’s basically a manual scroll saw that fits in your vise or attaches to your workbench with a clamp.
To use it, hold your workpiece over the notch with one hand while sawing with the other.
You can rotate the piece as you go to keep the blade on your line.
Bird’s mouths are great for small pieces and intricate cuts — but you can use them for bigger pieces too. Just add a few clamps.
NOTE:
When using a bird’s mouth, make sure your coping saw is cutting on the pull stroke (blade teeth facing the handle).
This pulls your workpiece into the jig and keeps it stable.
7. LET THE BLADE SIT AT AN ANGLE
Beginners sometimes don’t realize coping saw blades don’t have to be square to the frame.
In fact, it’s often better to have the frame and blade at a slight angle to each other.
This is especially true for wider boards.
If you’re clearing dovetail waste on the side of a cabinet, a 6 inch throat won’t be close to big enough to reach all the way around.
But with the frame at an angle to the blade, you can cut deep dovetails anywhere on a board.
Most decent coping saws allow the blade to be rotated in relation to the frame.
8. PRACTICE GOOD SAWING TECHNIQUE
When sawing, the only part of your body that should be moving is your arm.
Move it back and forth (or up and down) in a straight line like a pendulum, and let the saw do the work.
You can read this for more tips on sawing technique.
WHAT’S THE BEST COPING SAW?
A lot of coping saws on the market might be enough to get by…
But if you want a tool that performs exactly how it’s supposed to — you need a saw that can create serious blade tension.
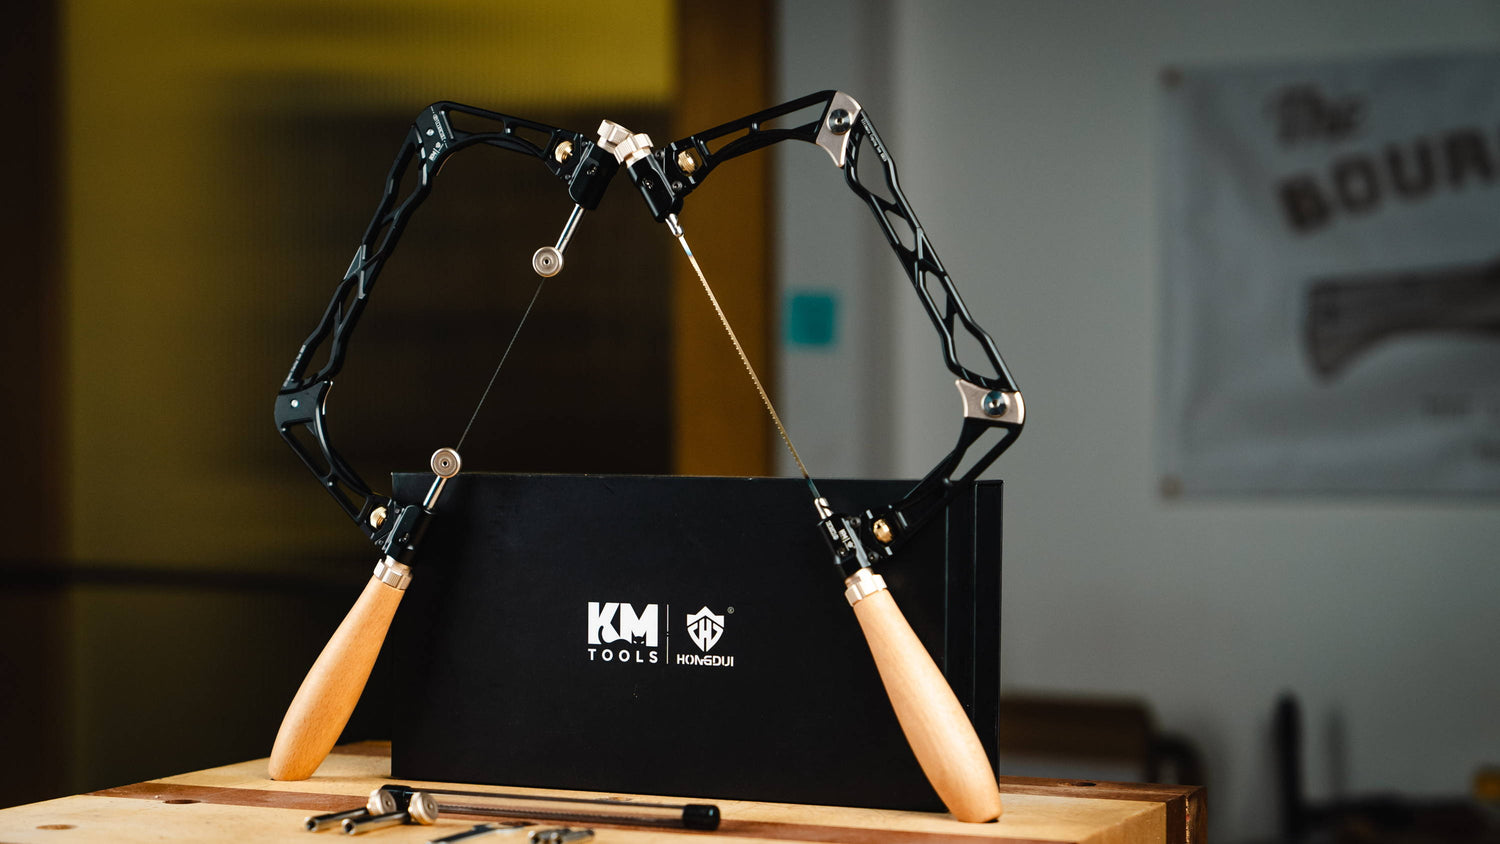
In my opinion, the KM-19 Coping/Fret Saw this better than any other (shameless plug).
The KM-19 is our third collaboration with Hongdui Tools, and not only is it the best coping saw on the market but it is the only one that doubles as a fret saw. From the quick stock removal to the tightest curves, the KM-19 Coping/Fret Saw is going to take your woodworking to the next level.
The body is made of 7075 aviation-grade aluminum and has unique mortise-and-tenon mechanical joints, giving you much higher tension than any single-body aluminum coping saw.
The handle can be screwed into either side, allowing you to cut on the push or pull stroke. The tension can also be adjusted from both sides, with 8 positive stops every 45 degrees. This allows you to set the blade to any angle you need for cutting. And if you need to perform free cutting for unique profiles, just loosen the cams all the way.
This saw takes 6.5 inch replacement coping saw blades AND 4.5”-6.5” wire fret saw blades. The included adapters for using wire style blades allows you to get super high tension on even the smallest of blades. Nothing else on the market can be used as a coping OR a hybrid fret saw, making it the most versatile saw available.
The other option is to make your own coping saw.
Seriously.
You can make a high quality coping saw that gets better tension than anything you’ll find at a big box store.
If you're curious, this video walks you through the whole process.
Taylor Toolworks put together a coping saw kit that has all the hardware you need, and I have templates available in my store to make the process even easier.
With the templates and kit, you can make your own coping saw for less than $50.
And I guarantee you’ll get enough tension to pluck the blade in the string section of your local philharmonic.
ELEVATE YOUR COPING STRATEGIES
It’s probably not the most-used tool in your shop…
But mastering your coping saw will do a lot for your woodworking down the road.
Push or pull stroke: what’s the right way? Let us know in the comments below!
Be sure to follow us on Instagram @katzmosestools and check out my YouTube channel…
And as always, STAY SAFE IN THE SHOP!
5 comments
Dan
Pat like you,been at it 50 years .. I guess you could call me a pusher on coping saw .. I also keep the blades very tight,not sure what sound on guitar string but it works for me .Have a great day !!
Pat like you,been at it 50 years .. I guess you could call me a pusher on coping saw .. I also keep the blades very tight,not sure what sound on guitar string but it works for me .Have a great day !!
Robert Green
I received my saw today. One issue I am having is the weight of the frame causes the handle to rotate changing the tension on the blade. Didn’t notice on my first cut with the saw until the brand new blade snapped.
Is there a way to lock the wooden handle so that it doesn’t turn?
Thanks
I received my saw today. One issue I am having is the weight of the frame causes the handle to rotate changing the tension on the blade. Didn’t notice on my first cut with the saw until the brand new blade snapped.
Is there a way to lock the wooden handle so that it doesn’t turn?
Thanks
JD Gates
A very good informative explanation on the preparation and use of the coping saw. Thanks
A very good informative explanation on the preparation and use of the coping saw. Thanks
Anonymous
I am in fact making your coping saw as I type this. I am using the “fiddlehead”? template with white oak. I dimensioned the wood and glued the pattern on with spray adhesive. Then I cut them out on a scroll saw. Quick and easy. You can stack the arms for a two for one. If I do a good job and it works I may make a few.
They would make a good gift and with the right blade, a blow-your-mind cheese cutter. Free marketing idea for you!
Thanks for all the great content and your store. I think you are taking things in a great direction.
Cheers from Ohio
Patrick Daniels
In he 50+ years of woodworking I’ve always used the blade turned towards the handle. Having found it easier, with no tear out , even in the most intricate and tight circles. I’ve known many others who use the opposite, or both in different applications, but I’ve always preferred a very tight blade is the secret to cutting quality.
Thanks for the post, and saw templates Jonathan, I’ll have to make a custom version for fun!
Warmest regards,
Pat Daniels