


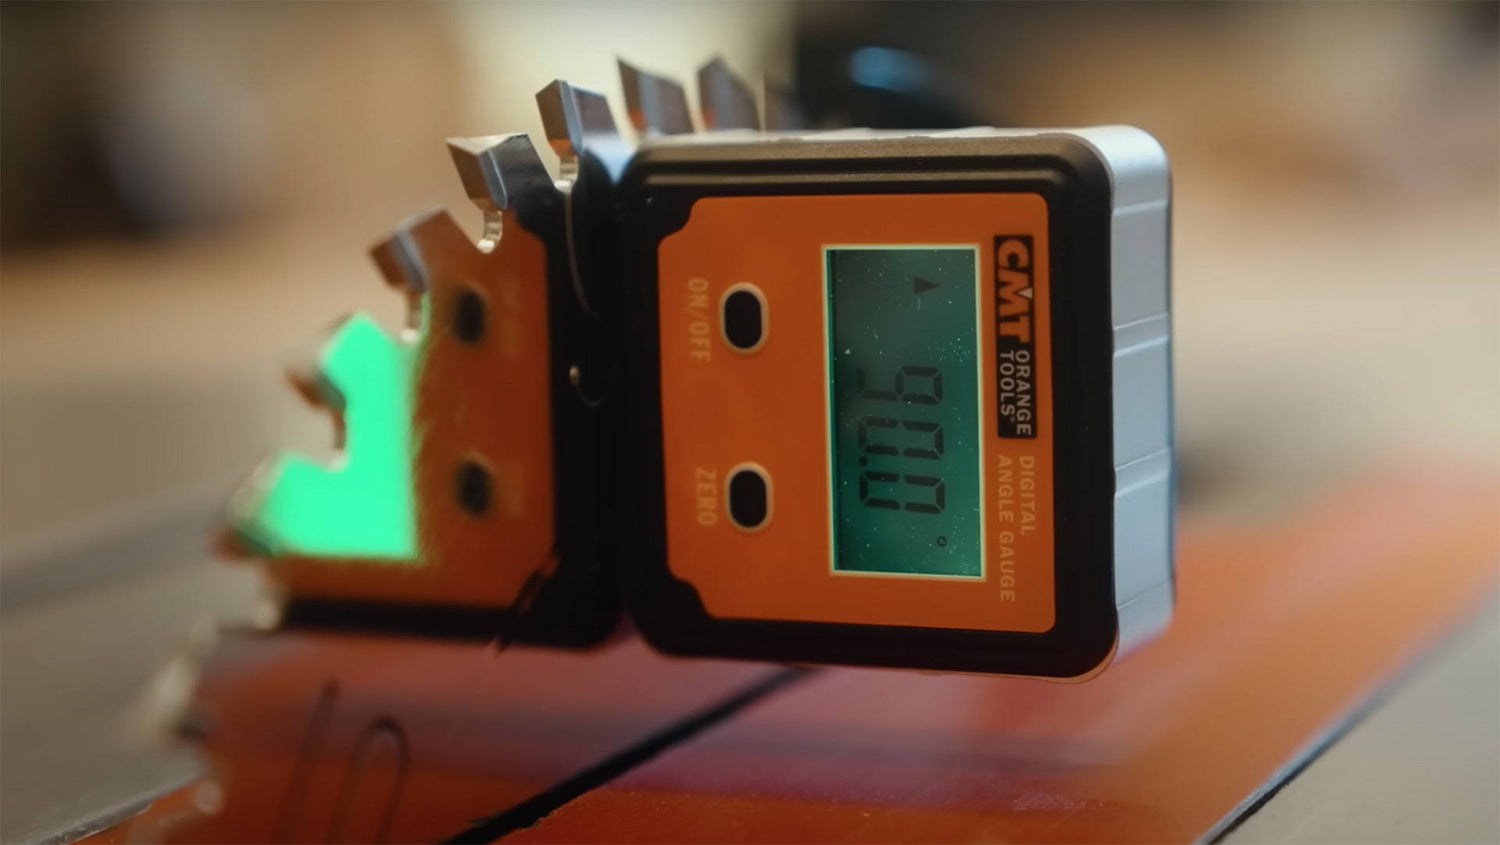
Perfect 90° or 45° cuts are critical for tight fitting joinery. That’s why I always use a digital angle finder to set up my tools.
Also called digital bevel gauges, they’re perfect for setting up table saw blades and squaring jointer fences.
But there’s something about digital angle finders beginners often don’t know: They measure compound angles.
When attached to a blade, they measure not only the angle of the bottom relative to 0°…
They also measure the angle of the back of the gauge.
That means if you’re trying to set a blade to a specific angle, you need to make sure the back of the gauge is square to the reference surface.
Otherwise, you could get an inaccurate reading.
It’s easy to do.
When you attach the gauge to a blade or fence, simply use a square to make the back of the gauge perpendicular to the reference surface.
Now you’re ready to set up your tools for ultimate precision.
Looking for a digital angle finder? I’ve been using this one from CMT for over four years.
It has a magnetic base for sticking to blades and fences, a seemingly endless battery life (still haven’t changed the batteries on mine), and — get this — it’s waterproof.
Pretty cool if you plan on using it out in the wild.
What's your favorite way to check your tools for square? Let us know in the comments below!
Follow us on Instagram @katzmosestools, on TikTok @katzmoseswoodworking, and check out my YouTube channel for more great woodworking content...
And as always, STAY SAFE IN THE SHOP!
23 comments
John
https://www.cmtorangetools.com/downloads/7750/947/DAG-001-2022-istruzioni%20WEB_VERS-2022-06.pdf
Here is the link for the instructions with some helpful pix.
https://www.cmtorangetools.com/downloads/7750/947/DAG-001-2022-istruzioni%20WEB_VERS-2022-06.pdf
Here is the link for the instructions with some helpful pix.
Scott
I never even considered error from front to back tilt. Huh, I seem to have just just used it correctly as follows: I put the tilt guage on the saw table top on its magnet base facing me and zero it. I raise the saw blade fully up above the table top. Then I have always just slide the tilt meter accross the saw table top until the side magnets attach to the blade. Now I tilt the blade to the desired angle. Without knowing it I seem to have removed front/back tilt error from the measurement – who kew? ;)
I never even considered error from front to back tilt. Huh, I seem to have just just used it correctly as follows: I put the tilt guage on the saw table top on its magnet base facing me and zero it. I raise the saw blade fully up above the table top. Then I have always just slide the tilt meter accross the saw table top until the side magnets attach to the blade. Now I tilt the blade to the desired angle. Without knowing it I seem to have removed front/back tilt error from the measurement – who kew? ;)
Raul S
I use a Dewalt 7491RS and they are notorious for not having a flat surface. they tend to droop down as you near the throat plate opening. Depending on the accuracy I need, how wide of a piece I am cutting, etc. I then use a known straight object to first zero it out then place it on the blade. Open for suggestions if anyone else deals with this.
I use a Dewalt 7491RS and they are notorious for not having a flat surface. they tend to droop down as you near the throat plate opening. Depending on the accuracy I need, how wide of a piece I am cutting, etc. I then use a known straight object to first zero it out then place it on the blade. Open for suggestions if anyone else deals with this.
John Schroeder
I have one. Not sure of the brand. I am not sure it matters because I suspect they are all from the same manufacturer. Be that as it may, I cannot trust it. I set it on the table, zero it, move it to the blade, adjust blade to 90. Then check with my Starrett square, and I am a degree or so off. Maybe it is defective, or a cheap knockoff. Or maybe it’s weight exerts enough pull on the blade to affect it.
I still use it, just not when precision is essential.
HJR
Don’t undestand why so many people are struggling to grasp the concept, It’s pretty simple really.
I’ll try to explain it as best as I can so it can be visualized: Imagine laying the gauge on its side on the table top, with the screen reading sideways. That’s the position it has to be attached to the blade, with that side that was against the table top still facing down, without tilting the screen up or down. Because if the screen is pinting – even slightly – up or down, you’re introducing another angle in the equation and your reading won’t be accurate.
Hope this helps someone.
Wiley Cotton
There is an even easier method. I have a Wixey and the same praise for it as you have for your CMT. I set it on my saw table, turn it on, zero it, then attach it to my blade and set it to the degree angle I want. Even if the saw table is off, the blade is exactly on relative to the table. A comment about making sure the angle meter is flat on the blade and doesn’t touch the teeth would have been helpful.
There is an even easier method. I have a Wixey and the same praise for it as you have for your CMT. I set it on my saw table, turn it on, zero it, then attach it to my blade and set it to the degree angle I want. Even if the saw table is off, the blade is exactly on relative to the table. A comment about making sure the angle meter is flat on the blade and doesn’t touch the teeth would have been helpful.
Allun Hamblett
Wow! Talk about confusing. I couldn’t figure out where the square is placed; however, Phil Rader’s explanation makes the most sense. Matt’s explanation without diagrams just didn’t make sense: front, back, bottom….
Wow! Talk about confusing. I couldn’t figure out where the square is placed; however, Phil Rader’s explanation makes the most sense. Matt’s explanation without diagrams just didn’t make sense: front, back, bottom….
Tom
Regardless of the angle of the blade, the gauge face and back must remain plumb.
Regardless of the angle of the blade, the gauge face and back must remain plumb.
Larry Fredrickson
My only comment would be that if you just attach it to the blade without referencing a 90 degree angle via whatever means, then the table itself better be level at exactly 0 degrees.
My only comment would be that if you just attach it to the blade without referencing a 90 degree angle via whatever means, then the table itself better be level at exactly 0 degrees.
Malcolm Hearn
Not.sure at all if this is the right device to square up the blade. I use a square with no problem. Certainly didn’t understand entirely what is being proposed here.
Not.sure at all if this is the right device to square up the blade. I use a square with no problem. Certainly didn’t understand entirely what is being proposed here.
Steve823
I was going to say the same thing as Marcin said. Zero it out on the table top, not the throat plate as the angle is between the table top and the blade.
I was going to say the same thing as Marcin said. Zero it out on the table top, not the throat plate as the angle is between the table top and the blade.
Anonymous
Are you guys talking about using it on a miter saw or a table saw? Marcin is doing it the same way I do. Couldn’t be simpler. How can you tilt the blade on a table saw toward or away? it only moves left or right. You have to tell us what saw your using it on. Jonathan shows using it on a table saw. Never even thought about using mine on my Miter saw. It sounds like he’s talking about setting a compound miter on a miter saw. So then if your making a cut with a miter saw then I understand why you would use a square to set the blade perpendicular before setting your angel. That’s because miter saws are not known for accuracy if your setting it by the numbers/angel on the saw.
Are you guys talking about using it on a miter saw or a table saw? Marcin is doing it the same way I do. Couldn’t be simpler. How can you tilt the blade on a table saw toward or away? it only moves left or right. You have to tell us what saw your using it on. Jonathan shows using it on a table saw. Never even thought about using mine on my Miter saw. It sounds like he’s talking about setting a compound miter on a miter saw. So then if your making a cut with a miter saw then I understand why you would use a square to set the blade perpendicular before setting your angel. That’s because miter saws are not known for accuracy if your setting it by the numbers/angel on the saw.
Randy
Donald….. the (Back) of the digital angle finder also needs to be perpendicular (90 degrees) to the tabletop……..Both the saw blade and the angle gauge needs to be perpendicular (each one 90º to the table top so place a square to the table top and the digital gauge.) It would have been more clear to show a square on the table top touching the back of the angle gauge.
Donald….. the (Back) of the digital angle finder also needs to be perpendicular (90 degrees) to the tabletop……..Both the saw blade and the angle gauge needs to be perpendicular (each one 90º to the table top so place a square to the table top and the digital gauge.) It would have been more clear to show a square on the table top touching the back of the angle gauge.
Mike Curtin
Marcin, yes, set the base of the angle gauge on the table top facing toward you and press the “zero” button. Chris, you are correct, but using a square gives you a longer baseline and works even if the blade has rotated a little since you mounted the gauge on the blade. Donald, the back of the gauge is the side opposite the buttons and display.
Marcin, yes, set the base of the angle gauge on the table top facing toward you and press the “zero” button. Chris, you are correct, but using a square gives you a longer baseline and works even if the blade has rotated a little since you mounted the gauge on the blade. Donald, the back of the gauge is the side opposite the buttons and display.
27Saxophone
More importantly, you need a “clean” reference surface. If the gauge can’t read a true horizontal reference for some reason, you’ll struggle to get accuracy on the relative blade angle.
More importantly, you need a “clean” reference surface. If the gauge can’t read a true horizontal reference for some reason, you’ll struggle to get accuracy on the relative blade angle.
Anonymous
I always just push mine down to the throat plate and so the side is referenced off the top of the plate. The gauge gets lifted off the throat plate when the blade is tilted. No square necessary.
I always just push mine down to the throat plate and so the side is referenced off the top of the plate. The gauge gets lifted off the throat plate when the blade is tilted. No square necessary.
Marcin
@Phil Rader: thank you for the explanation, it makes the point of Katz fully clear to me. I didn’t know that these gauges can measure compound angles.
Regards,
Marcin
@Phil Rader: thank you for the explanation, it makes the point of Katz fully clear to me. I didn’t know that these gauges can measure compound angles.
Regards,
Marcin
Marcin
What about using the “zero” button to make a reference? So first place the gauge on the table, use the “zero” function of the gauge, then place the gauge on the blade?
Cheers,
Marcin
What about using the “zero” button to make a reference? So first place the gauge on the table, use the “zero” function of the gauge, then place the gauge on the blade?
Cheers,
Marcin
Rich pauli
Well you guys have confused me. I think I’m using mine correctly but a video explanation will certainly help wade through the “front/back top/bottom” issues. I’ve gotta go lay down now!! Ha!
Well you guys have confused me. I think I’m using mine correctly but a video explanation will certainly help wade through the “front/back top/bottom” issues. I’ve gotta go lay down now!! Ha!
Mike
IOW, you can’t have the gauge attached to the blade at an angle (top tilting towards the front or back of the saw.).
IOW, you can’t have the gauge attached to the blade at an angle (top tilting towards the front or back of the saw.).
Anonymous
The “face” that has the digital angle and the buttons is the “FRONT” Which is orange on this model. Then you have the left right and top that are silver. The “Bottom” has a magnetic surface. That leaves the “Back” which is parallel to the “Front” what Jonathan is referring to is making sure the “BACK” face of the digital angle finder is perpendicular (90 degrees) to the table saw surface. IE" for a true 90-degree measurement of the blade to the table saw surface the digital gauge must also be perpendicular to the table saw in both directions. the bottom (magnetic) face which is stuck to the blade needs to be perpendicular to the tabletop (&) the (Back) of the digital angle finder also needs to be perpendicular (90 degrees) to the tabletop.
Hopefully that makes sense.
Donald P. Sattler
Sorry but this doesn’t make sense about the back od the gauge. Can you show more photos of what your talking about thanks
Sorry but this doesn’t make sense about the back od the gauge. Can you show more photos of what your talking about thanks
Donald P. Sattler
Sorry but this doesn’t make sense about the back od the gauge. Can you show more photos of what your talking about thanks
Sorry but this doesn’t make sense about the back od the gauge. Can you show more photos of what your talking about thanks