


If you’re looking for beginner-friendly joinery, there’s no better starting place than half lap joints.
Half laps come in all shapes and sizes: Corner laps, cross laps, T laps, dovetail laps…
And while they’re not too difficult to cut, they do teach you some of the basics of woodworking joinery.
More importantly, half lap joints are super useful. You can use them on tables, planter stands, and even full scale construction.
Today, I’m giving you the basics of half lap joints — including the different styles, how to cut them, and a few tips for success.
I’ve also included an amazing table saw trick for perfect fitting half laps with minimal layout (click here to skip ahead).
This joint is a great stepping stone to more difficult joinery, and a great way to level up your woodworking skills.
TABLE OF CONTENTS
WHAT IS A HALF LAP JOINT?
A half lap is a style of joinery where two boards are attached at recessed mating faces — like two notches cut to fit perfectly together.
Typically, the boards are the same thickness and recessed halfway through so the show faces are flush (hence the name half lap).
A half lap joint has two main components: A shoulder and a cheek.
The shoulder is the 90° wall that goes across the board's grain. The cheek is the surface of the recessed portion.
Because the cheeks are entirely long grain, half laps create really strong glue bonds and take fasteners well.
The shoulder helps with alignment and adds more strength than simply gluing and fastening two flat boards together.
Of course, some styles of lap joints are stronger than others. Which takes us to…
COMMON TYPES OF HALF LAP JOINTS
There are endless variations on half lap joints. But these are the basics — ordered in terms of strength.
CORNER HALF LAP JOINTS
Corner half laps, sometimes called end laps, are where two boards are joined by a half lap at their ends.
They typically come together to create a 90° corner, but any angle is possible.
Corner half laps are relatively strong as long as both cheeks are flat and there’s a good glue bond.
But since the joint is only housed by one shoulder on each board, it’s not the strongest. Because of that, they're often strengthened with fasteners.
Corner half laps are good for making frames and construction-style builds with dimensional lumber.
T HALF LAP JOINTS
T lap joints are where the end of one board is half lapped into the middle of another, making a “T” shape.
This joint is stronger than the corner lap because both sides of one cheek are supported by the mating piece’s shoulders.
This helps prevent lateral movement and lets you create a friction fit.
T laps are great for vertical support pieces in a frame or slat style table tops. I also used them in my Saw Stallion build.
CROSS HALF LAP JOINTS
Cross laps are where two boards cross over each other and are attached by a half lap, making an “X” shape.
Of the three half lap styles noted here, this is the strongest.
The four shoulders lock around the mating pieces to prevent any lateral or racking movement. When done well, this joint locks together with a satisfying click.
Cross laps are great for creating bases for planter stands, or even face frames for cabinets.
OTHER TYPES OF HALF LAP JOINTS
Dovetail lap joints are another common joinery style.
The wedge shape of the dovetail ensures the pieces can’t be pulled apart in one direction, just like a regular dovetail joint.
Mitered half laps are also common to get the look of a frame miter with a lot more strength.
From there, all sorts of angled half laps are possible. The layout and process will change, but the approach is the same.
HOW TO LAYOUT A HALF LAP JOINT
For ease of explanation, I’m assuming the two boards you’re connecting are the same thickness.
Corner laps, T laps, and cross laps all follow the same general layout procedure — but the mechanics are slightly different.
I’ll call out the differences below.
1. LABEL SHOW FACES
Labeling the show faces of your two boards is important so you don’t get confused later on.
On one board, the cheek will be cut on the show face. On the other board, the cheek will be cut on the interior face.
The little curly cue in the photo above is the classic marking for reference faces. I’ve heard it’s part of a cursive “f” for “face” (thanks, Rex Kreuger) — but I’m not really sure.
2. MARK THE SHOULDER LINES
The shoulder lines are marked across the width of a board, perpendicular to the long grain.
The placement is set to match the width of the mating board.
It’s easy on corner half laps.
Set your square’s fence on the edge of the mating board and let the blade drop to a flat surface below. Lock it down.
Then set the fence against the end grain edge of the board you’re marking and set the tip of your marking knife at the end of the square’s blade.
Keep the knife there, slide the square up to it while referencing a jointed edge, and mark a line.
It’s best to use a square and marking knife here versus a marking gauge. End grain edges can be wonky and aren’t great references for marking gauges.
If you like, you can plan to leave the ends of the boards slightly proud and flush trim them later. To do this, just mark the shoulder line slightly further from the end grain edge.
You can also just place one board upright against the other and trace it, but it's not always 100% accurate.
Remember: On one board, the shoulder line will be on the show face. On the other, the shoulder line will be on the interior face.
For t lap or cross lap joints, start by marking one shoulder line where you want it.
For the second shoulder line, you can either transfer the measurement with a ruler or physically trace the mating board (making sure it’s square).
If you want to trace, it’s helpful to cut the half lap on one board first, align it on the mating board, then trace. Just be careful your marking knife doesn’t ride up the board you’re tracing.
Once you’ve marked the shoulder lines on the appropriate faces, continue them halfway down each edge.
Just set the tip of your marking knife in the corner of the shoulder line, slide up your square, and mark the edge with a connecting line. Eyeballing halfway down is fine.
3. MARK THE CHEEK LINES
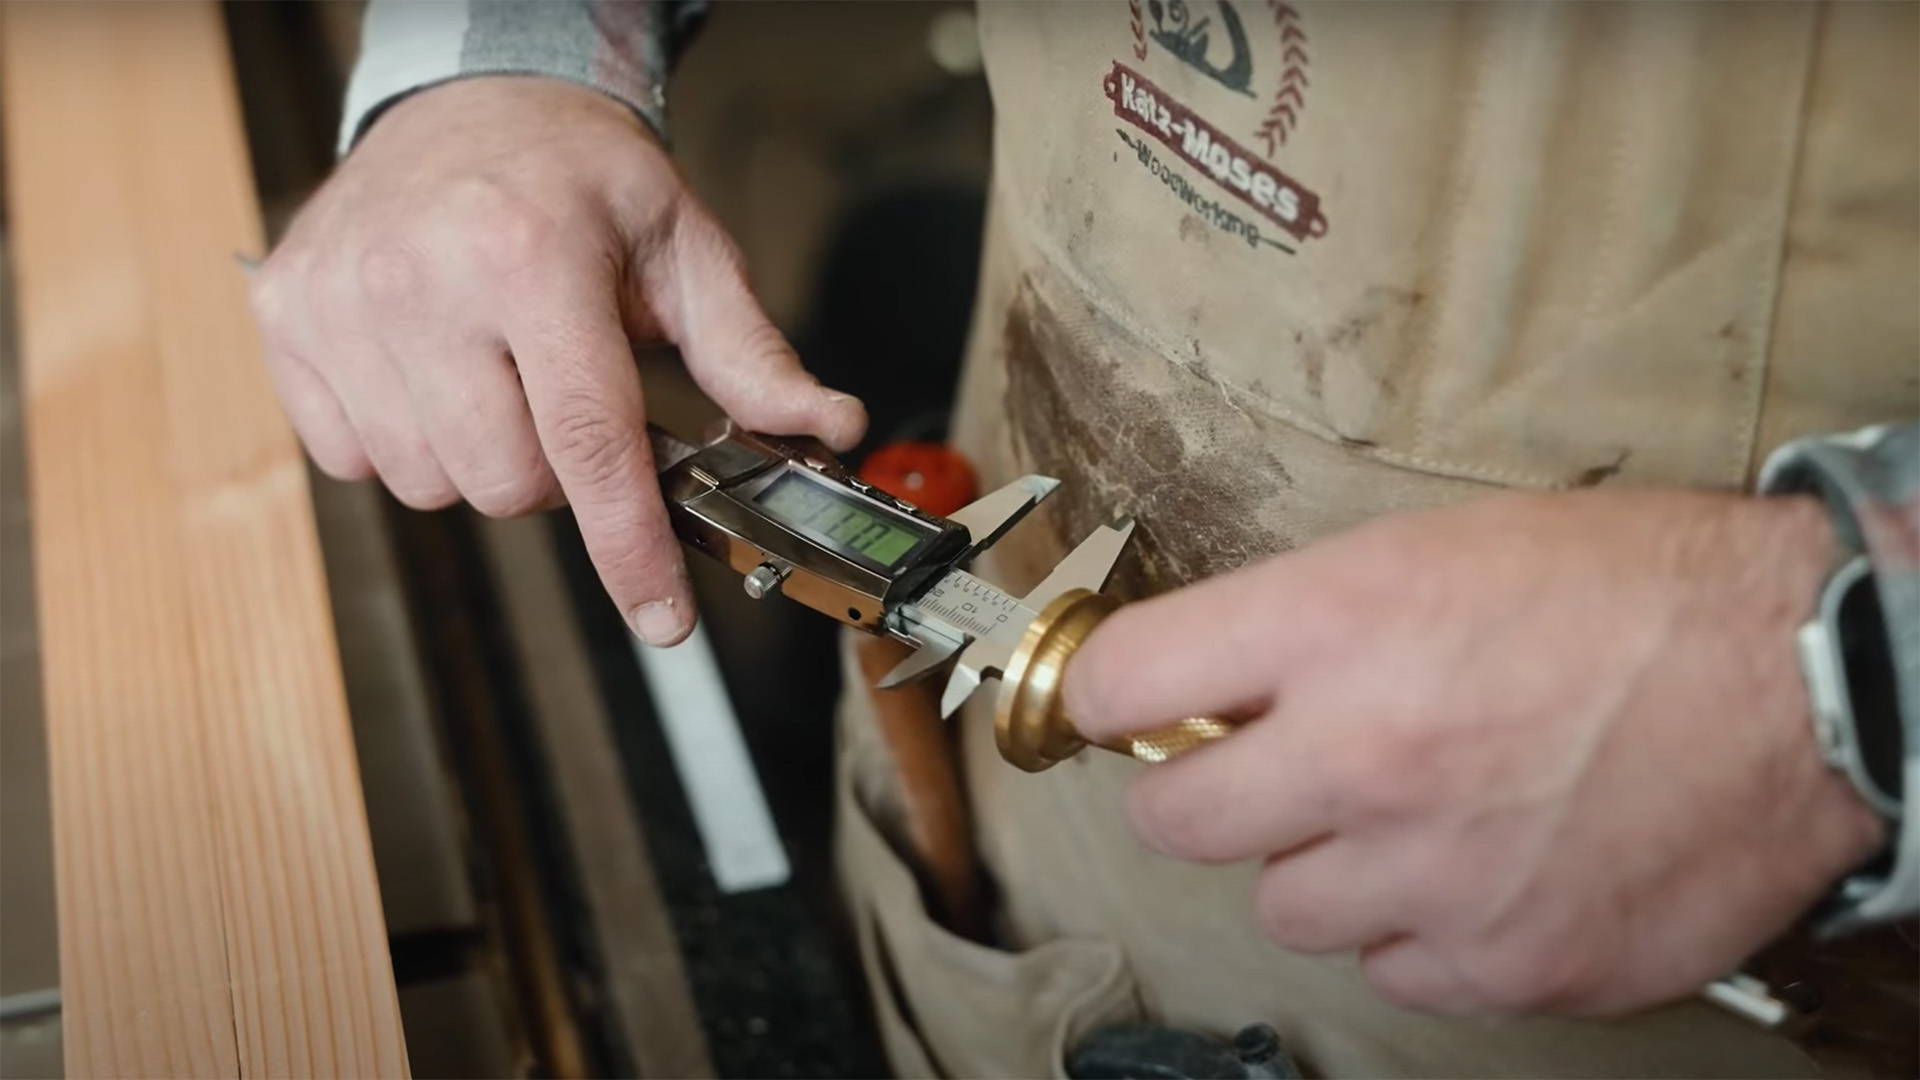
Typically, cheek lines are marked halfway through the thickness of the board.
Measure the thickness of a board with a pair of calipers. Divide that measurement by two, then set your calipers to that number.
Then transfer that measurement to your marking gauge (here’s a great way to do it).
Once that’s set, use your marking gauge to scribe a line along the edge of each board.
On corner laps, you’ll wrap this line from the shoulder line on one edge to the shoulder line on the other, including the end grain.
On T laps and cross laps, connect the two shoulder lines on both edges of the board.
This is the depth you’ll end up cutting to.
If you plan on using hand tools, only reference the fence of the marking gauge off the SHOW FACES of both boards. That way the faces will be flush even if the line isn’t perfectly centered.
Once the cheek lines are scribed, mark all the waste so you don’t get confused later on.
Now your layout is done and you’re ready to cut.
HOW TO CUT A HALF LAP JOINT
Your approach to cutting half laps will depend on the tools you use.
I do it all on the table saw with a dado blade. But you can also cut half laps with regular table saw blades, routers, circular saws, or hand tools.
1. CUT THE SHOULDER
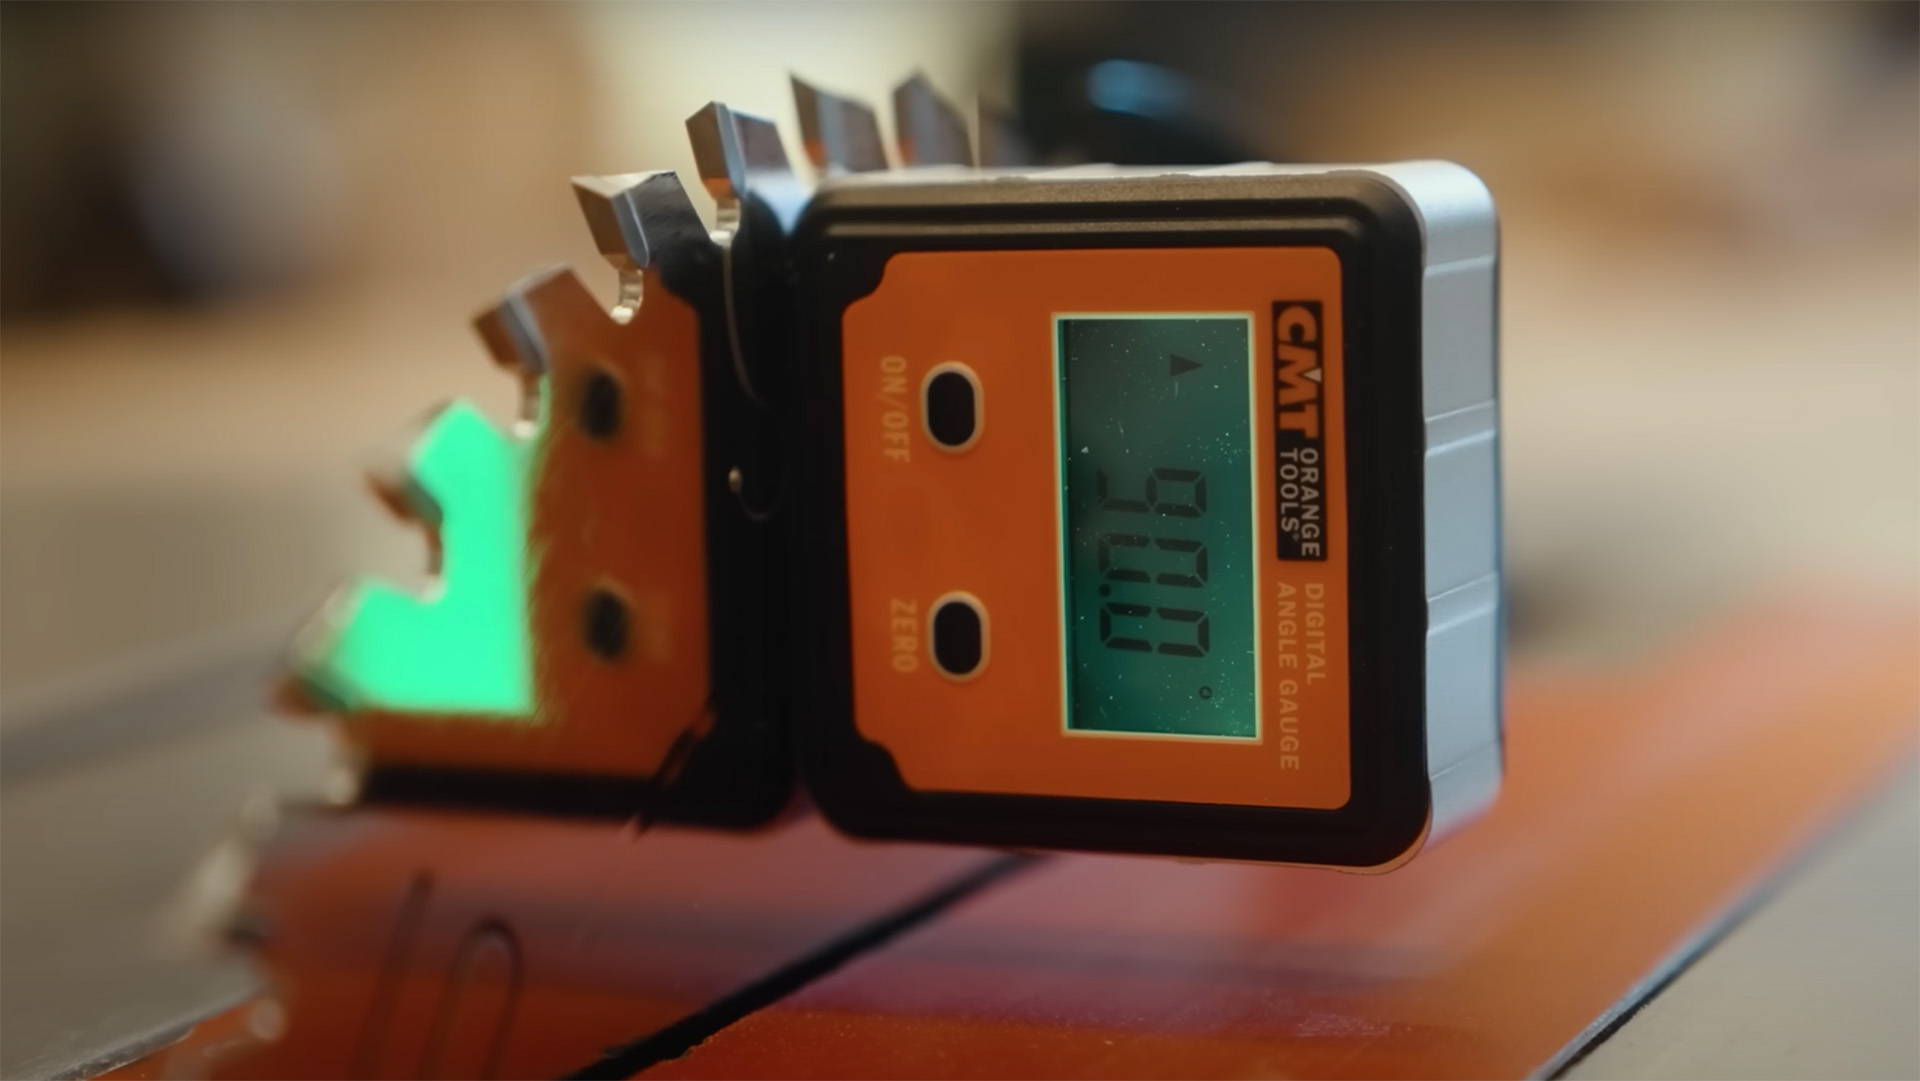
If you’re using a table saw, the first thing to do is set the blade height.
Place the board so the waste side is down. Then set the blade so the cutting depth maxes out at the cheek line.
This CMT Digital Height Gauge makes setting accurate cutting depths really easy. Otherwise, rotate the blade next to the board, adjusting the height until it barely touches the cheek line.
If you want to make sure the joint comes out absolutely perfect, set the cutting depth just shy of the cheek line. You can trim it down with a router plane or shoulder plane later.
Once the blade height is set, position the board on a miter gauge or crosscut sled.
Line up the shoulder line with a tooth on the saw blade. Make sure the tooth is one angled out towards the shoulder line (on ATB blades).
You can literally click the blade tooth into the line. Make sure the kerf of the blade is on the waste side of the line, then lock down a stop block to hold the board there.
Now make a cut to establish the shoulder line.
This first cut is the most important, so take the time to make sure it’s right. Once it’s done, don’t go past it.
If you’re using hand tools, consider sawing slightly away from your shoulder line on the waste side.
You can come back with a sharp chisel later on and pare to the line. This makes it easier to get an accurate shoulder line. Even if you’re good, hand sawing straight ain’t easy.
2. CLEAR THE CHEEKS
Now you just need to clear the rest of the waste to form the cheek. Important point: Don’t adjust the height of the table saw blade.
It only takes a few passes with a dado blade.
If you only have regular table saw blades, make multiple cuts to clear the waste. Then slide the board back and forth against the stop block as you push the crosscut sled through the blade.
This helps clear the hills and valleys left by ATB blades so you end up with a flat cheek.
You could also use a tenoning jig to cut the cheek lines. This can work great but takes a little more set up.
If you’re using hand tools, saw on the waste side of the line. Then pare down to the final line with chisels, a router plane, or a shoulder plane.
Repeat this process for both boards, then pat yourself on the back.
The bulk of the work is over.
3. TEST THE FIT
Now dry fit the pieces together. The goal here is to find any lumps or wood fibers that prevent the joint from properly seating.
The two common causes of gaps are humps in the middle of the cheeks or shoulder’s that aren’t quite 90°.
To check the cheeks for flatness, use the edge of a ruler. The edges of the cheeks should touch the ruler all the way across the joint. If they don’t, there’s a hump.
You can take down humps with a chisel, router plane, or shoulder plane. Work from the edges towards the inside of the cheek (paring all the way through can blow out the opposite edge).
Also check to make sure the shoulder is actually 90°.
If there are any lumps sticking out at the bottom, they’ll keep the mating piece from sitting flush against the shoulder.
Once you can close any gaps in the joint with hand pressure, you’re ready for assembly.
4. ASSEMBLE THE JOINT
Spread glue on the cheeks and shoulders of both boards.
The glue joint on the shoulders won’t add much strength, but will help seal any visible gaps.
Clamp the boards together (one clamp is usually enough). Check to make sure they’re square, then let it dry.
You can flush everything up with a hand plane once the glue dries. But hopefully, you nailed it and don’t have to.
Congratulations! You just successfully cut a half lap joint.
TABLE SAW TRICK FOR PERFECT HALF LAPS
This trick is amazing for getting perfect fitting cross and t lap joints with minimal layout.
All you need is a regular table saw blade, a stop block, and a “kerf spacer.”
The kerf spacer is just any spacer who’s thickness matches the kerf of your table saw blade.
I often use a drill bit. Thin kerf blades are generally 3/32”, while full kerf blades are ⅛”.
You can also make one by making a test cut in a piece of scrap, then trimming a strip of wood to fit the kerf.
Here’s how the trick works.
Start by marking a shoulder line on one of the boards and setting the blade height to reach the cheek line.
Line this up with the table saw blade like mentioned above.
Now place the kerf spacer at the end of the board and slide up the stop block to hold it in place. Make the first cut.
Remove the kerf spacer and replace it with the mating board. Push the piece you’re cutting up against it so it’s wedged against the stop block and make the second cut.
Now you’ve got two kerfs with outside edges that are exactly as far apart as the mating board is wide.
Just clear the waste in the middle and you’re done.
If you were to do this without the kerf spacer, the half lap you’d cut would be wider than the mating board by the exact thickness of the blade kerf.
It’s a simple super strategy — and produces insanely accurate results.
DON’T HALF A$$ YOUR HALF LAPS
Half laps are a perfect introduction to the world of wood joinery.
They’re useful, look great, and just challenging enough for you to develop the skills for more complex joints.
If you want to improve your woodworking even further, check out these 8 Tips for Joinery that Fits Like a Glove.
Any half lap tips we may have missed? Let us know in the comments below!
Follow us on Instagram @katzmosestools, on TikTok @katzmoseswoodworking, and check out my YouTube channel for more great woodworking content...
And as always, STAY SAFE IN THE SHOP!
3 comments
Carl J Wehner
Hi, Half Joints are one of my favorites. I have used them to make a cut table out of half inch USB. I have also used it to create a nine-foot garage panel from quarter inch plywood.
Hi, Half Joints are one of my favorites. I have used them to make a cut table out of half inch USB. I have also used it to create a nine-foot garage panel from quarter inch plywood.
DSG
Just a quick reminder: For tips directed at beginner woodworkers, consider that they (meaning ME🥹) most likely will not have a router plane or shoulder plane. Otherwise, good stuff!
Just a quick reminder: For tips directed at beginner woodworkers, consider that they (meaning ME🥹) most likely will not have a router plane or shoulder plane. Otherwise, good stuff!
Florent
In addition to the kerf spacer, my favorite trick to ensure a perfect, easy, and quick setup blade height for a half lap is to simply use the board itself as a reference: on a test piece the same thickness as your boards, you set up the blade just shy of half the thickness, make a cut at the end of the board, flip it over and repeat. That should leave you with a thin sliver at the end of the board. Raise the blade a little bit, and repeat the cut on both side of the board, repeating this process until the sliver disappears. At this point, your blade is set at exactly half the thickness of the board without having to measure anything!
In addition to the kerf spacer, my favorite trick to ensure a perfect, easy, and quick setup blade height for a half lap is to simply use the board itself as a reference: on a test piece the same thickness as your boards, you set up the blade just shy of half the thickness, make a cut at the end of the board, flip it over and repeat. That should leave you with a thin sliver at the end of the board. Raise the blade a little bit, and repeat the cut on both side of the board, repeating this process until the sliver disappears. At this point, your blade is set at exactly half the thickness of the board without having to measure anything!