


This skill is critical to accurate woodworking — but can be trickier than you’d think.
You need it to set up cuts. Lay out joinery like tenons and through-mortises. Even set up reference lines for your chisels and hand saws.
What skill am I talking about?
Accurately wrapping a layout line around a board.
That means connecting layout lines all the way around a board so the final line meets perfectly with the first line.
It seems simple enough. And it can be… with the right tools.
So here’s my method for wrapping lines around boards so they meet perfectly.
1. MAKE SURE YOUR BOARD IS SQUARE
If your board’s edges aren’t square and parallel, your final line won’t connect with the first line…
No matter how careful you are.
So take the time to properly mill your board and ensure it’s square all the way around.
2. GRAB THE RIGHT TOOLS
For this method to work, you need to use a marking knife — not a pencil or pen.
The physical reference left by a marking knife is critical to wrapping lines accurately.
You could do it with a pencil. But you’ll have to try a lot harder to get things to line up.
You’ll also need a reliable square.
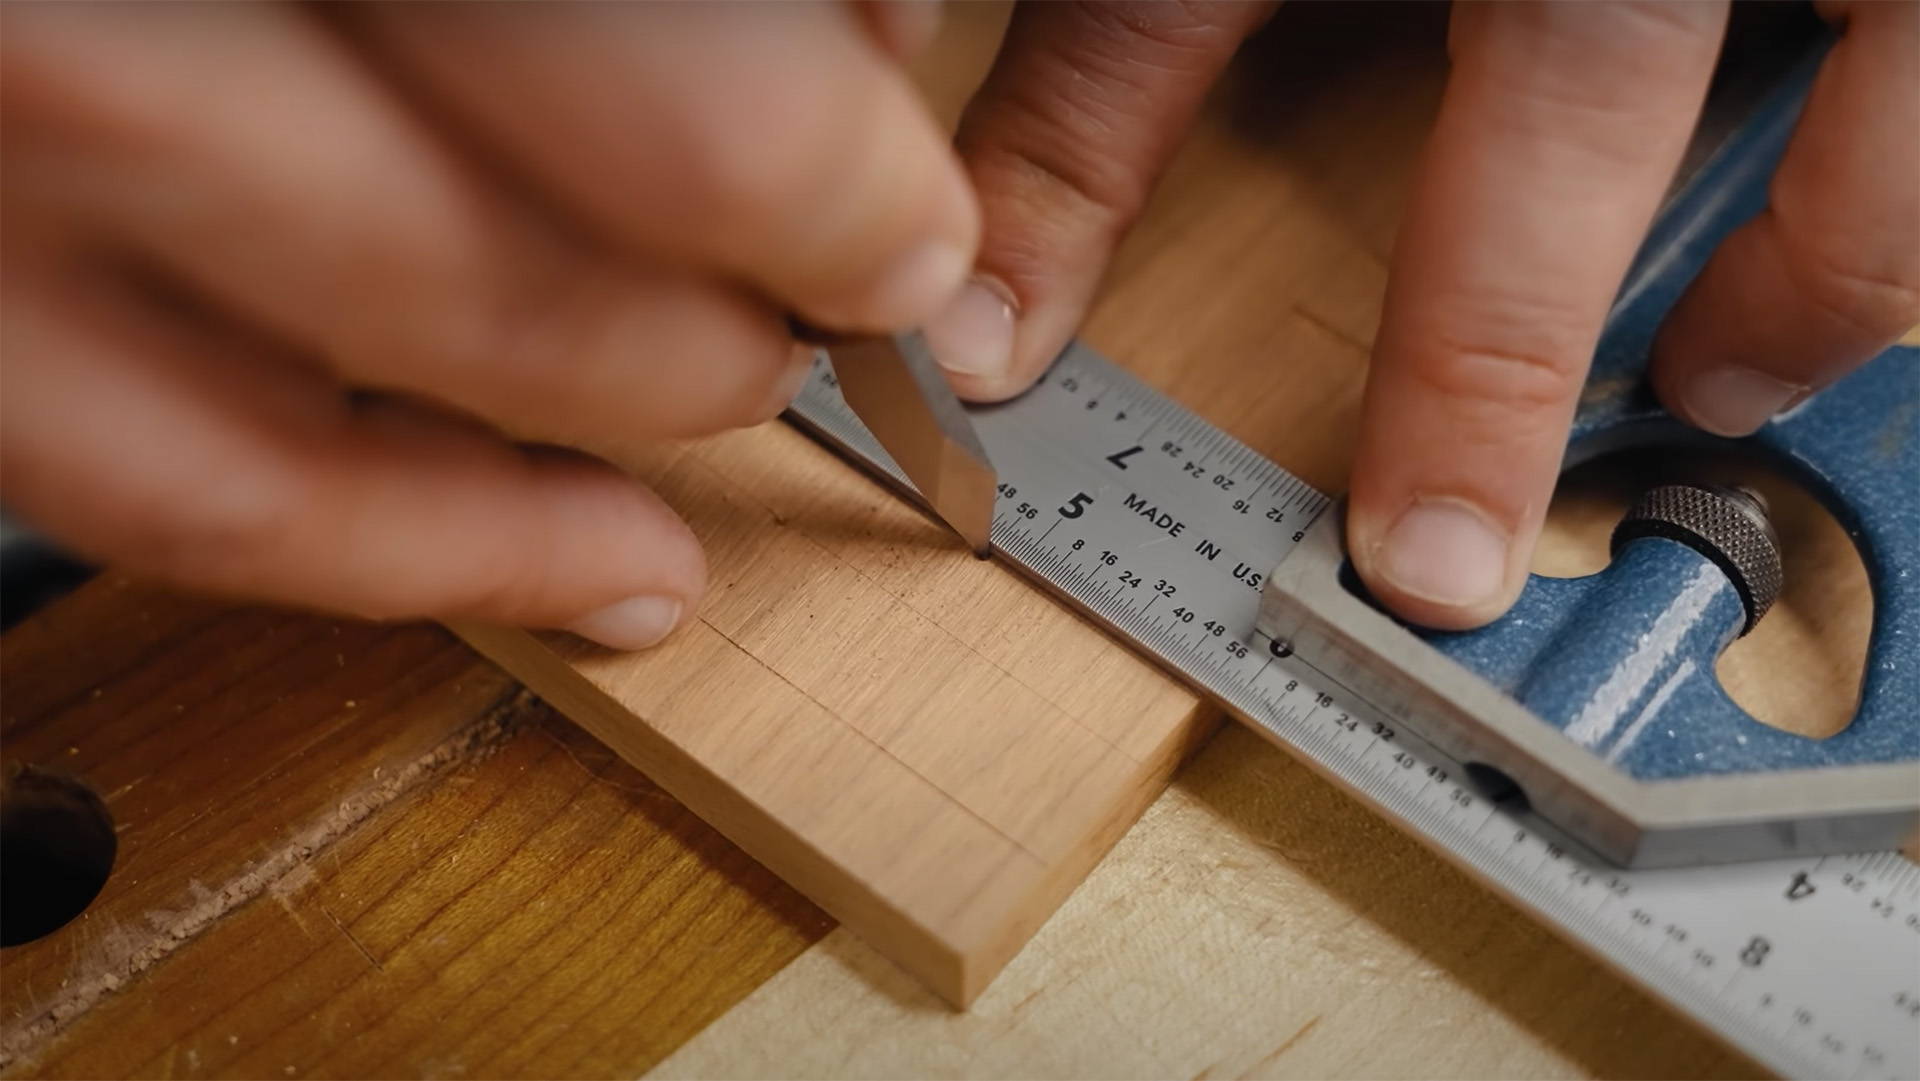
3. MARK THE FIRST SIDE
Place your square with the edge of the blade on where you want your line.
Set your marking knife blade against the edge of the square and mark the first line.
Make sure you mark all the way from one edge to the other (this is important).
4. MARK THE SECOND SIDE
Place the blade of the marking knife in the line you marked right at the corner of the board.
Now slide your square up until it’s stopped by your marking knife, with the square’s blade on the adjacent side.
Hold the square steady and mark the second line.
5. REPEAT AND CONNECT
Repeat this process for the next two sides of the board.
If you did everything right (and your board is square), the final line will connect perfectly with the first.
Like I said, this process is super simple.
And the physical line left by a marking knife lets you layout joinery and set up cuts accurately… without having to try too hard.
Want to learn more marking knife technique? Read this.
Got other layout tips of your own? Share them in the comments below!
Follow us on Instagram @katzmosestools, on TikTok @katzmoseswoodworking, and check out my YouTube channel for more great woodworking content...
And as always, STAY SAFE IN THE SHOP!

10 comments
Jim A. Paschis
Run the first line on the broader face. Then with the square run each narrow edge and make a mark visible on the fourth side. Place the square that spans the broader face and check how the alignment appears. If it is within you standards for tolerance then mark it. If it does not meet your standards then you have two choices. First, lay a straight edge that will fit between the two short visible marks, cutting your error in half. Second, if poor, redo.
Run the first line on the broader face. Then with the square run each narrow edge and make a mark visible on the fourth side. Place the square that spans the broader face and check how the alignment appears. If it is within you standards for tolerance then mark it. If it does not meet your standards then you have two choices. First, lay a straight edge that will fit between the two short visible marks, cutting your error in half. Second, if poor, redo.
Edward Caffey
Excellent advice and thank you for the information.
Excellent advice and thank you for the information.
David Sherby
I’m bummed. My marking knife rolled off my bench. Of course just like buttered toast, it hit the concrete floor right on the tip. I’m trying to decide if I can accurately sharpen it or just buy a new one.
I’m bummed. My marking knife rolled off my bench. Of course just like buttered toast, it hit the concrete floor right on the tip. I’m trying to decide if I can accurately sharpen it or just buy a new one.
David Walter Peterson
Unless the board is comletely square the lines won’t quite line up. To make sure the lines line up, you need to use the two reference faces as the only place to mark from. That will assure that even if the board is not perfectly square, the lines will meet up on the last marked line.
Unless the board is comletely square the lines won’t quite line up. To make sure the lines line up, you need to use the two reference faces as the only place to mark from. That will assure that even if the board is not perfectly square, the lines will meet up on the last marked line.
Jim
I do not understand why at Pic#4, it shows 2 parallel lines when the final Pic#5 shows just one line wrapping around the 2 sides of the board (as it should consistent with the text of the article). What is the purpose of the 2nd line. I likewise use a saddle square and find it easy to use as referenced by another viewer.
I do try to get the substance of all your pointers which are very helpful. Thanks, Jim
Anonymous
I agree with Brian.
My saddle square is one of the most used marking tools I have.
I agree with Brian.
My saddle square is one of the most used marking tools I have.
Tom
You should establish two referenced surfaces. That is, two adjacent surfaces that are perpendicular to each other. Then strike your lines, always referencing you square from one of these two surfaces.
You should establish two referenced surfaces. That is, two adjacent surfaces that are perpendicular to each other. Then strike your lines, always referencing you square from one of these two surfaces.
Brian Dormer
I use a saddle square that wraps around 2 sides of the board and ensures the marked line is in the same place on both faces of the board. That, a really sharp marking knife and a square board – and Bob’s your uncle!
I use a saddle square that wraps around 2 sides of the board and ensures the marked line is in the same place on both faces of the board. That, a really sharp marking knife and a square board – and Bob’s your uncle!
Anonymous
Even as a seasoned woodworker, I find your tips most valuable!!
Even as a seasoned woodworker, I find your tips most valuable!!
John McBratney
Yep, I do that already. I have as I’ve mentioned an engineer’s steel square and I have both a bevel marking knife like yours and a Japanese marking knife. The latter is a lovely tool with a Samurai sword type blade. It has a slip=on cover, essential to avoid injury!
Yep, I do that already. I have as I’ve mentioned an engineer’s steel square and I have both a bevel marking knife like yours and a Japanese marking knife. The latter is a lovely tool with a Samurai sword type blade. It has a slip=on cover, essential to avoid injury!