


Bigger isn’t always better (*ahem*).
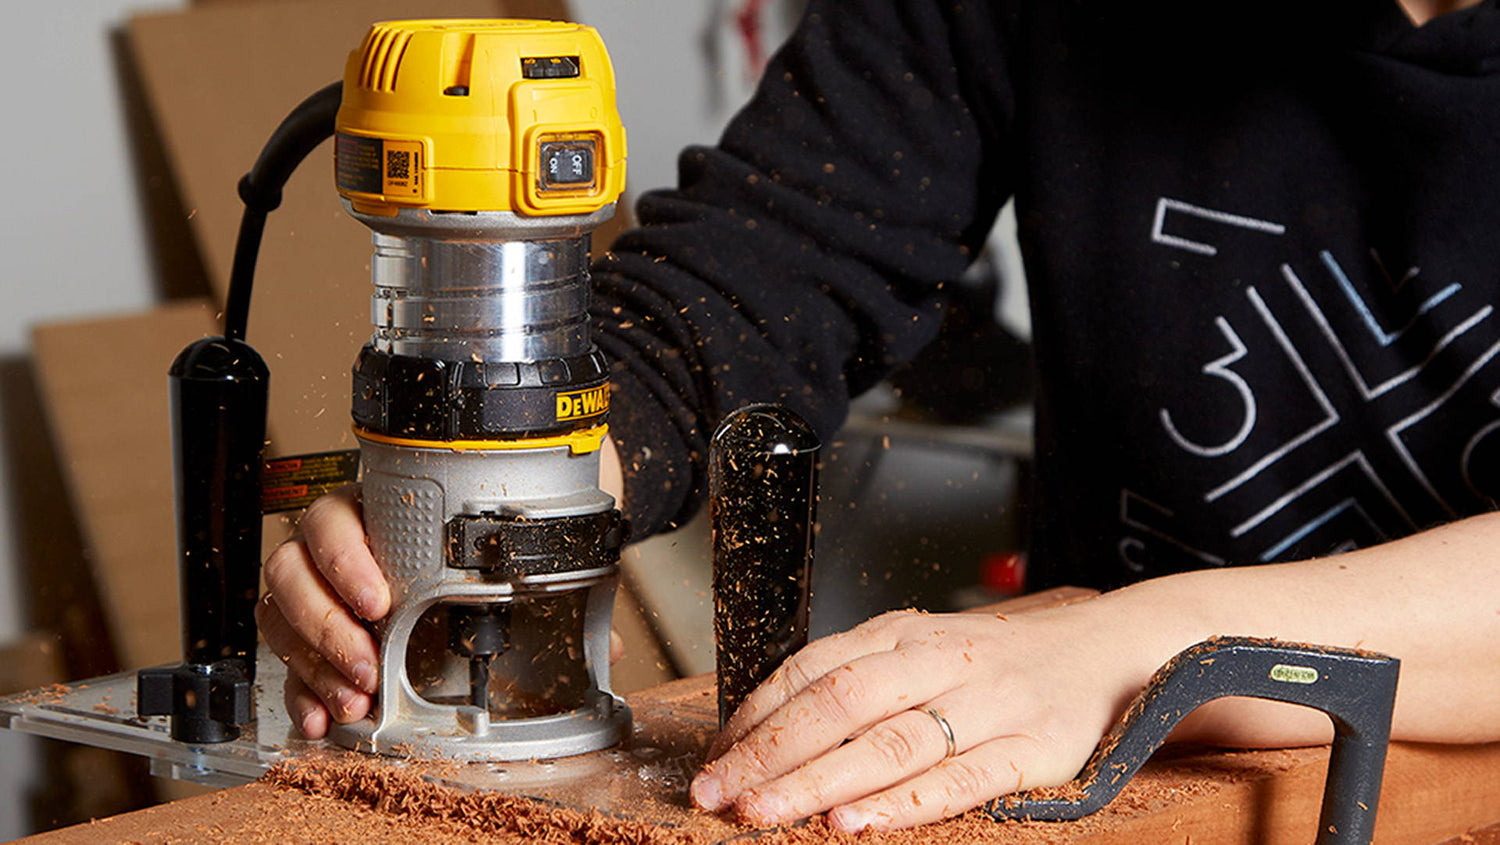
Trim routers are smaller and less powerful than full-sized routers — but that can be an advantage in some cases.
They’re small size means they’re easier to control. And for light and detailed work, it’s all about control.
Today, I’m giving you 7 situations where I prefer my compact router — to show just how mighty these little tools can be.
I think you’ll see that size isn’t everything… so get your head out of the gutter and let's talk tools.
If you need help deciding which trim router to buy, read this.
Want to add even more functionality to your trim router?
The 3x3 Custom 6-in-1 Universal Trim Router Jig makes your little palm router into an Optimus Prime. And it’s now available on pre-sale!
We sold out in a week on our last run — so if I were you, I’d order ASAP before this second run is over.
TRIM ROUTER TIPS AND TECHNIQUES
Before we get to the uses, here’s a few important tips to keep in mind with trim routers.
TAKE SMALL BITES
It’s important to take small bites with any tool — but especially with trim routers.
Hovering around 1 hp and using ¼” collets, these tools aren’t made to hog out a ton of material.
Aim to make multiple passes of a ¼” at a time. This makes sure you won’t strain the router, flex the bit, or put yourself in a sketchy situation.
FEED THE RIGHT WAY
Again, this is a basic router principle. But it always bears repeating.
Always feed the router over an edge the opposite direction the bit is spinning into that edge.
Confusing? Think about it like this:
When using your router with the bit pointed down, move the router from left to right on an edge facing you.
That means if you’re working your way around an entire board, move around it counterclockwise.
But if you're cutting the edges of a hole or large inlay (a.k.a. Butterfly key recess), move the router clockwise.
When using the router bit-up (like in a router table), move the workpiece from right to left against the side of the bit facing you.
HOLD THE BASE FOR CONTROL
If you’re doing detailed freehand work like inlays, holding your trim router’s base gives you a lot more control.
It helps keep the base flat so you cut at a consistent depth. Holding higher up on the tool can lead to accidentally tilting the bit during a cut.
On work where I need to be really accurate, I move the base with my thumbs and pointer fingers, then I use my other fingers as anchor points on the board.
This makes it easy to take small, controlled cuts without going over my lines.
7 CUTS WHERE TRIM ROUTERS SHINE
1. QUICK EDGE BREAKING
Milling leaves boards with really sharp edges. And while it may look clean, it’s not a great feature on household furniture.
At the same time, you don’t always want to completely lose those crisp edges with a large chamfer or roundovers.
I have a trim router dedicated specifically to quickly breaking sharp edges.
I leave a ¼” roundover bit in it at all times and whip it out whenever I want to quickly break an edge without changing the profile too much.
A tiny chamfer or 1/16” to ¼” roundover will maintain those clean lines — but save you from sliced fingers down the line.
And with a small compact router, it’s easy to knock out with minimal set-up time.
2. FLUSH TRIMMING PROUD JOINERY
Leaving joinery proud to flush trim later is a great way to get pieces that look like the work of a master.
And a trim router lets you do it in seconds instead of having to cut a shaving at a time with a block plane.
The key is making sure your router base is elevated above whatever you’re flush trimming — but is still stable.
For butterfly keys, place two pieces of equal thickness on either side to support the router base, then lower the bit to the surface of the workpiece.
The 3x3 Custom 6-in-1 Trim Router Jig has extra pieces just for this, and makes flush trimming a breeze.
3. HINGE MORTISES
To get hinges that sit flush on the edge of a board, you’ll need to cut shallow mortises. But this can be tricky on the narrow edge of a board.
The weight of a full-sized router would make it almost impossible to balance on a narrow edge. But it’s way more approachable with a trim router.
I’d still recommend clamping a board to the board face so you have more surface area to keep the router base steady.
But with a careful touch and light passes, you can clear the bulk of waste for a hinge mortise in no time.
4. FLUSH TRIMMING EDGE BANDING
Edge banding is a great way to hide the edges of plywood in a piece of furniture. And trim routers excel at giving edge banding a perfectly uniform look.
This is one of the functionalities of the 3x3 Custom 6-in-1 Trim Router Jig. It can be assembled to reliably flush trim edge banding while keeping the router super stable.
You could also just clamp a piece of wood parallel to the edge and use this to keep your router steady
5. BUTTERFLY KEYS AND INLAYS
When I need to hollow out space for a small inlay, I always prefer my trim router.
Its maneuverability makes it easy to get close to your layout lines with maximum control.
You can do it with a full-sized router — but the added weight makes sudden or jerky movements more likely.
As mentioned above, I hold the base with my thumbs and pointer fingers while planting my other fingers on the workpiece.
This really helps keep your router bit within a designated area so you can get close to your lines without going past them (here's some more tips for butterfly keys).
6. SIGN MAKING
Trim routers are the weapon of choice for many modern day sign makers.
If you want to cut detailed recessed designs, there isn’t a better tool choice (except for a CNC — but that’ll cost you a bit more space and money).
The smaller bits used on ¼” collets are perfect for intricate patterns and lettering.
And again, the smaller size and lighter build make it easier to control with precision — even by hand.
7. FLUSH TRIMMING TIGHT CORNERS AND CURVES
I prefer to do most of my template routing with a ½” shank flush trim bit on the router table.
And while this is great for most projects, some templates have tight corners that a larger diameter bit simply can’t register.
Instead of switching to a ¼” collet on my router table, I simply throw a ¼” flush trim bit in my trim router and finish the job.
BONUS TIP:
Did you know that the 3x3 Custom 6-in-1 Universal Trim Router Jig can be used as an on-the-go router table?
Flip the router upside down, clamp it securely in a moxon vise, and use the jig base as your worksurface!
SMALLER CAN BE BETTER
Even though they might not seem essential, trim routers are incredibly useful to have around the shop.
They can’t do the massive cuts a full-sized router can — but when you need quick precision and maneuverability, they can’t be beat.
3X3 CUSTOM 6-IN-1 UNIVERSAL TRIM ROUTER JIG
Want to get your hands on a 3x3 Custom 6-in-1 Universal Trim Router Jig? Order yours on presale today!
When do you prefer to use a trim router? Let us know in the comments below!
Follow us on Instagram @katzmosestools, on TikTok @katzmoseswoodworking, and check out my YouTube channel for more great woodworking content...
And as always, STAY SAFE IN THE SHOP!
1 comment
Andrew
Hi Jonathan,
I’m interested in the 3×3 custom 6-in-1 universal trim router jig, but I see my trim router (Kobalt cordless 24v) isn’t one that is listed. It appears to be close to the Makita design however. Can you please advise on whether or not this jig would work for me? Thanks, Andrew
Hi Jonathan,
I’m interested in the 3×3 custom 6-in-1 universal trim router jig, but I see my trim router (Kobalt cordless 24v) isn’t one that is listed. It appears to be close to the Makita design however. Can you please advise on whether or not this jig would work for me? Thanks, Andrew