


Flush trimming is a skill every woodworker needs to master.
It allows you to create joinery that looks seamless and inlays that blend perfectly into the rest of your project.
Through-tenons, dovetails, butterfly keys, edge banding — they all involve flush trimming.
But like anything in woodworking, there’s more than one way to do it. And different methods are better suited to different situations.
Today, I’m giving you six ways to flush trim with different tools.
By learning them all, you’ll be able to get seamless looking joinery no matter the situation — and can use them together for fast and beautiful results.
TABLE OF CONTENTS
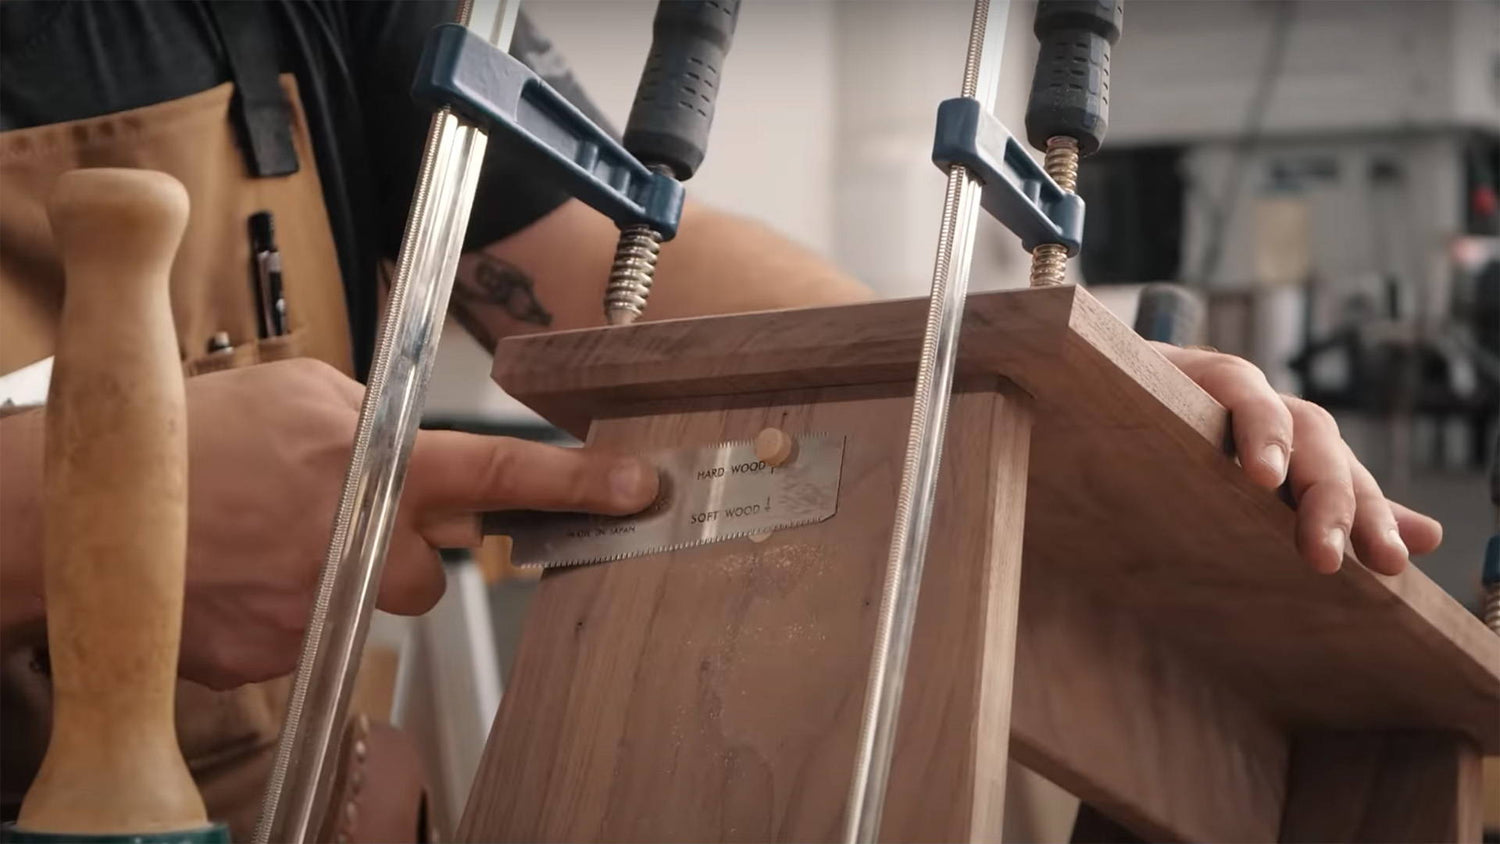
FLUSH CUT SAWS
Flush trim, or flush cut saws, are specially designed for flush trimming (who would’ve thought).
What makes them different from regular saws is their tooth set — or lack thereof.
On most hand saws, the teeth angle out slightly from the blade. This is called the tooth set.
But on flush cut saws, the teeth go straight out from the blade with zero set. This lets you saw with the blade flat against a reference surface without scratching it.
PROS:
- Can quickly cut off a lot of material
- Minimal set up
CONS:
- Can cut too deep if you’re not careful
- Often requires clean up with another tool
BEST USES FOR FLUSH TRIM SAWS
I find flush trim saws the most useful for shorter cuts, like dowels, plugs, and splines in mitered corners.
You can definitely use them for bigger pieces of exposed joinery, like through tenons, but there’s a chance of cutting too deep or not getting an even surface.
On large butterfly keys, for example, a flush cut saw wouldn’t be my first choice.
TIPS FOR USING FLUSH CUT SAWS
-
KEEP IT FLAT: Flush cut saws are super flexible, which is great when you need to trim something in the middle of a workpiece. But this flex can also lead to inaccuracies.
As I saw, I like to hold the back of the blade down with a finger to help keep it flat. Just be careful not to slip and nick yourself.
-
PROTECT WITH TAPE: Yet another use for blue tape. Surround the area you’re flush trimming with blue tape to protect the surface.
Even with zero tooth set, it’s still possible to scratch your workpiece with a flush cut saw. The tape makes sure everything stays scratch free.
HAND PLANES AND BLOCK PLANES
Hand planes are fantastic for incrementally cutting proud pieces flush.
If you’re flush trimming end grain (like on through tenons or dovetails), use a low angle jack or block plane for the easiest cutting.
Hand planes work slowly. But as long as you pay attention to grain direction, they can give you an ultra clean finish.
PROS:
- Create an ultra smooth finish that needs very little sanding
- Minimal set up time
CONS:
- Takes time and elbow grease if there’s a lot of material to take off
- Need to be weary of tearout
BEST USES FOR HAND PLANES
I do a lot of my flush trimming with a low angle block plane.
It’s just so quick to grab and use. I especially like to use it with butterfly keys and dovetails.
A hand plane can also work to take down edge banding — but you need to be careful you don’t cause tearout on your main workpiece.
TIPS FOR USE
-
BE CAREFUL WITH TEAROUT: Whenever you use hand planes, you need to keep grain direction and tearout in mind.
Take dovetails as an example. I always run my plane from the outside in. Since the backs of the pins or tails are supported by the other board, they won’t tearout.
-
SET IT UP RIGHT: To get the best results, your plane needs to be properly tuned and set up.
That means a sharp blade, appropriate cutting depth, etc. Read more about tuning and setting up a block plane here.
ROUTERS
An electric router is a super quick and efficient way to flush trim a lot of material.
You’ll need to fashion a simple jig that holds your router above whatever you’re flush trimming.
For example, say you’re cutting down inlay in the middle of a workpiece. Find two scrap pieces of the same thickness and fasten them on either side of the inlay with double stick tape.
Use them to support the base of your router, lower the bit to the level you’ll flush trim to, and cut away.
The problem with this method is that if something goes wrong, it goes very wrong. A tilt in the wrong direction can gouge your workpiece.
The 3x3 Custom Universal 6-in-1 Trim Router Jig has a special set up for flush trimming inlays and edge banding with little to no chance of tilting.
We’re starting our second production run of the jig now — so sign up here to be notified when it’s available.
PROS:
- Quickest way to remove a lot of material
CONS:
- Requires a bit of set up
- More opportunity to ruin a workpiece if you make a mistake
BEST USES:
If you have multiple or oversized butterfly keys to flush up, this method will help you speed through it.
It’s also great for trimming edge banding — as long as you have a reliable way to keep the router stable.
TIPS FOR USE
-
STABILITY IS KEY: The most important thing is making sure your router base is stable and parallel to your workpiece. Make sure there’s no chance of tilting.
- CUT SLIGHTLY SHY: This method can be great for removing the bulk of material. But you can stop shy of completely flush trimming your material, then finish with hand tools to make sure nothing gets ruined.
FLUSH TRIM BITS
This method also uses a router, but throws a flush trim bit into the mix.
It won’t work for every situation, like when you need to trim something in the middle of a table.
But when it does work, it’s quick, easy, and accurate.
PROS:
- Quick and accurate (as long as you’re using a good flush trim bit)
- Works with handheld router or router table
CONS:
- Won’t work for every situation
- May need to create support surfaces to keep router from tipping
BEST USES
This is a great way to flush trim proud tenons or bridle joints on narrow leg assemblies.
The catch is that the bit’s bearing needs to reach past the top of the joint. You could also use a pattern bit with the bearing on the bottom, or a double bearing flush trim bit.
Flush trim bits can also work for edge banding. The issue here is router stability — so you’ll need to fashion a way to keep the router from tilting as you ride it along a narrow edge.
TIPS FOR USE:
-
USE A GOOD BIT: I’ve always gotten better results with spiral bits over straight bits, so I’d start there. Down cut bits are a good choice for edge banding, since they push fibers down into the material behind them and won’t cause tearout.
- DON'T GET SKETCHY: Trying to balance a router on a 1/2" wide edge as you flush trim edge banding is NOT a good idea. Always set up your cuts so they're as safe as possible and with minimal room for error.
CHISELS
Is there anything chisels can’ts do?
While you probably don’t want to use chisels for the bulk of flush trimming, they’re amazing for dialing things to absolute perfection.
With a razor sharp edge and decently flat back, you can shave proud joinery so flush it ceases to exist in a 3-dimensional plane.
That said, chisels work slowly. They're more of a fine-tuning tool than something you use for heavy material removal.
PROS:
- Zero set up time (besides sharpening)
- Super precise flush trimming
CONS:
- Access to certain areas limited by length of chisel
- Slow… which is a pro or con depending how you look at it
BEST USES
Chisels are great to use as a “finishing” flush trimmer.
Cut the bulk of the material away with a flush trim saw or other method, then use the chisel to shave away the rest.
They also really shine for cutting angled edges in odd places. Use a guide block at the correct angle to support the back, then take shavings until you can’t any more.
TIPS FOR USE:
-
TAKE SIDEWAYS SLICES: Even with a super sharp chisel, trying to power straight through material isn’t the best approach.
Make slicing motions, sliding the chisel laterally into what you’re flush trimming. The sheer cut makes for cleaner, easier cuts and leads to better results.
- USE GUIDE BLOCKS: Guide blocks help you cut at exact angles with zero guesswork or eyeballing. Read more about guide blocks and other chisel tips here.
ROUTER PLANES
While it’s not a common use, you can flush trim with a router plane.
The trick is to switch the blade shaft to the bullnose position, so the blade is facing away from the base.
With nothing in front of the blade, you can shave away proud inlays and joinery a little bit at a time.
Looking for a router plane? Check out the newly released KM-17 Router Plane in our store!
PROS:
- Cuts will be parallel to the sole of the plane
- Can incrementally take off material for a clean finish
CONS:
- Takes a long time
- Sole can get in the way of flush trimming large inlays
BEST USES
If you want to incrementally shave away material in a place your chisels won’t reach, this method is a great workaround.
It’s ideal for inlays in the middle of a workpiece with lots of surface area to keep your plane base stable.
TIPS FOR USE:
-
TAKE SLICES: Just like with a chisel, you’ll have better luck taking lateral slices than trying to power through material.
- KEEP THE SOLE FLAT: In the bullnose position, it’s easy for a router plane to tilt forward during a cut. Keep pressure on the base so it stays flat on your workpiece.
FLUSH TRIM FOR THE WIN
The best woodworkers know multiple ways to tackle a problem — and know which situations call for which approach.
With the methods listed above, you have the knowledge to flush trim anything. No matter the situation.
Use these strategies in unison or find the one that works best for you.
But in the end, knowing them all will make you a better (and happier) woodworker.
Got any of your own flush trimming strategies? Let us know in the comments below!
Follow us on Instagram @katzmosestools, on TikTok @katzmoseswoodworking, and check out my YouTube channel for more great woodworking content...
And as always, STAY SAFE IN THE SHOP!
1 comment
Chris
Very useful tips here, Jonathan, thanks! Can I add a couple of additional things from my experience (no criticism meant, just hope it’s useful!)
1. You could emphasize more the combination of techniques that can work (e.g. flush-cut saw – with layers of tape for safety – followed by chisel/plane/router) as a general strategy.
2. I’ve got a decent flush-cut saw, but I’ve still stoned the ‘flat’ side on a fine diamond stone, just to make sure there are no tiny factory nibs sticking down to mar the workpiece (and I still use tape – Sellotape/Scotch tape, don’t know what your brand names are over there; it’s thinner by far than say masking or painter’s tape: I use that. Its non-sticky side is actually slippery too, a bonus!)
3. I’m really sorry about this one (my daughters call me ‘Grammar Guy’ !😂) I noticed ‘weary’ instead of ‘wary’.