Unless you work exclusively with massive slabs, mastering panel glue-ups is a must for every woodworker.
It's how you transform narrow boards into wide panels for table tops, cabinets, and a host of other projects. And all it takes is gluing boards together along their edges.
Easy, right?
Not exactly. Because a lot can go wrong. And if it does, that means a lot more work for you.
Today, I'm sharing my favorite tips for better panel glue-ups — so you can save time, avoid frustration, and keep wood out of the dust collector.
These tips will help you get panels so flat right off the clamps, you'll have to put on 3D goggles to see them.
1. USE THE RIGHT BOARDS THE RIGHT WAY
As I explain in my blog about milling, the first step to successful projects is letting lumber acclimate to your shop.
If you rush home from the lumber yard and instantly start gluing up a panel, the results will be anything but flat.
The boards will twist and contort as their moisture levels change — and you’ll either have to start over or go ham with a hand plane.
The other thing to keep in mind is board orientation. If you plan to smooth out the panel with a hand plane, make sure you arrange the boards so the grain direction of each one matches.
2. MILL BOARDS TOGETHER
To get a panel that's flat on both sides, the individual boards need to be the same thickness.
And milling those boards together is one of the most effective ways to achieve uniformity.
Anytime you need to reset your planer to an exact measurement, you're introducing potential discrepancies. It can lead to ridges along the seams that need to be taken down with sanding or more planing — meaning wasted wood and a thinner panel than you planned for.
Just run all the boards through your planer one after the other until they're at the thickness you're after.
It may be common sense, but still worth saying.
3. USE THIS TRICK FOR PERFECT EDGE JOINTS
The edge joints connecting boards need to be close to perfect for a panel to sit flat. But that doesn’t mean those edges need to be 90°
Setting your table saw blade or jointer fence to exactly 90° ain't easy — and even small discrepancies lead to gaps in the edge joints.
But with this tip, you get perfectly fitting joints... even if your tools aren't perfectly square.
Here's how it works.
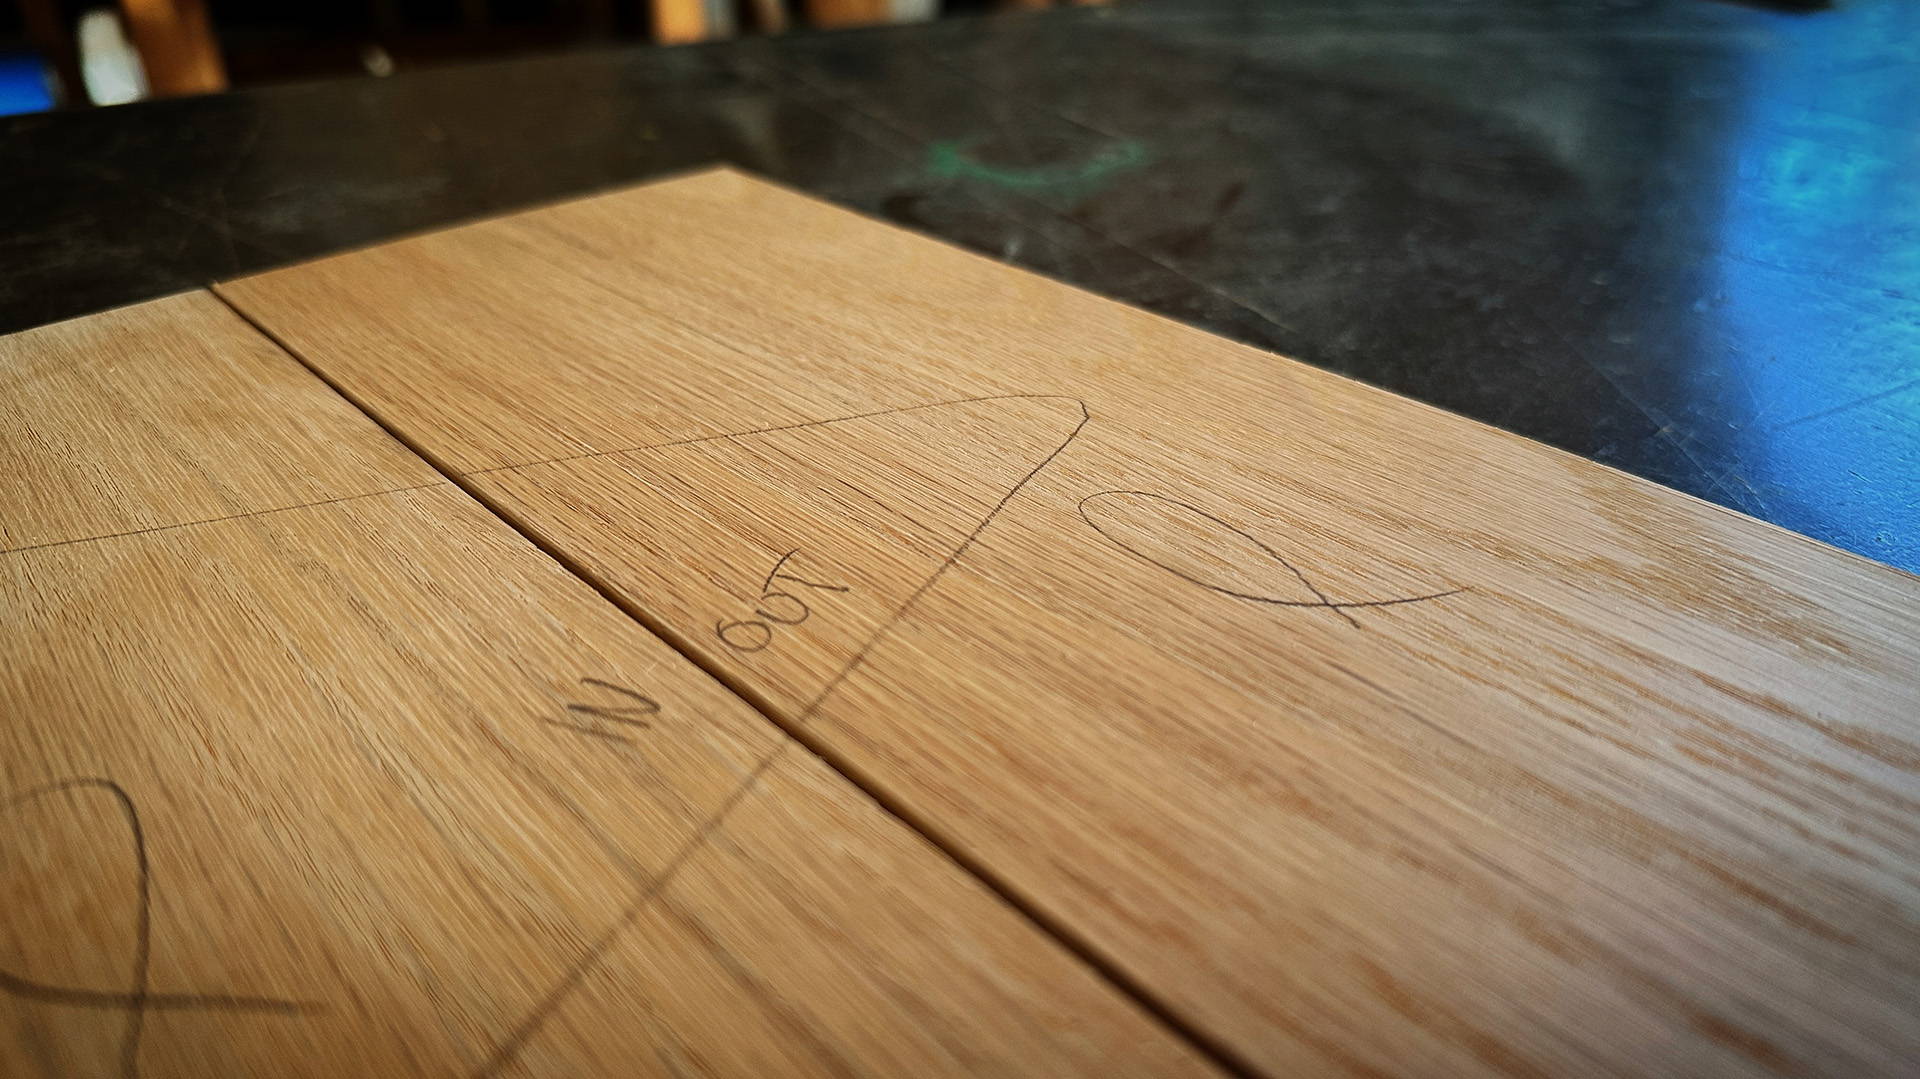
Dry assemble the individual boards next to each other how you want them oriented. Now write an "A" and "B" next to each mating edge so every side of a board has either one or the other.
When you go to cut the edge on your jointer or table saw, cut with the A sides facing out towards you (or up on the table saw) and the B sides facing in (or down) away from you.
Even if the cuts aren’t 90°, they’ll be complementary and lead to flat boards with perfect seams.
I recommend using this trick for every panel glue up, since it's basically an insurance policy against non-square cuts.
4. USE THE RIGHT CLAMPS
When it comes to gluing up panels, especially big ones, you really should use either pipe clamps or parallel clamps
These clamps create a flat surface for your boards to lay on so there’s nothing that stops them from being level (say if your workbench top isn’t 100% flat)
I like to do a clamp at both ends of the panel, then two in the middle from the other side. This provides good clamping pressure along the entire length and helps with cupping (more on that later).
But between pipe and parallel clamps, which should you choose?
Parallel clamps are like the Ferrari of panel glue-ups, but they're expensive. Pipe clamps work pretty much just as well (with maybe a bit more chance of cupping), and they're way more affordable.
The other nice thing about pipe clamps is they can be any length. All you need is a different length of pipe from your local hardware store.
Whatever you choose to go with, I recommend sticking to one brand / model. That way they'll be the same height and easier to keep level.
Want to make your own pipe clamps? Check out our 2-piece Pipe Clamp Hardware kits. Just add a ¾” pipe, and you've got a perfect clamp for panel glue-ups.
5. DON’T OVER-TIGHTEN THE CLAMPS
Clamps can exert a lot of pressure, and over-tightening them can bend your boards into cups.
If you're making a wine barrel, that's great. But not so much for tabletops.
Tighten each clamp incrementally, moving from one to the other in an alternating fashion (sort of like when you tighten the nuts on a car tire), then revisit each one for a second round.
You want the clamps tight without having to force them.
If you need to crank on them like a fire hydrant bolt to bring the board edges together, you should probably revisit those edge joints.
Quick Tip: The One Clamp Method
This is an old-school woodworking technique where you cut a slight concave in the middle of a board's edge. A hand plane works great for the job.
You can then pull the edges of two boards together with only one clamp in the middle, which creates a spring-like tension in the boards to create a tight joint.
6. USE CAULS
One of the biggest pitfalls of panel glue-ups is when the boards slide out of the same horizontal plane.
This leads to ridges along the seams — and you pretty much have to re-mill the entire panel to get it flat.
Luckily, cauls are an easy way to keep this from happening.
Cauls can be anything: metal bars, pieces of thick melamine, your ex's golf club collection. What matters is that they’re rigid and won’t get glued to the panel as well.
They sandwich around the top and bottom of the panel, held in place and pulled towards each other with clamps. This pulls all the boards in your panel into the same level
I generally use cauls at each end of a panel, and a set in the middle if the panel is on the longer side.
They can be a little tricky to set up, but start by loosely clamping one side then clamping the other.
7. GO EASY ON THE GLUE
You don’t need that much glue for a good edge joint
Too much is not only wasteful but can also just cause your boards to slide out of position.
Add enough glue to each board edge (though even just one side is fine) to create a thin film. As long as there’s a bit of squeeze-out along the entire seam (not a waterfall), you’re good.
Quick Tip: Add some anti-slide friction
To keep boards from sliding side to side, rub a bit of 220 sandpaper against itself above the edge. The little granules will help stop the boards from sliding without keeping edges from coming together. Fine salt works for this trick as well.
8. ADD JOINERY TO STRENGTHEN AND ALIGN EDGE JOINTS
Internal joinery is a more advanced way to keep boards aligned and add strength to a panel.
Dominos, biscuits, dowels, they're all fair game. What matters is that you use a quality tool for the job you trust. Nothing's worse than adding edge joint joinery that pulls your boards out of alignment.
Just know that this step isn't necessary. A good, simple glue joint will last for ages. But internal joinery definitely can help with alignment and provide security if the glue ever fails.
Looking for an affordable alternative to Dominos and biscuits? Check out this Doweling Jig we carry in our store.
9. LET GLUE PARTIALLY DRY BEFORE CLEANING
A good panel glue-up will inevitably lead to plenty of squeeze-out. And when you choose to clean up that excess glue makes a big difference.
I think the easiest method is to let the glue dry until it’s rubbery — not liquid but not super hard. This could be anywhere from the half-hour to one-hour range.
When it's there, use a chisel bevel down to clean it all away from seams in one fell swoop. It should come off clean and easy.
After a bit of sanding, there won’t be any splotches of glue left. And you don't have to mess around with wet rags or block planes.
TAKE THE PAIN OUT OF PANEL GLUE-UPS
Knowing how to be successful when gluing up panels takes a lot of frustration and wasted effort out of woodworking.
And with the tips above, you’ll have no problem getting perfectly flat panels of all sizes, right off the clamps.
Want to learn more about proper clamp technique? Read this.
Got any other tips for better panel glue-ups? Let us know in the comments below!
Follow us on Instagram @katzmosestools, on TikTok @katzmoseswoodworking, and check out my YouTube channel for more great woodworking content...
And as always, STAY SAFE IN THE SHOP!