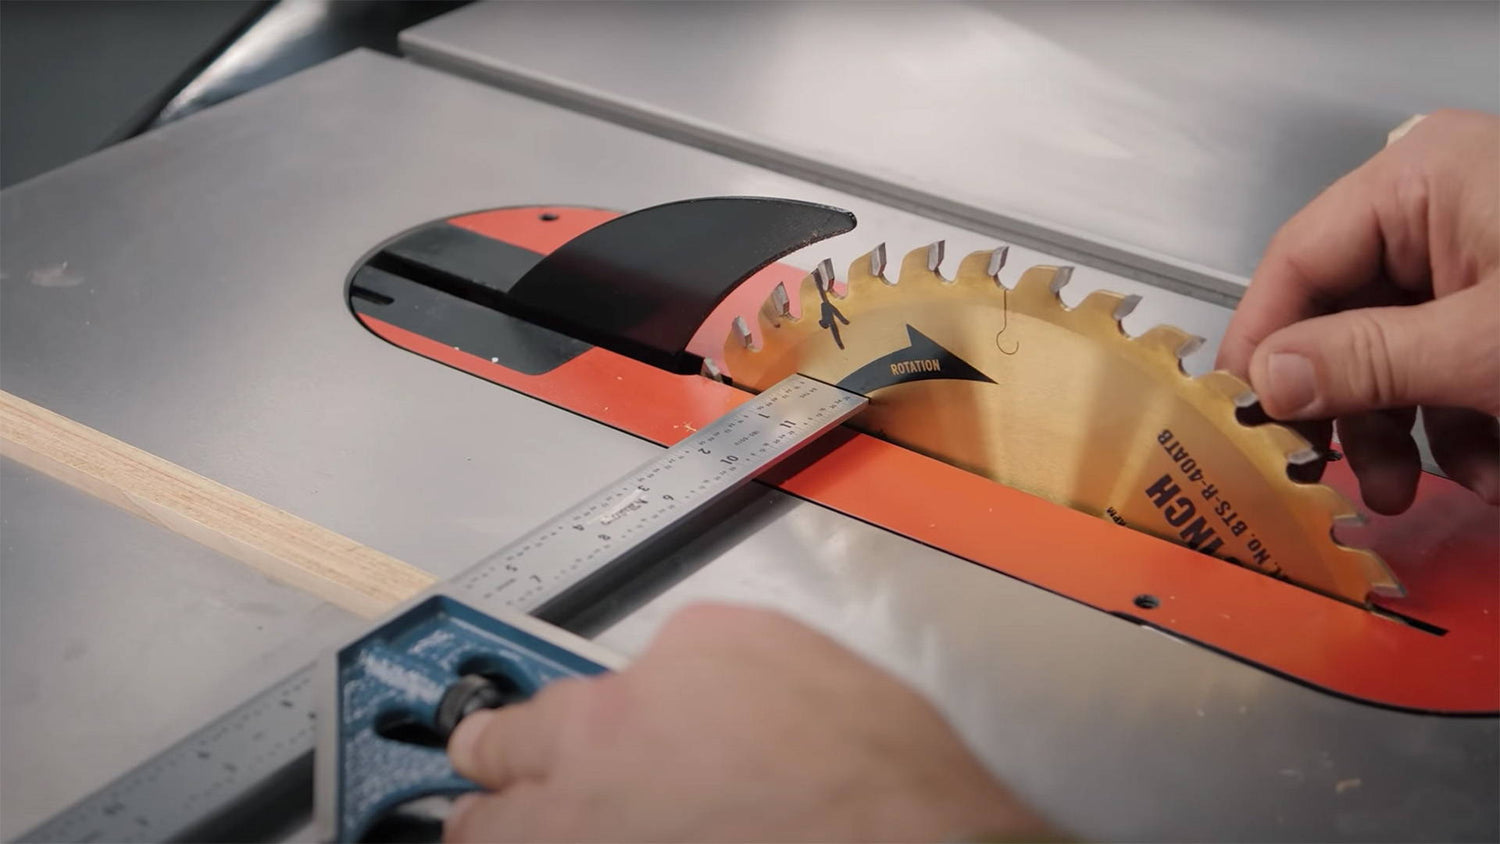
A huge part of table saw safety happens before your saw is even on.
I’m talking about blade alignment, where you check that the blade is parallel to the table top and fence.
Why does it matter? Well, it helps avoid kickbacks, reduces heat that can dull blades and burn wood, and improves your accuracy.
And if you’ve gotten a new or used saw, moved shops, experienced a kickback, or had an activation on a SawStop, it’s worth a check.
It might sound complicated. But checking blade parallelism is easy with a reliable square and a sharpie.
Here's how:
1. Unplug the saw. You’ll be handling the blade, so don’t risk injury.
2. Pick a saw tooth, any saw tooth. Make a small mark on the side of it with a sharpie. Pay attention to the tooth set (how the tooth angles away from the center of the blade).
3. Figure out which miter slot to reference. You want to use whichever one is closest to the blade tooth you marked (dependent on the tooth set).
4. Rest the fence of the square against the inside of the correct miter slot. Rotate the saw blade so the marked tooth is all the way at the front (user side). You can also use a strip of wood you know is square in the miter slot to hold the fence.
5. Adjust the blade of the square until it just barely touches the tooth. Test by moving the blade back and forth. You should hear and feel an extremely subtle scraping sound. Lock the square down here.
6. Rotate the saw blade so the tooth is now all the way at the back, and slide the square back as well. Test the same way to see how the tooth scrapes against the square.
If the tooth is scraping more than when it was at the front — or not touching the square at all — your table saw blade and table top are out of alignment.
Adjust the table top by a small fraction the correct way and check again. Reference a user manual to find out how to make this adjustment, but it's often done with a mallet (seriously).
Repeat until the tooth scrapes against the square the same way at the front and back. Your blade and table are parallel!
Want to make blade alignment easier and more accurate? Check out this Magswitch Universal Saw Indicator.
It drops right into your table saw’s miter slots, and clamps in place with just the push of a button.
Seriously. It has a pin that can switch on and off a magnetic force of 120 lbs. Epic.
The gauge pin gives you a precise number to check the parallelism of your blade, meaning greater accuracy, safer cuts, and less heat that dulls blades and burns wood.
You can also use the gauge to make micro-adjustments to your table saw fence, actually incorporating it into your woodworking.
Read this to learn more about tuning and setting up a table saw. And be sure to leave your thoughts in the comments below!
Follow us on Instagram @katzmosestools, on TikTok @katzmoseswoodworking, and check out my YouTube channel for more great woodworking content...
And as always, STAY SAFE IN THE SHOP!


9 comments
Yosy Wajcenberg
Hy Jonathan Katz-Moses
I take the time to read your articles carefully, which allows me to profit. I have implemented several of your explanations, which I appreciate. I am grateful for your tip and the cutting board at 45 and 90 degrees for hand cutting with a Japanese saw. I am inserting this wooden ruler into the groove of the saw table to align the blade.
Thank you.
Hag Succoth Smeah.
Yosi
Sean
No Ken. The new Hercules with the rack and pinion fence still doesn’t allow for blade adjustment as far as being parallel to the miter slots. I bought one and it was ridiculously out of alignment. Everything else about the saw seems like good quality but that one detail makes it an absolute piece of junk. Not worth buying. Mine went straight back. Ended up with a newer version of the kobalt table saw with rack and pinion fence. It was also out of square but the trunnions are adjustable on it so it is now extremely accurate.
No Ken. The new Hercules with the rack and pinion fence still doesn’t allow for blade adjustment as far as being parallel to the miter slots. I bought one and it was ridiculously out of alignment. Everything else about the saw seems like good quality but that one detail makes it an absolute piece of junk. Not worth buying. Mine went straight back. Ended up with a newer version of the kobalt table saw with rack and pinion fence. It was also out of square but the trunnions are adjustable on it so it is now extremely accurate.
Botch
I bought my Delta Contractor’s Saw in ~‘93, and my blade was not square with the miter slots. The hammer taps weren’t enough, and I had to turn the saw upside down, pull the body/trunnion off the table, and then file the four holes open a bit to allow for just a bit more twist; a huge pain.
I didn’t use a square; I held a 1/4" dowel tightly against the miter gauge, cut it with the blade, and then listened to the “zzt-zzt” sound as the dowel grazed the back of the blade, still running. I then moved the miter to the OTHER gauge slot, on the other side of the blade, and did the same operation. Once the ‘zzt-zzt" sounds from the dowel were the same on both sides, I knew my blade was square to the table. Ajusting the fence was cake, after that.
I’ve never used any offsets, and have never had burning/kickback issues. It fortunately kept its alignment moving from ND to UT, and I’m still happily using that 30-yr-old saw!
Love all the content and hints!
Ken
I’m a budget woodworker (a.k.a. “cheap”). I found the blade on my Hercules jobsite saw from HF was out of alignment and there is no adjustment whatsoever for neither it nor the fence. The word doesn’t appear in the user manual, and inspection reveals nothing to adjust. I retired that and got the Skil jobsite saw that has easy adjustment of the blade and the fence, the latter being of much better design. It’s possible to get reasonable tools at a reasonable price, but you need to know what to look for and do your homework. I didn’t and paid twice, for which I could have bought a more upscale saw once. :’(
ps: the HF saw in the store has been upgraded with a rack-n-pinion fence. I don’t know whether they fixed these other issues, though.
Mark
@Tom – the problem with canting the rip fence away from the blade at the out-feed end is that you can never use the fence on the left side of the blade. While a very rare technique – I have found it very useful on some rare occasions to do just that. Canting the fence on the out-feed side also calls into question why we are buying all these precision tools to set the blade and fence as well as why a good quality splitter or riving knife properly set behind your blade is actually doing its job. Everyone is so concerned, apparently, that we need to allow for the wood to move away from the blade after the cut so it doesn’t get pinched by the blade and fence. But more logically, why wouldn’t the wood being cut on the left of the blade, which can move freely, not provide relief from stress, causing pinching?
@Tom – the problem with canting the rip fence away from the blade at the out-feed end is that you can never use the fence on the left side of the blade. While a very rare technique – I have found it very useful on some rare occasions to do just that. Canting the fence on the out-feed side also calls into question why we are buying all these precision tools to set the blade and fence as well as why a good quality splitter or riving knife properly set behind your blade is actually doing its job. Everyone is so concerned, apparently, that we need to allow for the wood to move away from the blade after the cut so it doesn’t get pinched by the blade and fence. But more logically, why wouldn’t the wood being cut on the left of the blade, which can move freely, not provide relief from stress, causing pinching?
John Carlson--Canada
Thank you—your system works well. I appreciate you taking the time to help us get it right. Incidentally, when your workshop apron was first offered I purchased one for one of my sons. He loves it and uses it all of the time when he’s in my shop. The last time my wife and I visited him he cooked us dinner and was wearing your apron as he prepared a stake dinner. One thing he will not do is wipe the glue off on the apron :)———————cheers and thank you.
Thank you—your system works well. I appreciate you taking the time to help us get it right. Incidentally, when your workshop apron was first offered I purchased one for one of my sons. He loves it and uses it all of the time when he’s in my shop. The last time my wife and I visited him he cooked us dinner and was wearing your apron as he prepared a stake dinner. One thing he will not do is wipe the glue off on the apron :)———————cheers and thank you.
Anonymous
@Mike
You’ve received bad advice or misunderstood what you were told.
You want the BLADE to be perfectly parallel to the miter slot. On the other hand, it’s not uncommon to want to have the “away” side of the FENCE a few thousands further away from the slot.
@Mike
You’ve received bad advice or misunderstood what you were told.
You want the BLADE to be perfectly parallel to the miter slot. On the other hand, it’s not uncommon to want to have the “away” side of the FENCE a few thousands further away from the slot.
Christoph
i have a big old Martin panel saw from the 60s and it is actually aligned such that the teeth at the back of the blade are just NOT touching the wood when you rip against the fence (you can hear it when you push a piece of wood through and also measure it). The trick that I didn’t realize at first is that the sliding table is also aligned such that the back teeth are not cutting. In the end there thus is a small angle between the fence and the sliding table as well. When you think about it, that actually doesn’t compromise accuracy at all, because you should not crosscut with the sliding table while pushing against the fence anyway.
i have a big old Martin panel saw from the 60s and it is actually aligned such that the teeth at the back of the blade are just NOT touching the wood when you rip against the fence (you can hear it when you push a piece of wood through and also measure it). The trick that I didn’t realize at first is that the sliding table is also aligned such that the back teeth are not cutting. In the end there thus is a small angle between the fence and the sliding table as well. When you think about it, that actually doesn’t compromise accuracy at all, because you should not crosscut with the sliding table while pushing against the fence anyway.
Mike
I’ve gotten advice to set the “away” side of the blade a few thousandths further from the slot than the “near” side to make sure there is no binding. I’ve done this with a dial indicator mounted on a homebrew runner. .What do you think?
Thanks for all the tips and videos, they have all been very useful.