


Of all the edge profiles out there, you really only need to know how to cut two: Chamfers and roundovers.
Whether it’s to break a sharp board edge, add decorative detail, or serve as a functional feature, almost every project calls for chamfered or rounded edges.
And routers are often seen as the tool of choice for getting them done.
But newer woodworkers may not realize you can cut chamfers and roundovers with a TON of different tools…
Some of which work even better than routers in certain situations.
Today, I’m explaining how to cut chamfers and roundovers with 9 different tools — including the pros, cons, and a few tips for each technique.
Versatility is key to becoming a better woodworker…
And this post will have you ready to cut edge profiles no matter the situation.
TABLE OF CONTENTS
1. SANDPAPER FOR CHAMFERS AND ROUNDOVERS
It may not be the most sophisticated approach, but sandpaper can get the job done creating chamfers and roundovers.
Sandpaper is best used when you just want to break a sharp edge without adding much of a profile.
PROS
- Readily available
- Minimal set up time
- Can be used after assembly
- Can get into tight corners and hard to reach areas
CONS
- Difficult to get an even chamfer (works better for roundovers)
- Slow method if you want a large edge profile
TIPS
- Add edge profiles after all other sanding is done
- Use a higher grit sandpaper (220+) for more control and a cleaner finish
- Sanding blocks make a difference: Use a hard block for chamfers and a padded block for roundovers
- Long strokes along the entire edge produce more even results
2. CHISEL FOR CHAMFERS AND ROUNDOVERS
Chisels are great for cutting chamfers and roundovers on very short edges — like the edges of proud tenons or dovetails.
These short edges don’t provide much reference surface for a router or even a block plane. But a chisel and a steady hand do the trick.
PROS
- Everyone has a chisel
- Zero set up time
- Excellent for super short edges
- Can be used after assembly
CONS
- Takes skill and a steady hand to get an even chamfer or roundover
- Need to be careful of digging too deep or tearout at corners
- A bit slow
TIPS
- Make sure your chisel is sharp
- Use chisel bevel down for longer edges so you can adjust cutting depth by tilting the chisel up or down
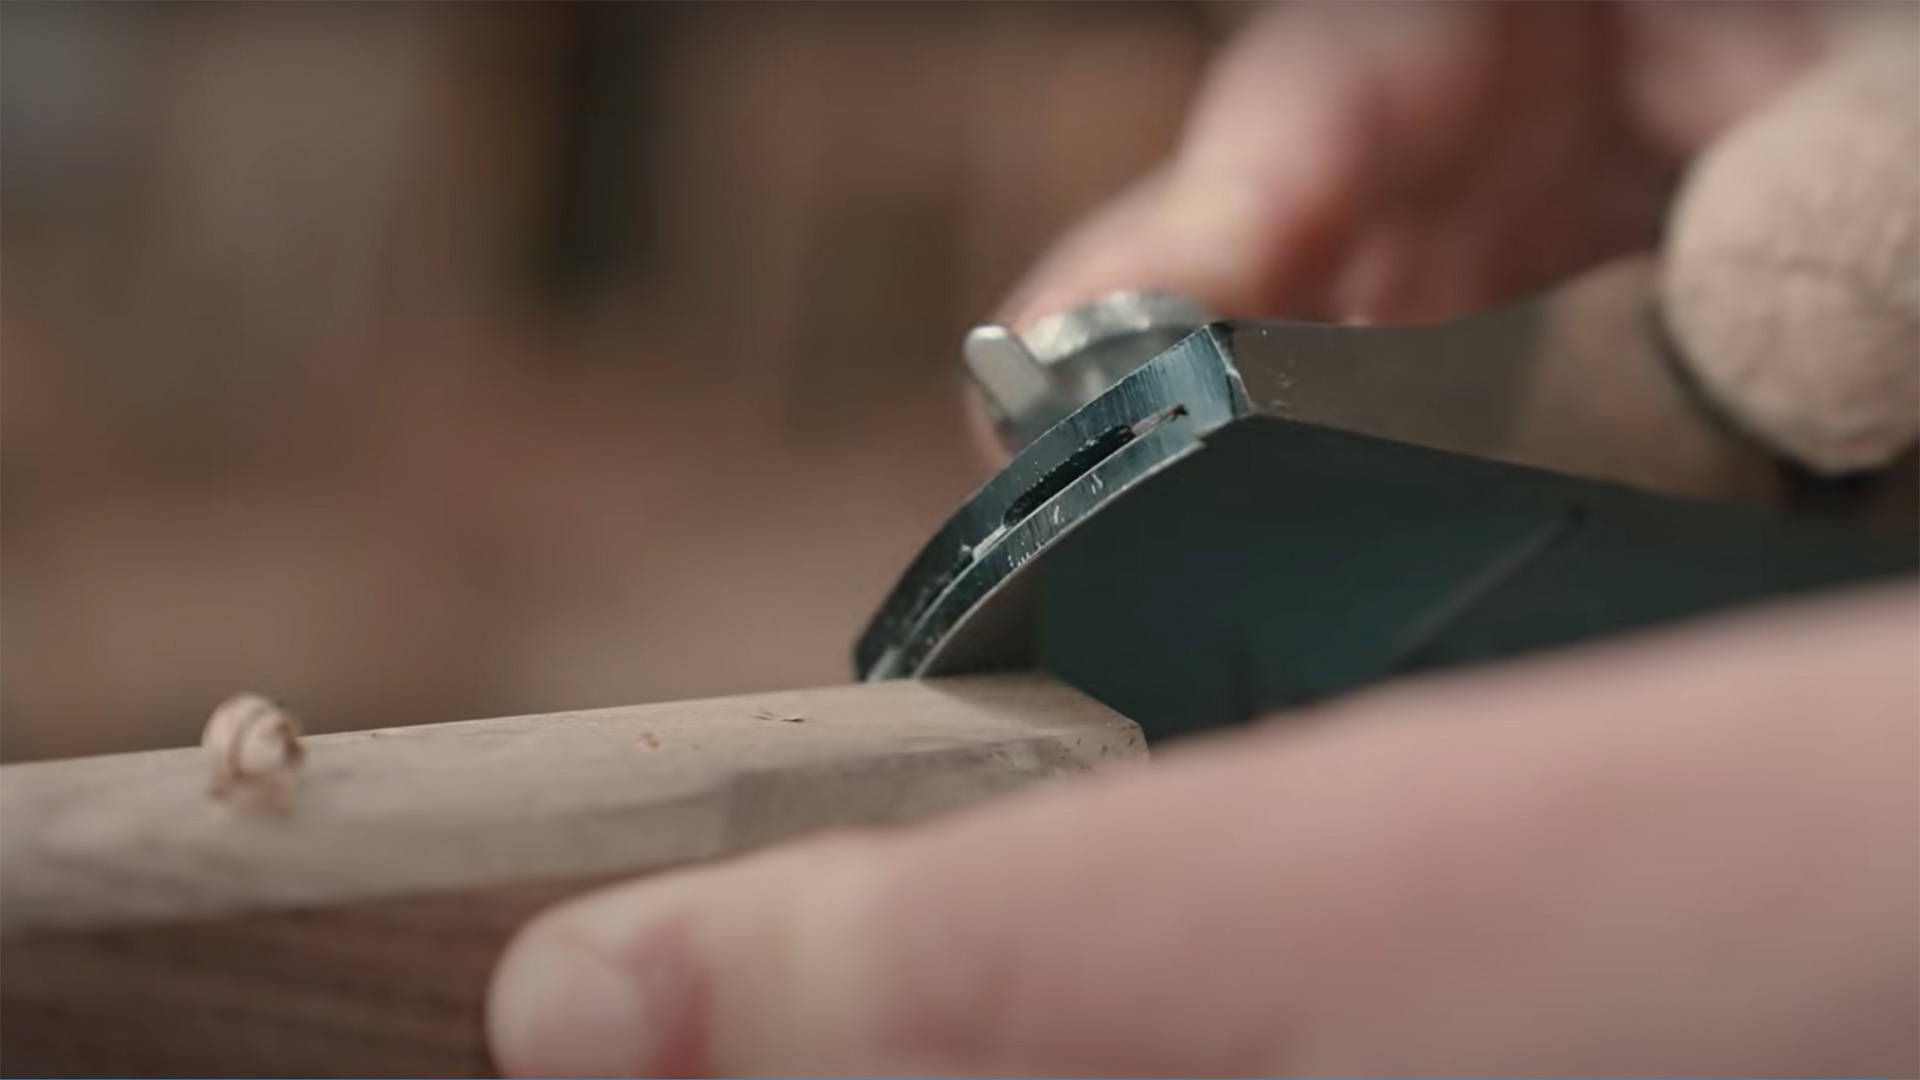
3. HAND PLANE FOR CHAMFERS AND ROUNDOVERS
One of my favorite ways to quickly break an edge is with a hand plane — specifically, a block plane.
I keep my block plane set up for thin shavings so I can quickly grab it and create a small edge profile with just a few strokes.
PROS
- Can quickly break edges and create small chamfers or roundovers
- Zero to Minimal set up time (if plane is properly set up)
- Lots of control over size of edge profile (and angle of chamfers)
- Creates an ultra clean and smooth edge
CONS
- Not very efficient for large edge profiles
- Takes skill to make chamfers a consistent angle along entire edge
- Need to be careful with tearout when planing end grain edges
TIPS
- To create consistent edges, count the number of strokes for each edge
- For chamfers, use your fingers as a gauge to hold the plane sole and keep it at a consistent angle to the workpiece
- For roundovers, make multiple light passes with the plane at different angles
4. 2-IN-1 CHAMFER & ROUNDOVER PLANE
This is a super cool hand tool we just started carrying (get it here). It’s made specifically for cutting even chamfers and roundovers by hand.
The 90° sole wraps around the edges of your workpiece, making sure the edge profile is perfectly centered.
PROS
- Minimal set up time
- Cuts perfectly even chamfers and roundovers
- Leaves a smooth, finish ready edge
- Can be used after assembly
CONS
- Limited to 45° chamfers up to 3/16” deep and ⅛” radius roundovers
- Specialty tool not everyone has
TIPS
- Make multiple small passes to get the best results
- If blades seem dull, rotate them to a fresh edge (extra third blade included as well)
5. DRAWKNIFE FOR CHAMFERS AND ROUNDOVERS
Drawknives aren’t as common in modern workshops, but they’re surprisingly versatile (and fast) tools.
A drawknife wouldn’t be my first choice for cutting chamfers.
But they’re often used for rounding the legs and other parts of Windsor style chairs.
PROS
- Zero set up time
- Total control over size, shape, and angle of edge profiles
- Can be used after assembly
CONS
- Takes skill to cut even, straight edge profiles (especially chamfers)
- Easy to cut too deep or dig in
TIPS
- Play around with using the drawknife bevel down and bevel up to see which works best for you
- Plan to follow up with another tool to clean and even out edges (spokeshave, sandpaper, etc.)
6. SPOKESHAVE FOR CHAMFERS AND ROUNDOVERS
I think of spokeshaves as a sort of cross between a drawknife and a block plane — and that makes them excellent for breaking edges.
The sole helps you maintain an even cutting depth, but is also short enough to be effective on concave edges.
If you need to chamfer or round over edges on a concave curve (like some table legs), a spokeshave is the hand tool for the job.
PROS
- Zero to minimal set up time
- Lots of control over size, shape, and angle of edge profile (though depth of chamfers is limited by the width of the blade)
- Excellent for chamfering or rounding over concave edges
- Can be used after assemly
CONS
- Tricky to stay at consistent angle through every cut across every edge (chamfers will be trickier than roundovers)
- Slow way to cut large edge profiles
TIPS
- When you start a cut, lock your wrists to keep the spokeshave at the same angle across the entire edge
7. JOINTER FOR CHAMFERS
Jointers are lesser known for cutting chamfers, but they do a good job of it.
All you need to do is tilt the fence to the appropriate angle. Then run boards through similar to how you normally edge joint.
PROS
- Quickly cut chamfers of almost any angle and size
- Little set up time, just need to adjust fence angle
CONS
- Edge might need touching up to be finish-ready
- A little awkward and scary to joint board at an angle (might just be my history with jointers)
- Has to be done before assembly
TIPS
- Make multiple small passes (don’t try to cut big chamfers in one pass)
- Know how to stay safe with a jointer, including adjusting fence position to expose less of the blade and using push paddles
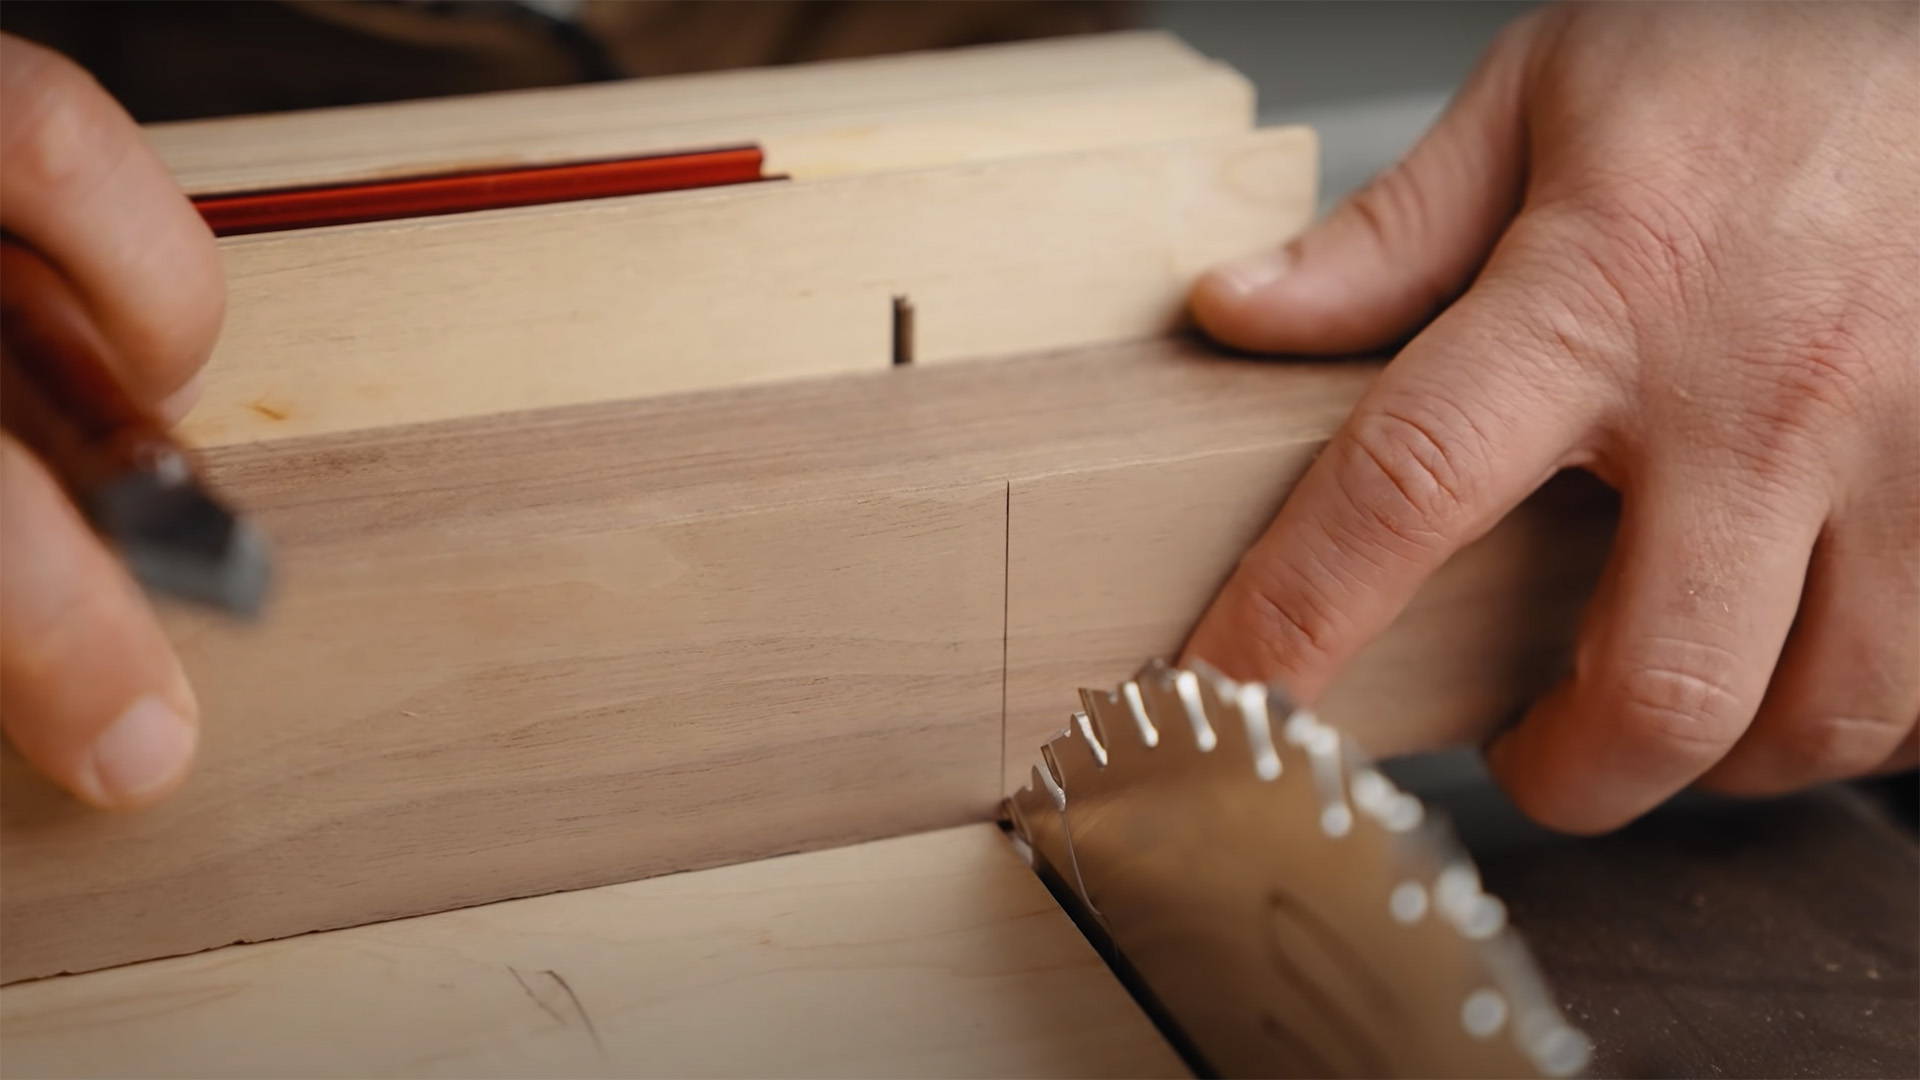
8. TABLE SAW FOR CHAMFERS
Table saws are a great way to quickly cut chamfers big and small — and really don’t take that much set up time.
I like to use a sled with a fresh kerf cut into the fence. This makes it easy to know where to line up cuts when the blade's at an angle.
PROS
- Can quickly cut multiple perfectly even chamfers of exact same dimensions
- Total control over size and angle of chamfers
- Not too much set up time
CONS
- Chance of burning, tearout, or saw marks
- Needs to be done before assembly
TIPS
- For large chamfers, cut just shy of your final depth, then follow up with a finishing cut to prevent burning
- Consider blade choice: crosscut blades might work best for small chamfers to minimize tearout, but ripping blades might be best to prevent burning in large chamfers
- To find the right depth, nudge fence or stop block over incrementally and make test cuts
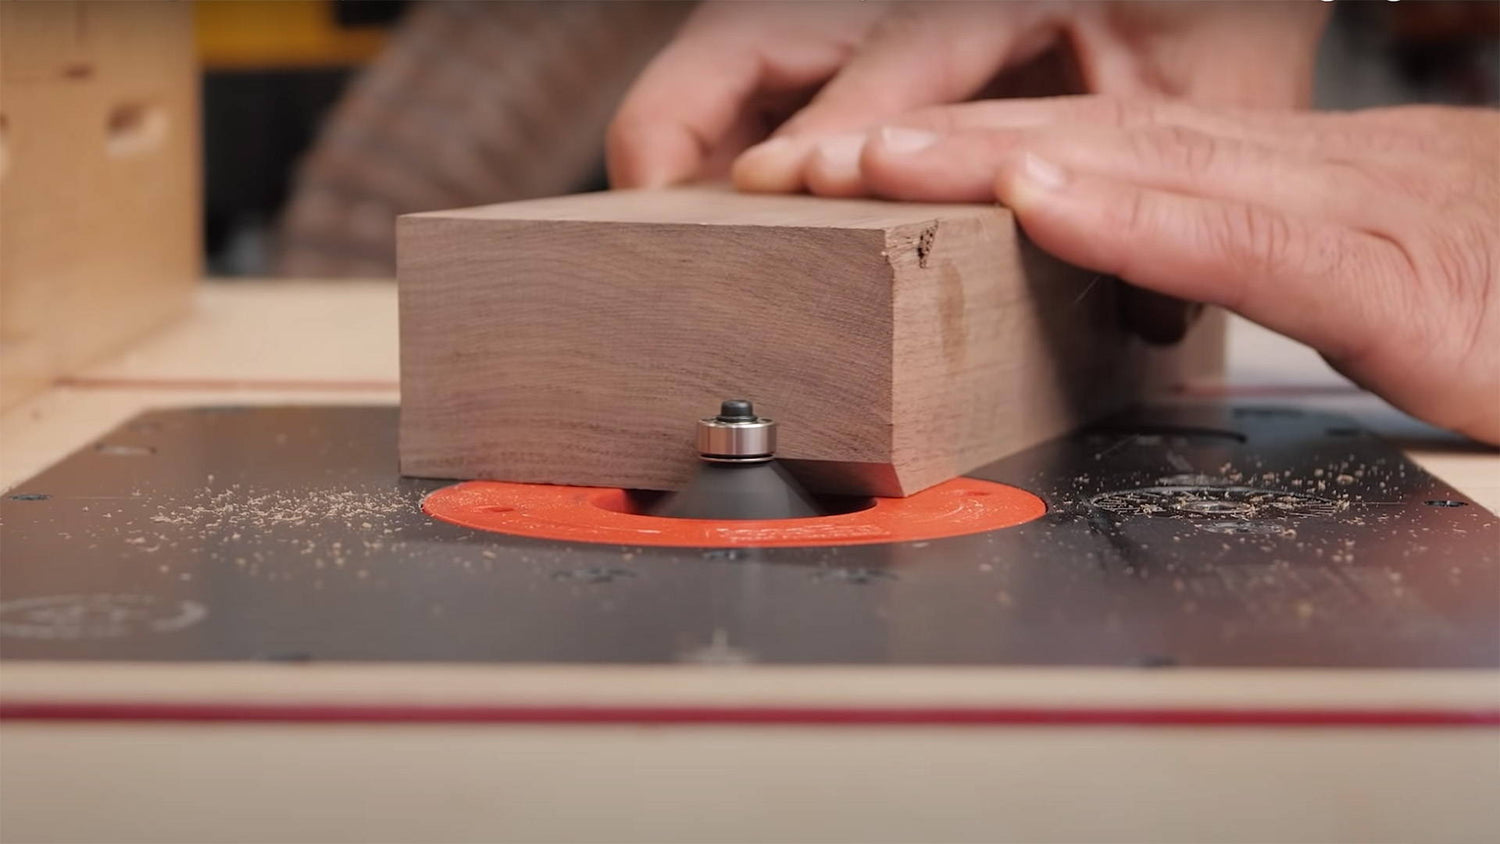
9. ROUTER FOR CHAMFERS AND ROUNDOVERS
Now onto the Queen of edge profiling: the all mighty Router.
Handheld routers and router tables are probably the most common way to cut chamfers and roundovers — and for good reason.
Although they take a little set up, they give you perfectly predictable results.
PROS
- Perfectly even and identical edge profiles all the way around
- Once everything’s set up, can quickly cut multiple edges
- Can sometimes be used after assembly
CONS
- Chance of burning and tearout
- Requires a bit more set up (especially handheld routers)
- Limited by the router bits you own
TIPS
- Cut large edge profiles incrementally, not all at once (prevents burning and keeps you safe)
- Do end grain edges first, then long grain to clean up any tearout
GET EDGY
Unless you’re a fan of roman ogees (ew), you’ll likely use chamfers or roundovers in every woodworking project.
And by knowing all the different ways to cut them — and which situations each method is best suited to…
You’ll become a more versatile and overall better woodworker.
Want to learn more? Here’s how to stay safe while cutting big edge profiles on a router table.
What’s your favorite way to cut chamfers and roundovers? Let us know in the comments below!
Follow us on Instagram @katzmosestools, on TikTok @katzmoseswoodworking, and check out my YouTube channel for more great woodworking content...
And as always, STAY SAFE IN THE SHOP!
1 comment
Andre
Rocket Soccer Derby is not just a game; it’s a genre-defying experience that combines soccer, car racing, and simulation elements effortlessly. https://rocketsoccerderby1.gitlab.io/
Rocket Soccer Derby is not just a game; it’s a genre-defying experience that combines soccer, car racing, and simulation elements effortlessly. https://rocketsoccerderby1.gitlab.io/