


Does this sound familiar?
You see a piece of furniture for $500 and think, “I could build that for less.”
Next thing you know, you’re a couple thousand dollars into tools. Woodworking's a blast, but it ain't cheap.
Here’s the thing. While some tools are essential, there are other “nice to have” tools you can get by without.
All it takes is a little creativity — and this all-in-one DIY track saw is a perfect example.
I'm going walk you through how to build and use this sled…
So you can keep woodworking without breaking the bank.
WHY BUILD THIS SLED?
Track saws are amazing for getting straight cuts with a handheld saw. But if you’re reading this, you know they cost a pretty (ugly) penny.
So I got to thinking. What's one of the first tools most hobbyists or DIYers buy?
A circular saw, a.k.a. skilsaw.
So I set out to build a sled that not only gave me straighter cuts with a circular saw — but had even more functionality than traditional track saws.
Through trial and error (heavy on the error), I came up with a circular saw sled capable of accurate ripping and crosscutting from 45° to 90°.
It can even help you put off buying a table saw for a while (to an extent).
And best of all, you can adapt it to your exact needs.
HOW TO USE THE SLED
The sled consists of a base, a top and bottom fence, and hold down clamps.
They’re used in different ways depending on the type of cut.
RIPPING OR CUTTING PANELS
Say you need to cut a panel of plywood into a 2 foot wide piece.
First, lock down the bottom fence so it’s square to the zero-clearance ripping edge (the picture below is setting up for a 45° cut, but it's the same idea).
Mark 2 feet on the plywood sheet, and set your sled on top.
With the bottom fence flush against the reference edge of the plywood, line up the zero-clearance edge with the line you marked.
The bottom fence makes sure the zero-clearance edge is square to the reference edge of the panel — so you only need to measure at one end (instead of both ends like you would with a straight edge).
Lock the hold down clamps onto the panel so it’s steady. You can also use the clamping block or other clamps to further tighten it down.
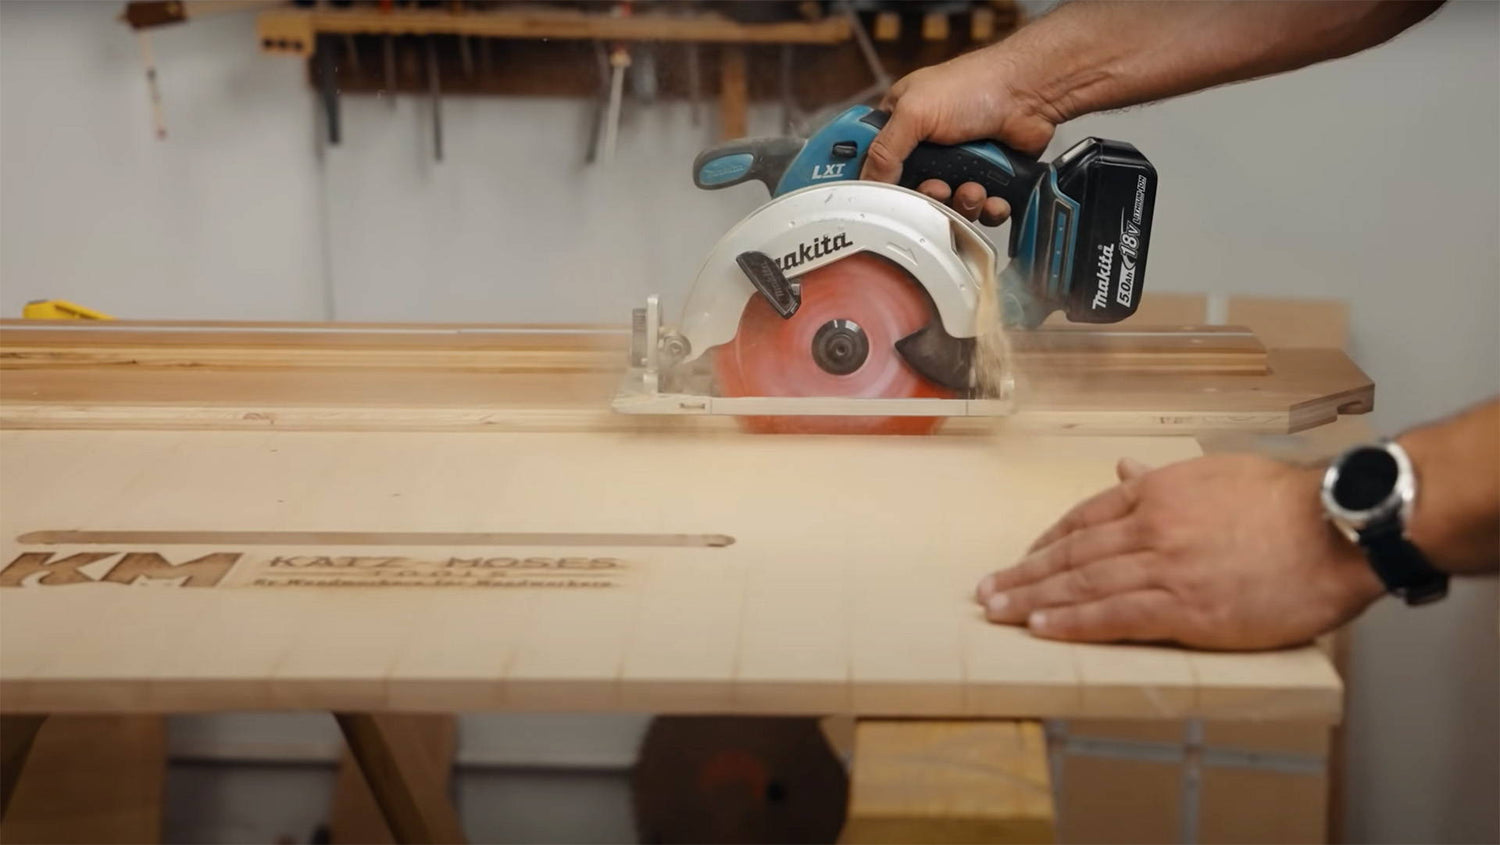
Set your circular saw on the sled with the base against the top fence. Put light lateral pressure into the fence as you make the cut, and you’ll get a straight, square edge.
Want to make a cut that isn’t 90°? Just adjust the bottom fence to the appropriate angle and follow the same steps.
CROSSCUTTING
Lay the board you’re crosscutting on the base so it’s flush against the top fence.
Line up your marking knife or pencil line with the 90° crosscut zero-clearance edge, and lock the board in place with the hold down clamps on the top fence.
Flip the sled upside down and set the bottom fence to the 90° position.
Clamp the sled to something stable, then make your cut with the edge of your circular saw riding along the bottom fence.
To make 45° crosscuts (say for mitered picture frames), set the bottom fence to the 45° position and follow the same steps.
It’s dead simple to use. And you can build it in less than an afternoon.
MATERIALS
Besides plywood, we carry all the necessary materials for this sled in our store.
1. CUT THE BASE AND TOP FENCE
Start by breaking down plywood for the base and top fence.
The dimensions depend on your circular saw and how you plan to use the sled.
For reference, I made the base 7 inches wide and 50 ½ inches long, and the fence 3 inches wide and 45 ½ inches long.
Note: Cut the base a little wider than the final dimensions you’re after. You need to leave some extra meat for cutting the zero-clearance edge later on.
You can make it longer if you like — say for breaking down 8 foot sheets of plywood (just be careful to not knock off any heads when you swing it around).
The important thing is that the top fence be shorter than the base. This lets you to flip the sled over and cut zero clearance sides for 90° and 45° crosscuts.
NO TABLE SAW TIP:
No table saw? No problem.
The only edge that needs to be straight is the side of the top fence your circular saw rides against.
If you don’t trust yourself to cut a straight line, use one of the pre-cut edges of your plywood for this reference edge (just double check to make sure it’s straight).
Even if the base comes out wonky, it’ll work perfectly once you cut the zero-clearance edge.
2. INSERT T-TRACK
You’re going to cut two grooves in the bottom of the base, and one in the top fence for t-track.
If you’re using the t-track we carry, cut the grooves ¾ inch wide and a hair deeper than ⅜ inch.
I use a dado stack, but a router with an edge guide works too.
The placement of the groove in the top fence isn’t critical. Just make sure the hold down clamps will be able to reach the base.
Cut the grooves in the base so your circular saw blade won’t hit any t-track when you cut the zero clearance edge. I offset these grooves from the edges by 1 ½ inches.
Once the grooves are cut, lay in the t-track and secure it with screws. For the bottom base, insert t-track to match the length of the fence (leaving none at one end for zero-clearance edges).
3. ATTACH TOP FENCE TO BASE
The top fence doesn't need to be square to the base — but try to get it close.
Make sure to offset the fence forward on the base. The side where it doesn’t reach is where you’ll later cut zero-clearance edges for crosscuts.
Spread a layer of glue over the bottom of the fence and lay it in position. Make sure wherever you place it, your circular saw blade won’t hit t-track when you cut the zero clearance edge.
I use a few pin nails to secure the fence while the glue dries. You can just clamp it and wait — but the pin nails let you keep going.
4. CUT THE ZERO-CLEARANCE REFERENCE EDGE
Once the fence is securely attached to the base, you can cut the zero-clearance edge.
Check to make sure your circular saw blade is actually at 90° to its base.
Secure the sled to your workbench or a couple sawhorses with some clamps. Be careful not to cut into anything you don’t want to.
Then with the side of your circular saw resting against the fence, make a cut along the full length of the base.
Make sure to keep the saw against the fence for the entire cut.
You’ve now got a reference edge that’s perfectly parallel to your fence. I recommend labeling it with a sharpie or pencil so you don’t get confused later on.
5. MAKE THE BOTTOM FENCE AND CLAMP BLOCK
The bottom fence serves two functions: It rests against stock to keep the sled square during rips, and works as the fence for your saw to ride along during crosscuts.
I made mine out of maple for its strength and stability — but you could use plywood as well.
Mill it so it’s straight and square on all sides. Mine came out to 14 inches long and 1 ½ inch wide.
You’ll then drill a ¼ inch hole and cut a ¼ inch slot for t-bolts to fit through. You can figure out the length and spacing with a combo square.
Lay the bottom fence across the base, using the square to keep it at 90° (make sure the combo square fence is referencing your freshly cut zero-clearance edge).
Mark the points where it crosses the t-track.
Then do the same for a 45° angle. Lay the square against it so one point you marked is still over the t-track, then mark where it crosses on the other side.
Drill a ¼ inch hole through the fence at the single point you marked. Then use a router to cut a slot between the other two points (you can also just do two slots — up to you).
SLOT ROUTING TIP
I recommend using a spiral upcut bit for cutting slots.
It clears out material quickly so you don’t overburden your router.
Also, cut the slot in multiple passes, taking about ¼ inch at a time. Trying to cut the full depth in one pass won’t be good for the bit or your router.
And if you want to get your hands on the 3x3 Custom 6-in-1 Universal Trim Router Jig in the pic above, sign up for our second release here.
Slide some t-bolts through the bottom fence and insert them in the two rows of t-track. Double check that the fence can be locked down from 90° to 45°, and adjust the slot as necessary.
If you want a bigger range of angles, just make the slot longer.
The clamp block is just a piece of wood with a ¼ inch hole drilled through. You can use it to better secure the sled to a workpiece during rips.
6. SET UP THE BOTTOM FENCE FOR CROSSCUTS
To use the bottom fence as a saw guide for crosscuts, we need to drill a couple more holes.
(I didn’t realize this until halfway through the build, but the t-bolts and locking knobs can get in the way of the saw motor if you're trying to make crosscuts with the sled upside down.)
Drill a ¼ inch hole through the top fence and base (at the end where the base extends further).
Flip the sled upside down, then put a t-bolt through the hole in the bottom fence and the hole you just drilled.
Use a combo square to get the bottom fence 90° to the reference edge, then lock it down with the knob and a clamp.
Drill a hole through the slot that again passes through the top fence and base (you could just go through the base, but then you’d need to countersink the end of the t-bolt).
Insert another t-bolt and locking knob to secure the fence. Now you can make a pass with your circular saw to get a zero-clearance edge for 90° crosscuts.
Do the same with the bottom fence at 45°. Position the bottom fence with a square, drill a new hole, lock it down, then cut a 45° zero-clearance edge.
7. FINISH AND ASSEMBLE
Time to slather this sucker down with your favorite finish.
Shellac or cutting board conditioner are both good options for protecting the plywood and keeping your saw riding smoothly over the base.
Once the finish dries, put it all together — and you’re ready to get cutting.
VARIATIONS
This design is fully modifiable to your needs.
For example, you can make a version for cutting 45° bevels for miter joints.
Follow all the same steps, but have your circular saw set to cut at 45° when you trim the zero-clearance edges.
You could also put another line of t-track in the top of the base next to the fence for an adjustable stop block (like the Katz-Moses No Deflection Stop Block).
Lock down the stop block, and you can butt stock against it to make multiple equal length cuts.
Depending on the make of your circular saw, you might even be able to come up with a way to get the saw to attach to a track so there’s no risk of going off your line (like a real track saw).
I didn’t want to mangle my saw’s base plate, and the fence works just fine when used correctly. But if you have an idea, I’d love to hear it.
BUILD WITH THE TOOLS YOU ALREADY HAVE
Track saws are no doubt useful. But with a little creativity, you can get by just fine without one.
Hopefully, this DIY track saw inspires you to find solutions to your tool limitations — and helps you get cuts as square as the Minecraft universe.
Got any ideas for improving or modifying this circular saw sled? Let us know in the comments below!
Follow us on Instagram @katzmosestools and check out my YouTube channel for more great woodworking content...
And as always, STAY SAFE IN THE SHOP!
5 comments
Liz
I found this tutorial looking for a way to do certain things if you only have a skilsaw. However the instructions require one to have the tools that this is designed to be a solution for not having in order to create the solution.
I found this tutorial looking for a way to do certain things if you only have a skilsaw. However the instructions require one to have the tools that this is designed to be a solution for not having in order to create the solution.
Trevor
Cutting some holes for handles and wall hanging and just to reduce some weight might be a good idea if possible, too.
Cutting some holes for handles and wall hanging and just to reduce some weight might be a good idea if possible, too.
Brian
I’ve been dying to make one of these. Your plans look perfect, thank you! I don’t have a dado for my table saw though. Any tips for using a Ryobi trim router instead? Shallow passes and get good at changing batteries?
I’ve been dying to make one of these. Your plans look perfect, thank you! I don’t have a dado for my table saw though. Any tips for using a Ryobi trim router instead? Shallow passes and get good at changing batteries?
Scotty
Please do a video on this.
Please do a video on this.
Anonymous
Just have a wider fence to allow the saw to miss the knobs.
Just have a wider fence to allow the saw to miss the knobs.