Half-blind dovetails are more than just pretty — and not because love is blind (lies, lies I tell you).
They’re actually a super utilitarian woodworking joint.
Sometimes called lapped or half-lapped dovetails, they’re used for drawer faces or on any piece where you don’t want exposed end grain on one side.
But don’t be intimidated by their looks.
If you can cut through dovetails, you can definitely master their myopic counterparts.
Most of the joint is hidden — so you really only need to worry about precision on the show faces.
I’m going to walk you through how to cut half-blind dovetails by hand — and throw in a few tips to make them look like the work of an expert.
A lot of the process is the same as regular dovetails, so I’ll breeze through some of the steps. If you’ve never cut dovetails before, I recommend you first look at this.
WHAT ARE HALF-BLIND DOVETAILS?
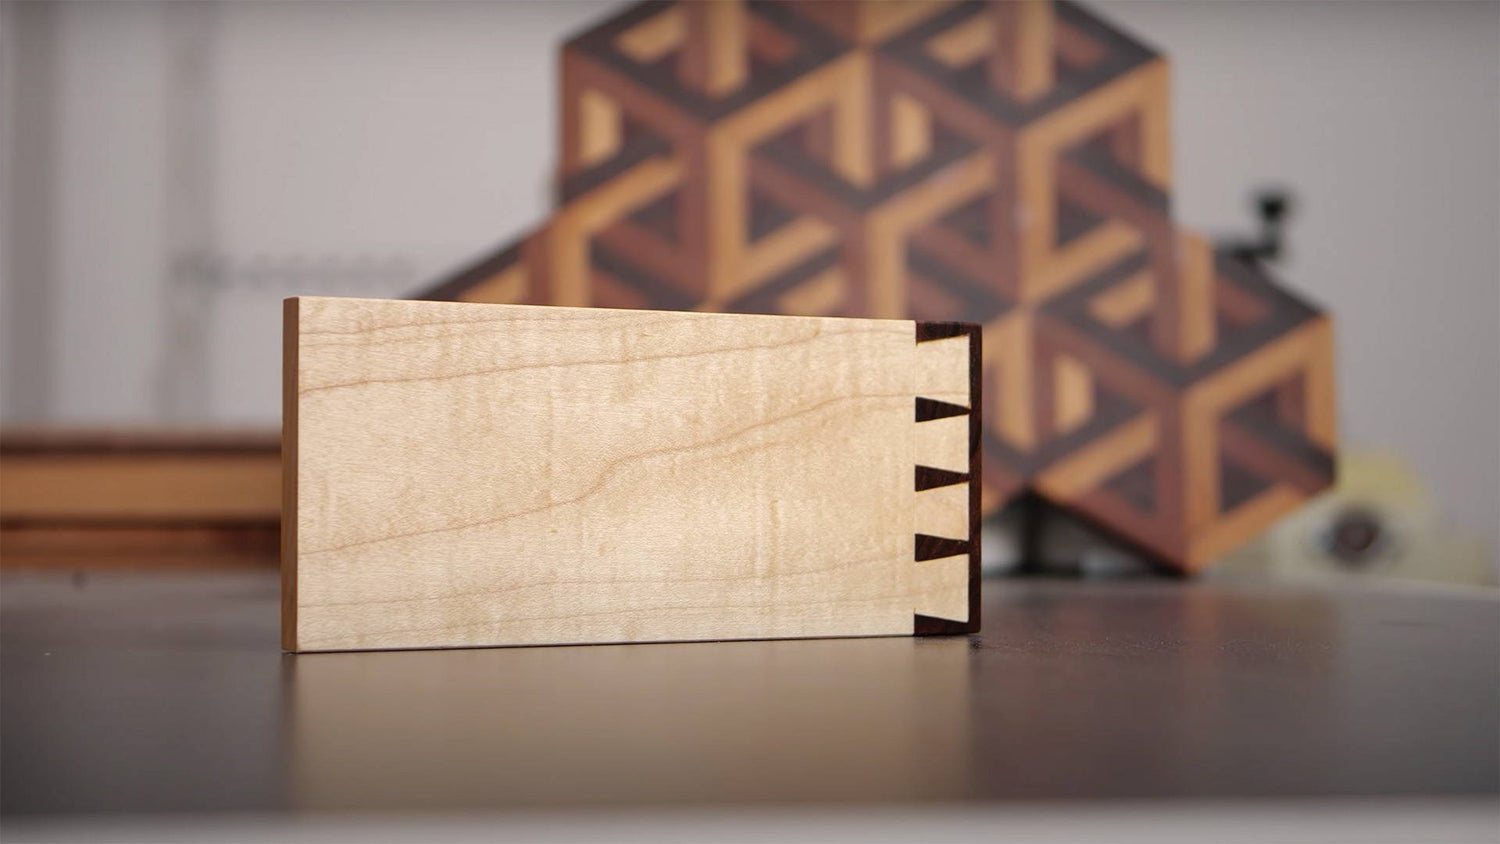
In half-blind dovetails, the tails are embedded in the pins board without going all the way through.
They give you the strength of regular dovetails with uninterrupted grain on one side, which is why they’re often used for drawers.
The pins board makes the drawer front, while two tails boards make up the sides — leaving the pins and tails only exposed on the sides as a nice decorative touch.
Cutting half-blind dovetails is similar to the regular version, with the biggest difference in how you approach the pins board.
HOW TO CUT HALF-BLIND DOVETAILS
TOOLS
-
Marking gauge: Some people say you need two, but you’re fine with one
-
Dovetail saw: This 9.5 inch Dozuki is my favorite saw and go-to for all joinery
-
Chisels: Make sure you have a chisel small enough to fit between your tails and that they’re extra sharp
-
Coping or fret saw: Learn how to make your own high-quality coping saw here
-
Dovetail alignment board: Not 100% necessary, but SUPER helpful
-
The Katz-Moses 8:1 Dovetail Jig: Not necessary, but cuts the learning curve down BIG time — and works as both a saw and chisel guide. Use the 8:1 for hardwood and 6:1 for softwood
STEP 1: DESIGN AND LAYOUT
First things first, make sure your boards are square. Then you have a few design choices.
Decide on the show faces and mating edges of your boards and label them. Trust me, do this now so you don’t mess up later on.
Now decide how deep you want the tails inset into the pins board. ⅔ through the thickness of the pins board is a good starting point, but it’s up to you.
Test with a pair of calipers until you find a depth you like, then match your marking gauge to that measurement.
Use the marking gauge to mark a line on the end grain edge of your pins board — making sure the fence of the gauge is against the inside face (not the show face).
Without adjusting the marking gauge, mark a line all the way around your tails board.
OPTIONAL STEP: RABBET ON TAILS BOARD
This step is optional — but you should do it.
I ALWAYS cut a rabbet on the inside face of my tails board for three reasons:
- Squareness: It helps guide your chisels at when cleaning up the tails
- Accuracy: It helps with alignment when tracing the tails onto the pins board
- Appearance: It makes the inside of your joint will look flawless, even if you absolutely mangle the inside face of the tails
The rabbet doesn't need to be deep — 1/16 inch will do.
Set your table saw blade to that height and cut it on a crosscut sled. Sneak up on your depth line to make sure it’s perfect, and check for square.
A blade with a flat bottom tooth works best, but you can use any blade and clean up with a rabbeting plane.
LAYOUT THE TAILS
This again comes down to design choice.
Personally, I love the look of thinner pins. But the size and number of your pins and tails is entirely up to you.
Whatever you decide, first mark the outside edges of your outermost tails. I measure in ⅛ inch from the sides and mark a line on the end grain edge.
From there, I use a pair of dividers to help lay out the other edges.
Finding the spacing you want takes a little playing around with the dividers. I’ll often test it out on an offcut with the same width until I find a layout I like.
If you want more details on this process, read this.
Once you’ve made indents with the dividers, place your marking knife in each indent and mark across the end grain with your square.
You can use a bevel gauge to mark from the ends of these lines down to the depth line, but it’s not necessary if you’re using my dovetail jig.
And make sure to label your waste!
STEP 2: CUT THE TAILS
Cut the tails exactly as you would for a regular set of through dovetails.
For hardwood, you can use the Katz-Moses 8:1 Dovetail Jig to make the process easier.
TIP: DON’T SCRATCH UP YOUR DOVETAIL JIG
Every dovetail saw has tooth set — meaning the teeth are angled slightly away from the blade.
If you’re not careful, they’ll scratch up your dovetail jig (mine or any other).
You can do one of two things:
- Put a strip of tape over the bottom half of the jig to protect it
- Start your cut freehand, then slide the jig up to the saw as soon as the teeth are set in the kerf
If you’re sawing without a jig, check out these tips for how to saw accurately.
As long as you’re close to your line and keep your cut straight — it’s fine.
I like to saw from the show face side so I can be sure not to pass my depth line.
CLEAR THE WASTE
Use a coping saw to clear out the majority of the waste between the shoulders. Be careful with the depth line on the show face.
Flip the tails board sideways in your vise and cut off the shoulders — again making sure not to cut into your tail on the show face.
Now it’s time to pull out your paper-slicing sharp chisels.
Start clearing away the waste between the tails. I like to first give a light tap from the back side to make sure it won’t blow out, then work from the show face.
Take off only half of the waste at a time, and work from both sides.
Check out this video for a more in depth look at chisel technique.
It’s ok to slightly undercut the inside faces so there’s no humps in the way. As long as the lines on your showface are crisp, you’re gravy baby.
STEP 3: TRACE AND CUT THE PINS
Grab your marking gauge and set it to the thickness of your tails.
NOTE: If you cut the rabbet in your tails board, make sure you’re using the thickness of the tails, not the board.
Now mark a line on the inside face of your pins board. This is the depth line for your pins.
DRAWER TIP:
If your pin board will be a drawer face and is cut to final dimensions, set the marking gauge a hair thinner than the thickness of your tails.
This will leave your tails board slightly proud.
When everything’s put together, you can shave down the sideboards with a hand plane and leave your pins board at the perfect dimensions.
Set your pins board in a vise and place the tails on top of the end grain. Make sure both show faces are oriented correctly.
A dovetail alignment board makes this SUPER easy. If something slips, the fence lets you lock the tails board right back into place.
Trace the edges of the tails with a marking knife. Use light pressure at first, then trace that line again.
Use a square to continue these lines down to your depth line as a visual guide.
SAWING THE PINS
Here’s where things get different from through dovetails.
Instead of sawing all the way through the board, saw through only to both depth lines.
Be careful about not passing the depth line on the end grain — but don’t panic if you slightly pass the depth line on the inside face. The rabbet will hide it.
I like to start the kerf with my dovetail jig, then finish by eye.
CLEARING THE PIN WASTE
There’s lots of ways to clear the bulk of the waste. Forstner bits, a palm router, your teeth — they all work.
But if you’re feeling brawny, do it with your chisels.
Taking out this much material dulls chisels pretty quick, so either set a sharp chisel aside for paring or be ready to do a bit of honing.
Alternate chopping down into the show face side, then in from the end grain. It’s not a big deal if you mangle the inside face — but make sure the show face lines stay clean.
Give the inside edges of your tails a slight chamfer to help them seat without bruising the edges of the pins.
TIP: PARE AT A SLIGHT ANGLE
When paring down to your lines, I recommend doing it at a very slight angle.
By undercutting just a hair, you make sure the tails board will seat no problem. It doesn't need to be a lot — a fraction of an inch will do.
None of it will be visible when assembled. And don’t worry. With the glue bond, the strength of the joint won’t be affected.
STEP 4: GLUE AND CLEAN UP
The hard part’s done.
Now slather the spaces between the pins with glue and knock those tails home.
Word to the wise, though: Clamp a piece of scrap on the back of the pins board to support the back wall. I’ve blown these out before — and some foul words might have been said.
The tails should seat with several light mallet taps.
Wipe away the squeeze out with water, then cover the joint with sawdust from your offcuts to fill any gaps and make it look seamless.
Once it’s dried, you can take down any proud sections with a plane.
A UTILITARIAN BEAUTY
They may look intimidating — but half-blinds really aren’t difficult compared to regular dovetails.
Cut a few sets and they may even become your go-to joint for drawer faces and other projects…
With a perfect balance between beauty and functionality.
Got another type of joinery you want featured in the blog? Let us know in the comments below!
Tag @katzmosestools in pictures of your half-blind dovetails, check out my YouTube channel for great instructional woodworking videos…
And as always, STAY SAFE IN THE SHOP!


2 comments
Peter Radbourne
I really enjoy your posts. I used to struggle with cutting the pins accurately not getting the on the correct side of the marked line. I have now made a jig which makes it perfect every time as it takes in to account the thickness of the blade .it’s a very simple jig and very easy to make.
Pete
I really enjoy your posts. I used to struggle with cutting the pins accurately not getting the on the correct side of the marked line. I have now made a jig which makes it perfect every time as it takes in to account the thickness of the blade .it’s a very simple jig and very easy to make.
Pete
Anonymous
Another masterfully crafted how-to blog post. Thanks for the care you take to be clear, concise and complete in all of your vids and blogs. I recently cut my first through dovetails using your saw guide, alignment board and instructional video. It only took me 75 years to finally try it, but it turned out pretty well using the moxon vice I built using your design. Thanks, again!
Another masterfully crafted how-to blog post. Thanks for the care you take to be clear, concise and complete in all of your vids and blogs. I recently cut my first through dovetails using your saw guide, alignment board and instructional video. It only took me 75 years to finally try it, but it turned out pretty well using the moxon vice I built using your design. Thanks, again!