


Routers are one of the most versatile tools in the shop. But guide bushings give them an adrenaline shot of functionality.
They lock onto your router’s baseplate and act like an offset bearing…
Opening up a world of advanced jigs and template routing possibilities.
If you’ve ever been stumped by a situation where a flush trim or pattern bit didn’t work — guide bushings are likely the answer.
Today, I’m exploring what you need to know about router guide bushings — including setup, use, and how they fuel your creativity.
After reading this, you’ll wonder why you haven’t been using them all along.
Need some guide bushings? Check out this 10-piece set.
WHAT ARE ROUTER GUIDE BUSHINGS?
Guide bushings are removable collets that attach to your router’s baseplate, surrounding the bit.
They consist of a locking nut and another piece with a “barrel.” This barrel surrounds the router bit, acting as a guide for referencing templates and jigs.
Unlike bearing bits, a guide bushing moves with the base instead of the bit. That gives you a lot more control over cutting depth — but also creates an “offset” from your template.
The other advantage is they transform any router bit into a sort of pattern bit… saving you from having to buy a bunch of specialty bits.
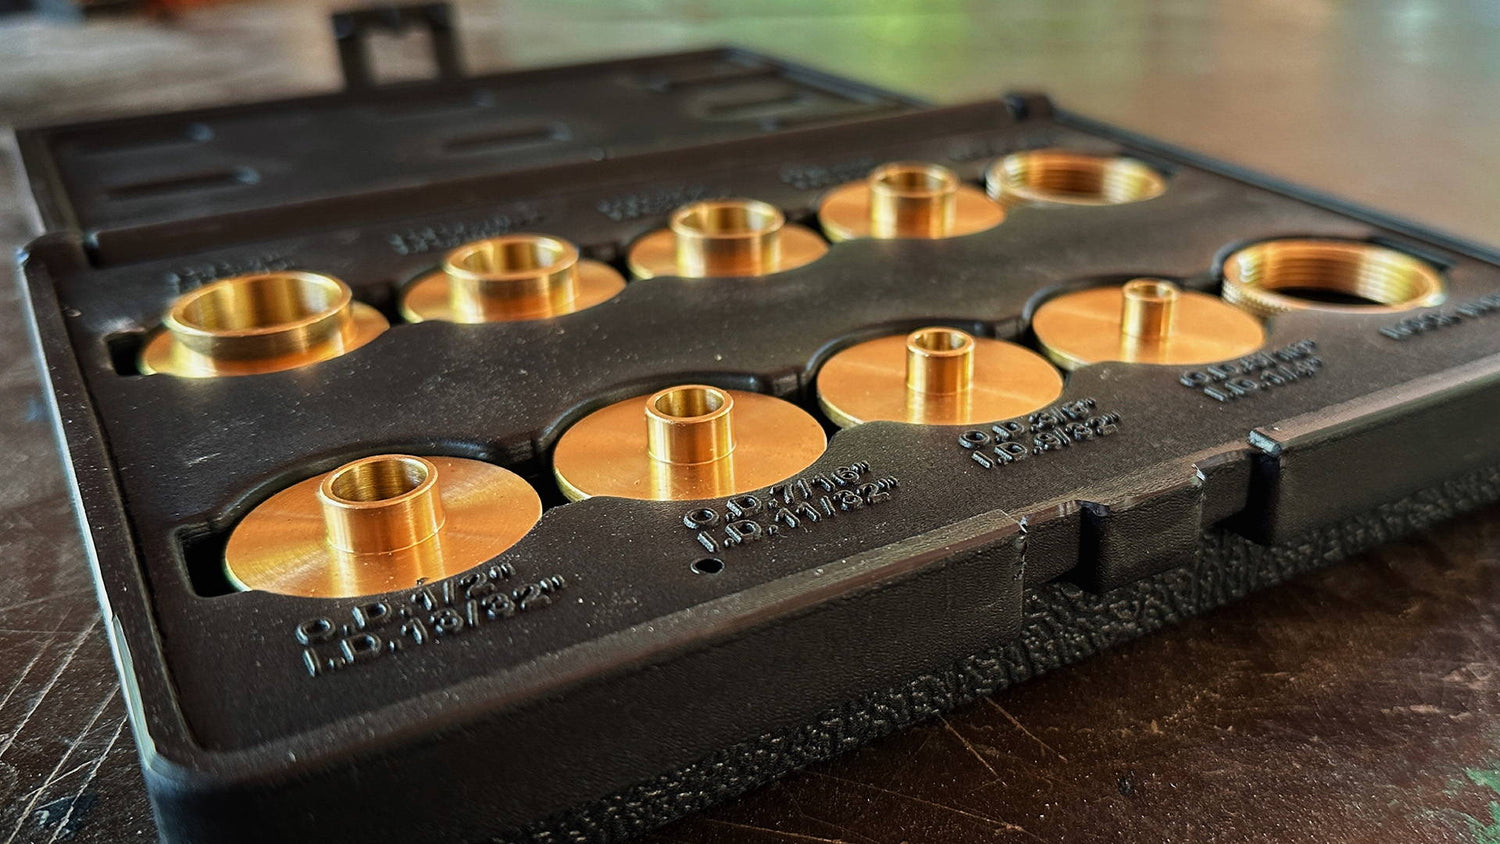
Guide bushings usually come in sets with pieces of different outside diameters (shortened to OD).
This lets you switch them out depending on the size of your router bit or the amount of offset you need (more on this later).
HOW DO YOU ATTACH GUIDE BUSHINGS?
The first thing you need to do is make sure your router’s baseplate is centered over the collet.
If it’s not, the offset won’t be even all the way around the cutter.
There’s a couple ways to do this. One is with a specialty tool called a centering cone. Another is by using conical screws to “self-center” the base plate (here’s a video explaining how).
But I think the easiest way is to first put in a bushing with the same inside diameter as your bit.
Insert a bushing with a ¼” inside diameter, center it around a ¼” bit in your router’s collet, then secure the baseplate. Now just switch out the bushing for a bigger size before cutting.
Attaching the guide bushing itself is simple (though it can be annoying).
I recommend removing the base first. It makes the process easier when the motor and bit aren't in the way.
Place the piece with the barrel in the bottom of the router base plate, then screw the locking nut onto the other side until it’s snug.
Give it a little wiggle (stop it) to make sure there’s no play.
And obviously ensure the inside of the bushing won’t touch any part of your router bit. You don’t want to ruin your bits or bushings.
GUIDE BUSHINGS VS FLUSH TRIM AND PATTERN BITS
You might be thinking: I already own a flush trim bit or a pattern bit — why would I need guide bushings?
Simply put, guide bushings are adaptable in ways bearing bits aren’t.
For example, say you want to use a mortising template. Since the bearing on a pattern bit (which is by the shank) needs to ride on the edge of the template, your first pass would have to be at full depth.
Not the best for your bit, router, workpiece, or safety.
It might be fine with a short pattern bit — but not if you need a super shallow hinge mortise. Plus, you’d need multiple sizes of pattern bits for different tasks.
With a guide bushing, you have full control over cutting depth since you’re not limited by a bearings position.
Just adjust the position of the router in its base and you’re good.
Plus, guide bushings can be used with virtually any router bit.
Router-based dovetail jigs, for example, are used with a guide bushing around a dovetail bit. And straight spiral bits can be used with guide bushings for a ton of applications. You can even use them with ball-nose or V-groove bits for sign making.
Of course, bearing bits do have one big advantage over guide bushings: They cut exactly to the size of your template.
That makes the math a little easier since you don’t have to account for offset — and is why they’re my typical choice for template routing.
But how do you account for offset with router guide bushings?
HOW TO ACCOUNT FOR ROUTER BUSHING OFFSET
Figuring out the cutting offset of guide bushings can seem intimidating — but it’s actually straightforward.
All you need to calculate is the distance from the outside of the bushing to the outside of your router bit.
Here’s how to do it:
- Figure out the outside diameter (OD) of your guide bushing and router bit.
For example, a ½” bit and a ¾” OD bushing.
- Subtract the bit diameter from the outside diameter of the bushing.
¾” – ½” = ¼”
- Now divide that result in half to find the radius of your offset.
¼” ÷ 2 = ⅛” radius
So if you’re using a ¾” OD bushing with a ½” bit, you’ll have an offset of ⅛”.
For template work, that means you’ll want to undersize your templates by ⅛” all the way around.
And if you’re making a mortising jig, oversize the rectangle by ⅛”.
(Another way to think about it is to undersize positive templates and oversize negative templates).
I always recommend doing a test cut to make sure you’ve got everything right.
It can be a little confusing at first. But once you figure it out, guide bushings skyrocket the accuracy and efficiency of your woodworking.
WHAT BUSHINGS ARE COMPATIBLE WITH MY ROUTER?
So, you’re sold on guide bushings. But how do you know if a particular set will work with your router’s base?
It of course depends on your brand of router.
But most guide bushing sets — and router bases — follow what’s commonly called the “Porter-Cable Standard.”
Porter-Cable is obviously a well-known brand in the woodworking industry, and they developed a standardized guide bushing system that has become widely adopted by most popular brands.
The standard base plate hole size is 1 3/16” (30 mm). If your router follows that standard, you’ll be good with most bushing sets.
(With a piece of acrylic, you can even make your own base plate to fit standard bushing sizes).
Side note: The 3x3 Custom 6-in-1 Trim Router Jig is designed to accept standard guide bushings — so you can even use them with your compact palm router.
WHAT CAN ROUTER GUIDE BUSHINGS BE USED FOR?
DOVETAIL JIGS
Not into hand-cutting dovetails but still want to use this classic joinery style?
Router dovetail jigs are designed to work with guide bushings to make this complex joint a cinch.
Some jigs (like the omni jig) even allow you to quickly cut other joinery styles with minimal effort.
MORTISING JIGS
Guide bushings are perfect to use with mortising jigs — from the dead-simple to the ultra-versatile.
Make a simple jig with a negative space that matches the outside diameter of one of your guide bushings. All you have to do is position the jig, place your router, and cut out perfect mortises every time.
For a more versatile mortising jig, check out this video from 3x3 Custom — where my friend Tamar makes a jig that works super easily with guide bushings.
TEMPLATE ROUTING
Template routing lets you cut precise replications of shapes and patterns — whether it’s letters for sign-making or holiday decorations.
Making your own custom templates isn’t too difficult with a ¼” piece of MDF or plywood.
But if you want to jump right into more complex designs, there are a TON of pre-made templates you can buy online.
INLAYS
Router bushings really shine for intricate inlay work.
Create or purchase a template for the inlay, attach the guide bushing, and just follow the pattern.
You can even experiment with different router bits for decorative edges or designs.
DON’T BEAT AROUND THE BUSHING
Router guide bushings open up a world of possibilities in woodworking — and should definitely be a part of your tool arsenal.
They’re great for adding more creativity, repeatability, and efficiency to your workflow…
And as you can see from the guide above, they’re super easy to use.
Not sure which router bits you actually need? Read this.
How might you use guide bushings in your woodworking? Let us know in the comments below!
Follow us on Instagram @katzmosestools, on TikTok @katzmoseswoodworking, and check out my YouTube channel for more great woodworking content...
And as always, STAY SAFE IN THE SHOP!
4 comments
Pat
Don, the difference in hole sizes is to account for the rim on the locking nut which seats on the plate .
Don, the difference in hole sizes is to account for the rim on the locking nut which seats on the plate .
Don
Your guidance refers to the center hole as 1 3/16” (30 mm) dia., while some other how-to articles refer to a stepped hole where the top & bottom diameters differ by about an eighth of an inch. Why the difference?
Your guidance refers to the center hole as 1 3/16” (30 mm) dia., while some other how-to articles refer to a stepped hole where the top & bottom diameters differ by about an eighth of an inch. Why the difference?
Michael Strahan
Sign me up for newsletters
Sign me up for newsletters
Godwin
This article came at the right time! Thank you for breaking down the offset math!
This article came at the right time! Thank you for breaking down the offset math!