One of the most important aspects of router safety is getting feed direction right.
That means being aware of how you make cuts relative to the router bit’s rotation.
Essentially, you want the direction you push the router along the edge of a board to be the opposite of the bit’s rotational direction.
Cutting in the same direction as a bit’s rotation is called a climb cut — and if you’re not careful, it can cause the router to shoot out of your hands… or send the board you’re cutting shooting across the shop.
Overtime, cutting direction becomes second nature.
But when you’re first getting started, it can be a bit confusing (punny, I know). Especially if you’re switching between a handheld router and router table.
To make it easier, I’m sharing 2 easy tricks to help you remember router feed direction — until safety becomes second nature.
1. THE RIGHT HAND TRICK
When you’re first getting started, this trick is the easiest way to quickly remind yourself of the correct feed direction.
It uses your right hand — with your fingers and thumb representing different elements of the router.
Start by making a “thumbs up” sign with your right hand.
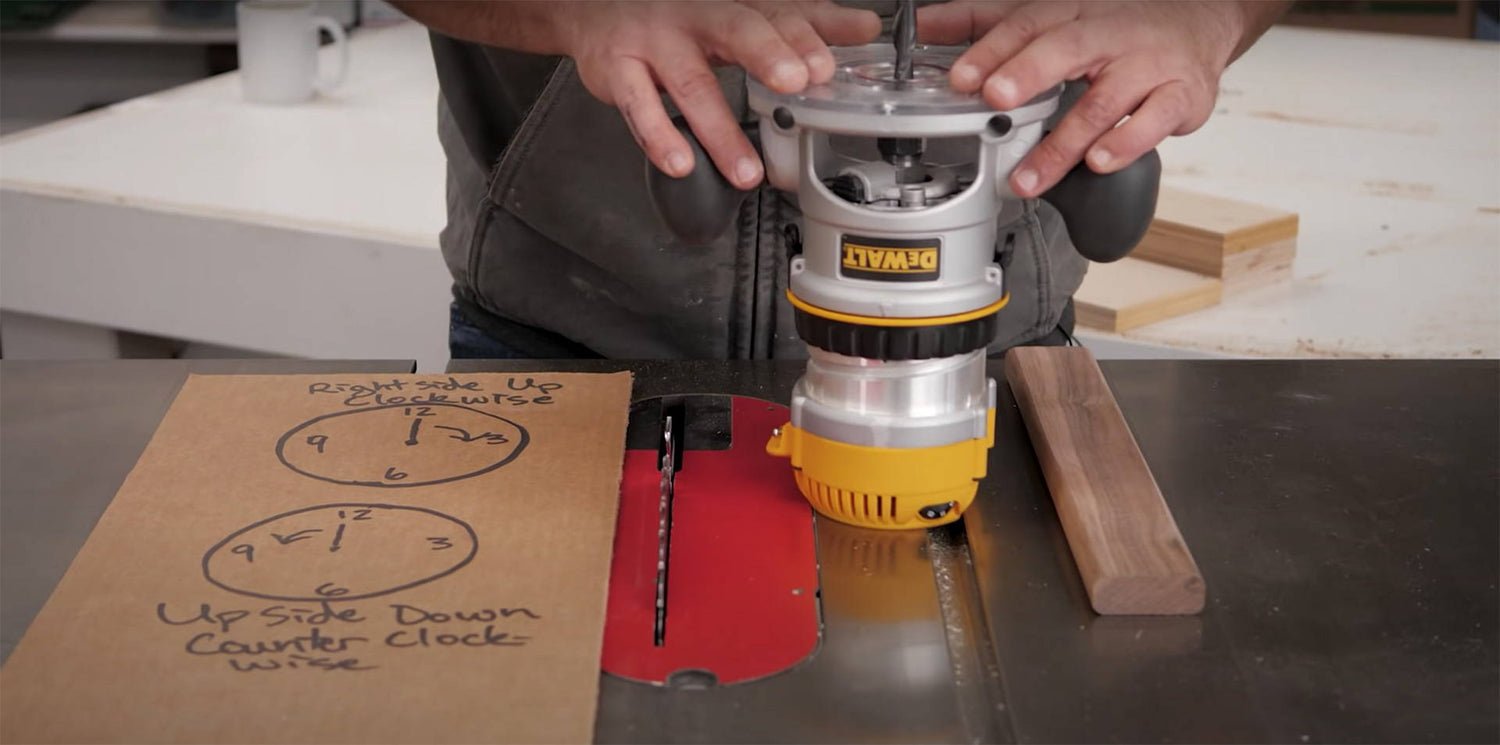
Your thumb represents the orientation of the router bit. So if you’re using a router table, point your thumb up. If you’re using a handheld router, point your thumb down.
The direction your fingers curve represents the router bit’s rotation. So whichever way they’re pointing is how the bit spins in that orientation.
(You’ll notice that for handheld routers the bit spins clockwise, and on router tables it spins counterclockwise).
Your feed direction should be the opposite of whatever direction your fingers are pointing.
So whether you're pushing a handheld router — or pushing a board over a router table — the direction that the board’s edge moves along the bit should be the opposite of that bit’s rotation.
For example, say you’re cutting a rabbet in a board with a handheld router. Make a “thumbs down” sign next to the edge you’re cutting and look at where your fingers point.
Push the router the opposite way through the cut — and you’ll have all the control you need!
2. THE PICTURE FRAME CLOCK
This method isn’t as intuitive as the right hand trick, but can still be a good frame of reference (dang it, another pun).
Imagine you’re rounding over the edges of a picture frame.
For a handheld router, you want to push the router:
- Counter clockwise on the outside edge of the frame
- Clockwise on the inside edge of the frame
On a router table, you can think of the same directions — but now you're moving the workpiece instead of the bit.
So on a router table you’d rotate the workpiece:
- Counter clockwise for the outside edge of the frame
- Clockwise for inside the inside edge of the frame
The clockwise/counter clockwise idea remains the same. What changes is whether you're rotating the router or the actual board.
Just remember:
- Outside edge = Counter clockwise
- Inside edge = Clockwise
For handheld routers that rotation refers to the actual router, while on router tables that rotation refers to the workpiece.
Cutting with the correct feed direction will give you greater control with your router — keeping you safe as you build.
And with the two tricks above, you’ll have no problem remembering… until you get enough experience to just know.
Want more router safety tips? Read this.
Got your own trick for remembering feed direction? Let us know in the comments below!
Follow us on Instagram @katzmosestools, on TikTok @katzmoseswoodworking, and check out my YouTube channel for more great woodworking content...
And as always, STAY SAFE IN THE SHOP!


7 comments
Ben Kates
I’ve been struggling with my router for years. This was a very good explanation. Totally helpful! Thank you.
I’ve been struggling with my router for years. This was a very good explanation. Totally helpful! Thank you.
David Meadow
I use the left to right method. When facing the piece, cut from left to right. Doesn’t matter if you are holding the router or it’s in a table.
I use the left to right method. When facing the piece, cut from left to right. Doesn’t matter if you are holding the router or it’s in a table.
Bruce
Thanks JKM, another great article. The “right hand trick” I learned for handheld routers is; make an “L” with your right thumb and index finger like a kid makes an imaginary pistol. Then with your palm facing down touch your thumb to the edge you want to rout. Your finger points the way of the router. Works for inside and outside edges.
We used the “thumbs up” for a reminder of bit rotation on the router table.
Frank
I had trouble routing a wide blind slot (both ends blind) – I hog out as much as possible with a forstner bit – drilling each end of the slot oversized to drop the piece over the router bit – then cut each side – problem is should I cut the between the bit and fence or the side opposite of the fence?
Maybe I need to glue up two pieces of wood with spacer blocks then plane, joint and cut to size…
Tom Albertson
Food for thought: if you change the “right hand trick” to the “left hand trick” then your fingers would point in the feed direction. Maybe easier to remember if you want to know which way to push the router/work piece and don’t care which way the bit spins. (No, I’m not left handed.) In any case, this info is great! Thanks!
Food for thought: if you change the “right hand trick” to the “left hand trick” then your fingers would point in the feed direction. Maybe easier to remember if you want to know which way to push the router/work piece and don’t care which way the bit spins. (No, I’m not left handed.) In any case, this info is great! Thanks!
Jim A. Paschis
The picture from interior and exterior surfaces present a good example for router feed directions. When advancing toward the next 90 degree piece with the exterior edge extremely thin there is a chance for corner tear out. For crucial, delicate work a protective piece can be clamped and routed.
The picture from interior and exterior surfaces present a good example for router feed directions. When advancing toward the next 90 degree piece with the exterior edge extremely thin there is a chance for corner tear out. For crucial, delicate work a protective piece can be clamped and routed.
Joseph Lowe
EXCELLENT! This really should not be difficult, and it’s embarrassing how many times I’ve had to figure this out moving between routers, particularly if I haven’t routed in a couple of weeks. Many thanks.
EXCELLENT! This really should not be difficult, and it’s embarrassing how many times I’ve had to figure this out moving between routers, particularly if I haven’t routed in a couple of weeks. Many thanks.