


Making wooden hinges is an incredible way to elevate your projects. And it’s a lot easier than you think.
Whether it’s for a box or small cabinet — or even an adjustable lamp arm…
Wooden hinges add that extra bit of detail that will really WOW anyone admiring your work.
Of course, there are a ton of ways to make them.
But this box joint method for wooden hinges is one of the easiest.
It’s essentially just cutting regular box joints, but with an added roundover….
And it’s a technique that’s totally adaptable to your needs.
TOOLS AND MATERIALS
Aside from your typical shop tools like a drill press and table saw, there’s a few other things you’ll need for this build.
- Brass or other metal rod (I recommend ⅛” diameter)
- Drill bit that matches metal rod’s diameter (I got an extra long one then cut it to length for my drill press)
- Roundover router bit
- Box joint jig
1. MILL BOARDS TO SIZE
Your hinge will consist of two pieces of wood of the same thickness.
You can either cut them both from the same board, or use contrasting wood species to make something with more visual pop.
The thickness of the boards should be no more than TWICE the radius of the roundover bit you’ll use.
For example, if you mill the pieces ½” thick, use a roundover bit with a minimum ¼” radius.
This ensures the roundover you eventually cut will allow the hinge to move correctly.
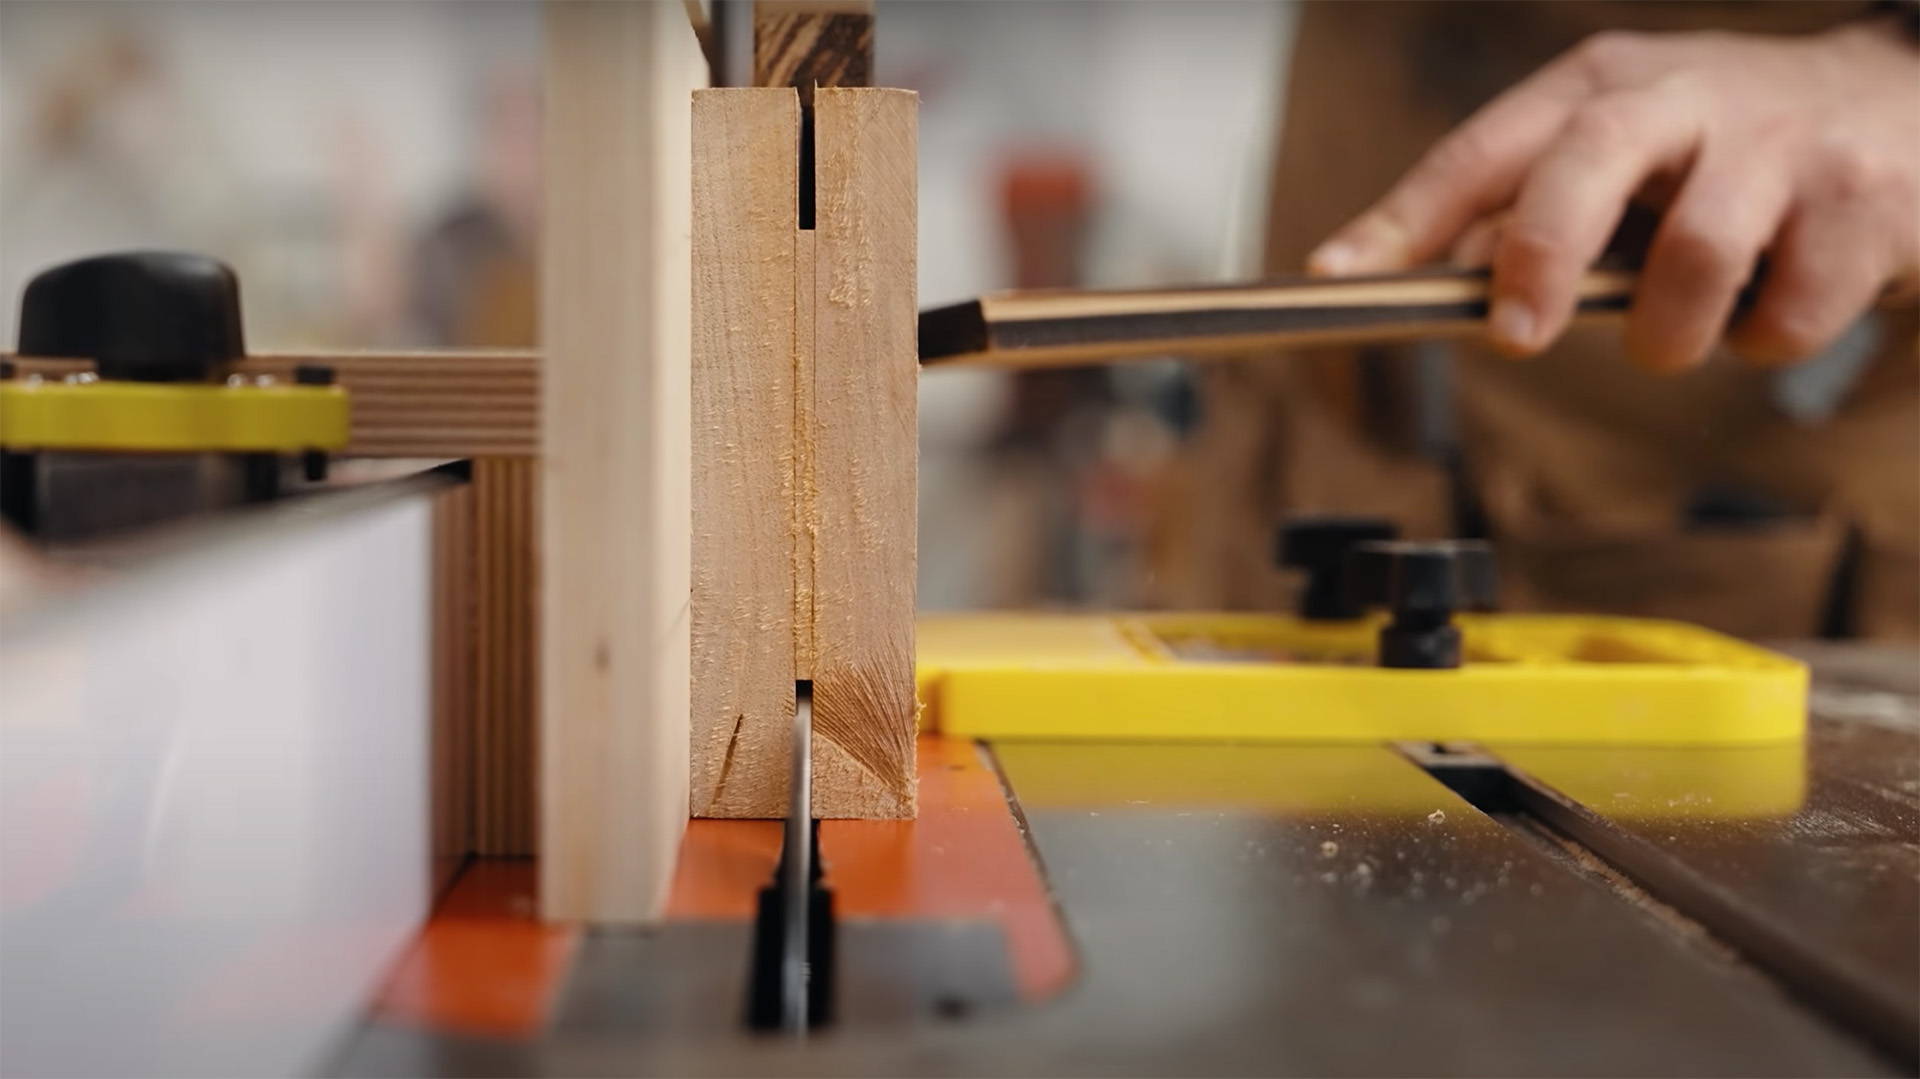
2. DRILL HOLES FOR THE ROD
This is probably the trickiest part of this build because precision is key.
You’re going to drill a hole all the way through the board from one edge to the other.
And that hole needs to be perfectly centered on both pieces. (Need a refresher on finding the center of a board? Read this).
Start by using a marking gauge to mark a centerline down the long grain edge of each board.
Then use that same setup to mark a perpendicular line, referencing the marking gauge fence off the end grain edge of the board.
The point where those two lines intersect is where you’ll drill your hole. Use a center punch or awl there to help you with setup.
Check to ensure your drill press is square and properly set up. I also recommend using the drill press fence and a clamp to keep the board stable on its edge.
Take your time to make sure you’re set up for success. Then drill the hole all the way through.
3. ROUND OVER THE EDGES
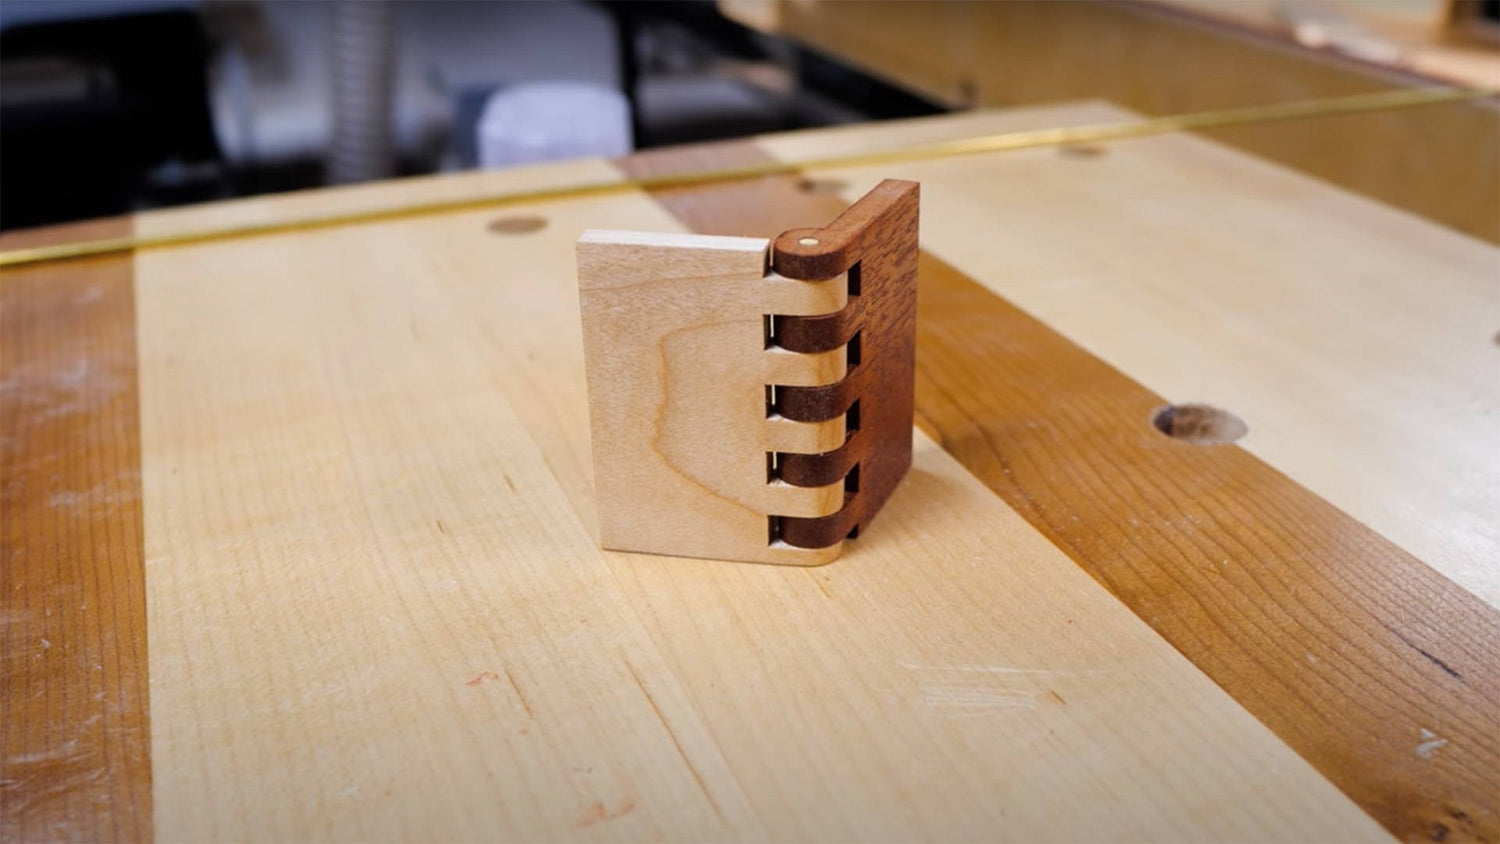
A roundover is all it takes to turn your regular box joints into a hinge.
Again, use a bit with a curve radius that’s HALF the thickness of your boards. You can use a bit with a larger radius — but not one that’s smaller.
I recommend doing this on a router table because the setup is easier to get right.
Install the bit in your router table, then hold the edge of a square over the opening for the bit.
Slowly raise the bit until the corner edge of the bit’s blade just barely touches the edge of the square (the same way you would to make your own dowels).
It’s important to get this right so the roundover reaches the middle of the end grain edge.
Now you can start cutting roundovers on those end grain edges.
TIP: When cutting roundovers on end grain edges, use a backer board to help stop tearout. Here’s some more anti-tearout tips for the router table.
The number of edges you round over depends on the type of hinges you want.
Rounding over 1 edge on each board will make a hinge that can swivel from 45° to 90°.
If you decide on this, know that the edges with roundovers will be the inside of the hinge.
Rounding over both edges on each board will make a hinge with a bigger range (though if you want to make one that folds flat, there’s an extra couple steps I’ll cover below).
Once you’re done with the roundovers, it’s time to cut some box joints.
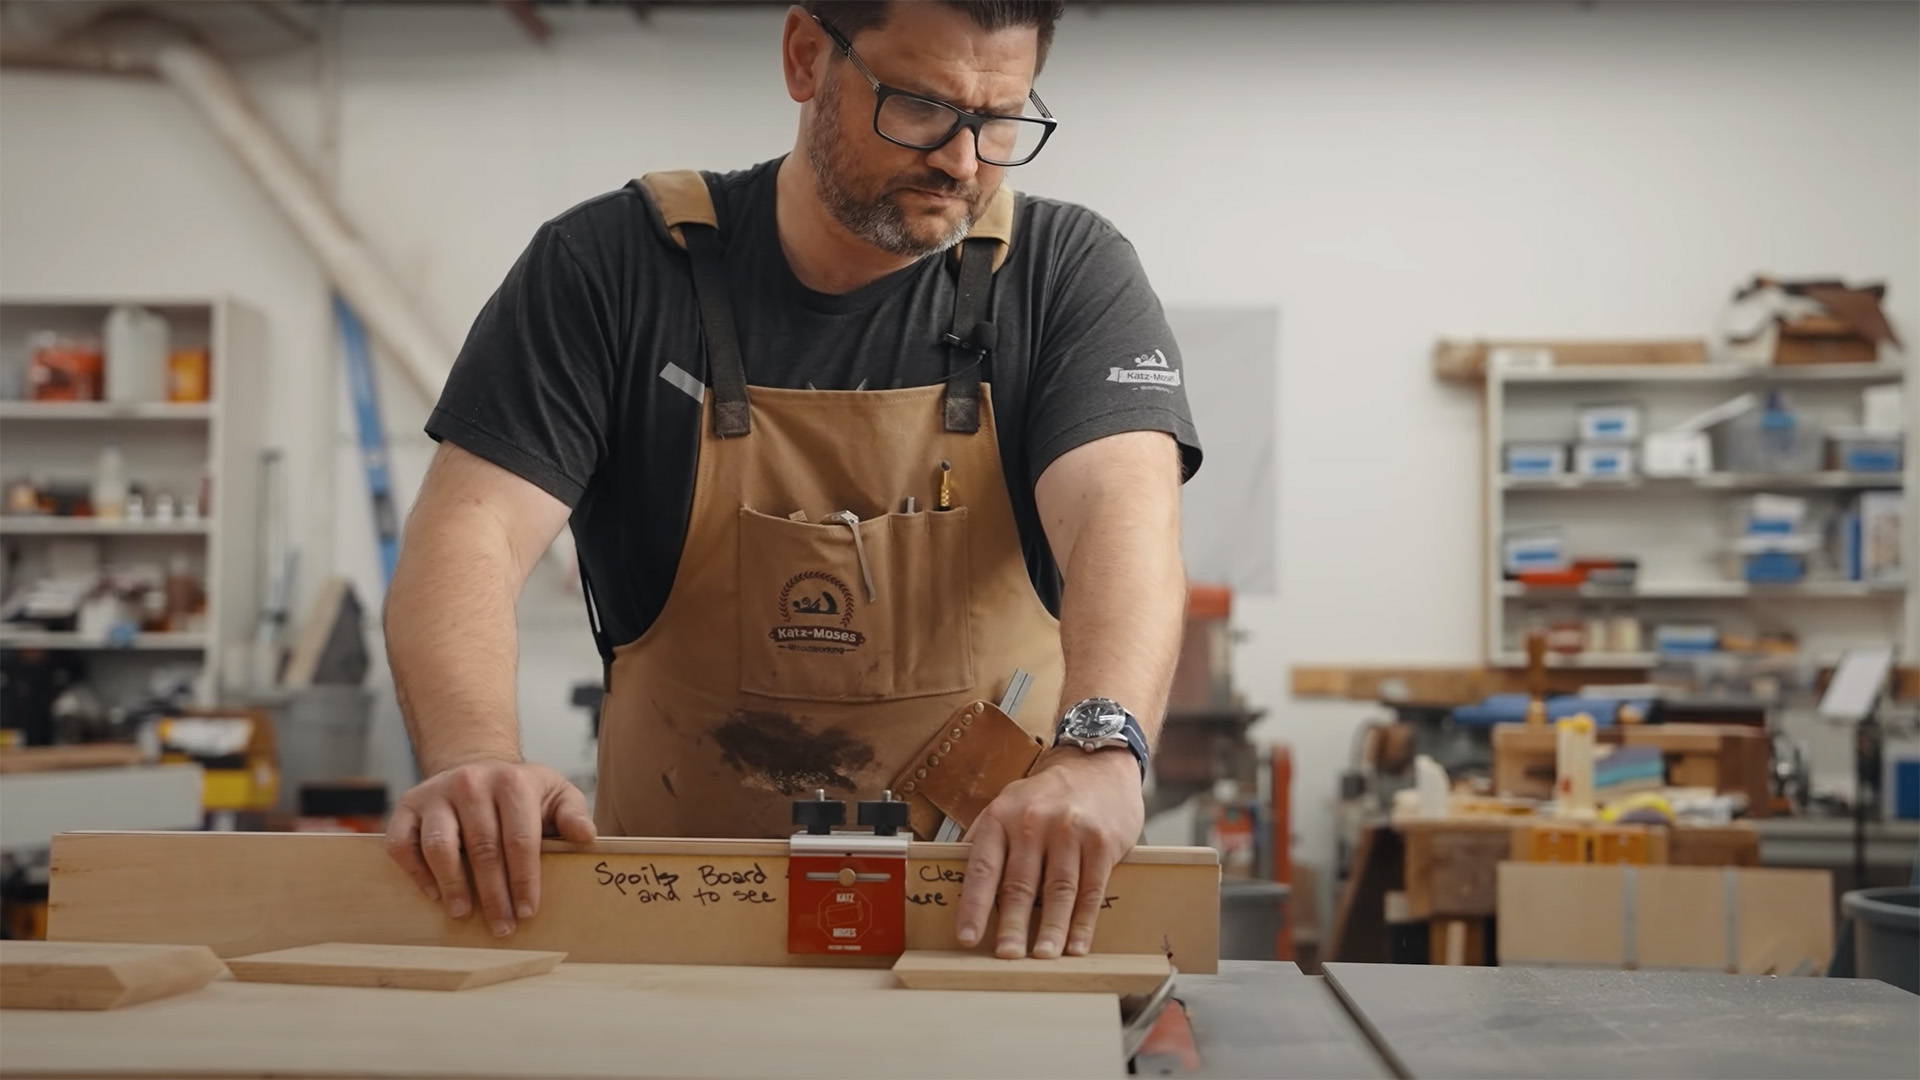
4. CUT THE BOX JOINTS
Now all you need to do is cut some simple box joints!
Of course, I recommend using the Katz-Moses Universal Box Joint Jig. Zero bias. I promise.
What’s important here is setting your dado blade to the right height.
The cutting depth should exactly match the thickness of your boards.
This is easy to set up. Just lay one of the boards flat on the base of the jig. Then adjust the blade height so the apex of the blade matches the board’s thickness.
To be safe, cut a test joint to make sure everything’s exact.
Once that’s done, cut your box joints as you normally would (here’s a refresher in case you need it).
And for a more symmetrical look, opt for center keyed box joints.
5. ASSEMBLE THE HINGE
If you’re going to add finish, do it before the hinge is assembled (otherwise, the components could get stuck).
I also recommend rubbing down the inside of the box joints with paste wax so the hinge can move smoothly.
Now put the box joints together and insert the metal rod through the hole. Take your time here — but a few delicate whacks with a mallet should get the job done.
Finally, trim off the excess rod with either a grinder or rotary cutter, then sand the ends smooth.
Congratulations. You’ve made a wooden hinge you can now inlay and screw in place like regular hardware!
WOODEN HINGE VARIATIONS
FLAT HINGES
If you want your hinges to fold flush, there are a couple extra steps.
Basically, you’ll need to thin out both boards to half their thickness behind the hinge.
This thinned out portion should start at a distance from the end grain edge that matches the thickness of the board.
For example, if your board is ½” thick, start the thinned out portion ½” from the end of the board.
I like to clear away the waste with a dado blade that’s set just shy of the halfway point, which lets me clean away saw lines with a block plane and get things perfect.
The last step is to roundover the inside edges. I do this with a block plane while the pieces are assembled without the pin.
Just be careful, because the little tabs are liable to snap off.
INTEGRATED HINGE
Instead of making separate hinges, you can adapt this technique to build the swivel mechanism into your actual box lid.
I’d do this by making a GIANT center keyed box joint with only two tabs on either side (you’d do this with the box lid and back).
Then with the pieces in place, drill a hole in from the side. It doesn’t need to go all the way through the lid — just far enough to get into the center key.
Knock the brass rod into both sides, trim it flush, and you’re done.
DON’T GET UNHINGED
Wooden hinges are such a cool way to add functionality and pizazz to your woodworking.
And with the box joint technique outlined above…
You can see just how easy the process can actually be.
Need a refresher on box joints? Read this.
Got another way to make wooden hinges? Let us know in the comments below!
Follow us on Instagram @katzmosestools, on TikTok @katzmoseswoodworking, and check out my YouTube channel for more great woodworking content...
And as always, STAY SAFE IN THE SHOP!
1 comment
Neil
If the fingers are too fragile, why not just make them wider next time?
If the fingers are too fragile, why not just make them wider next time?