


Nothing’s better than when the pieces of a woodworking project fit together like a puzzle — and nothing’s as frustrating as when they don’t.
Joinery that’s too tight or too loose. Assemblies that won’t get square. Tables so wobbly you debate just calling them rocking chairs.
Getting a real life project to look like the pretty picture in your head ain’t easy.
The cold hard truth is it takes practice — and countless failures (with a few scattered successes to give you hope).
However, there are some strategies that can immediately improve your accuracy in woodworking — and they’re dead easy to learn.
I know. It sounds like a line from a snake oily supplement ad.
But these techniques really are simple. Some of them might even seem intuitive to seasoned woodworkers.
And when I started using them years ago, they made an immediate difference in the accuracy of my cuts.
So today, I’m giving you my best techniques and tool tips for greater accuracy — so you can start recreating those pretty pictures in your head and flirt with perfection.
TIPS FOR BETTER ACCURACY
MILL YOUR LUMBER SQUARE
The first step of any woodworking project is milling your lumber straight, flat, and square.
You can do a perfect job of laying out your lines — but if your edges aren’t parallel, nothing will come out right.
MAKE SURE YOUR TOOLS ARE TUNED
For accurate results, your tools need to be tuned, sharp, and (fairly) clean.
Table saws are amazing for quick straight cuts — but only if they’re properly set up (here’s how to tune your table saw).
This is especially important for hand tools. Chisels and hand planes will only work as well as their level of sharpness. So be sure those blades are honed.
Here’s a few other resources to get your tools in order:
STOP MEASURING
This one’s counterintuitive, but can make a massive difference in your accuracy.
Good woodworking is all about repeatability. And it’s virtually impossible to measure out 30 inches on four separate pieces and get them all to the exact same length.
We’re humans, not androids (hopefully this stays true for a while).
In the end, it’s not the final measurements that matter — it’s consistency.
Here’s a few ways to rely less on your tape measure and stay consistent.
-
Batch out similar pieces: If you’re making four table legs, don’t make them one at a time. Set up your tools and cut them all in batches.
Do all your rips at once and you won’t have to worry about resetting your table saw fence to the exact same point.
-
Use jigs: Jigs make repeatability a cinch. If you need multiple pieces to be the same length, set up a stop block on your table saw crosscut sled and you’ll only have to measure once.
Jigs can be as simple or complex as you need — from ultra-versatile multi-sleds to magnetic shooting boards for your hand plane.
-
Reference reality: Instead of always measuring, use your actual pieces of wood to determine your layout (see an example in the marking gauge section below).
And if you’re trying to find the center of a board, skip the division.Just set your square so it looks about center, and mark a line at the end. Do the same from the other side, and the space between those two lines is your exact center.
(On that note, this video shows how to take accurate inside measurements without dealing with a bent tape measure).
SNEAK UP ON FINAL CUTS
It can be good to intentionally leave a little extra material on your first passes.
You can micro-adjust your set up until it’s exact, or even take things down to their final dimensions with hand tools.
If you’re cutting a half lap, cut the recess a little shy of the halfway point. Then use a chisel or router plane (coming soon to the Katz-Moses Tools store) to take it down until your pieces sit perfectly flush.
CUT TEST PIECES AND PROJECTS
When cutting the pieces for a project, make a few extras.
Use them as test pieces for setting up your cuts — or even as replacements if something goes wrong.
Take this a step further and build entire test projects.
If you’re about to tackle a challenging build, make a prototype out of less expensive material (like poplar or pine).
It lets you work out the problems before cutting up expensive hardwood — and can become extra shop furniture… or firewood if all else fails.
TOOLS FOR ACCURATE LAYOUT
This might start to sound like a broken record. But here it goes anyway:
“Good woodworking is done with a pencil. Great woodworking is done with a marking knife.”
Ok. Obviously, there’s a ton of highly skilled woodworkers who use pencil or ink and get super accurate results. But let me reiterate — these folks are highly skilled.
Even the thinnest pencil or ink line has a thickness. If you’re not consistent about always cutting to the same side, that error gets compounded and can cause big problems.
The advantage of layout tools like marking knives and marking gauges is they create a physical reference for your lines.
That means you don’t have to eyeball anything. Your chisels, squares, and other tools will click right into place.
So let's talk about these tools and how to use them.
A GOOD SQUARE
The MOST important tool for accurate layout is a good square.
Combination squares, double squares, try squares — whatever you use, it needs to be accurate.
The best ones have the measurements etched into the ruler that give you a place to set your marking knife or marking gauge blade.
Quality squares can cost a lot. But consider it an investment in your future accuracy. If there were ever a buy once cry once tool, this is it.
HOT TIP: Taylor Toolworks sells Blem squares from some of the top brands. These squares have cosmetic blemishes but are still super accurate. Check ‘em out here!
TIP: TESTING A SQUARE FOR SQUARE
You’ll need a piece of wood you know has two perfectly parallel sides (a metal bracket can work too if you find a way to mark it).
Set the fence of your square against one side and mark a line across. Then set the fence on the opposite side and mark another line directly beneath the first.
If the two lines are parallel, your square is ready to hit the races.
MARKING KNIFE
Again, the advantage of a marking knife isn’t just how thin the line is. It’s the physical reference it creates for all your tools.
Here’s how to use one.
1. Use a tape measure or square to find where you want to score your line. Set the tip of your marking knife in the wood at that point.
Even if you remove your marking knife, you can just set the tip back in that indent and be in the exact same spot. It’ll fool proof.
2. With your knife set, slide up your square until it touches the knife. Make sure the blade is flat against the edge of the ruler.
3. Keeping the blade flat against the ruler’s edge, use light pressure to score a line. Follow up with a second pass and a little more pressure.
To wrap the line around a board, set the blade in one end of the line so the tip extends past the edge. Then again slide up your square and mark your line.
TIP: GETTING RID OF MARKING KNIFE LINES
You probably don’t want a bunch of lines scratched into your finished project. So how do you get rid of them?
First, be aware of your show faces. Mark the lines on show faces lighter, or only score them deep on the actual edges of your joinery.
A card scraper is my favorite tool for removing marking knife lines since it takes off such a thin amount of material — but you can also use a block plane or sandpaper.
Just be careful not to take off so much material that your joinery gets loose.
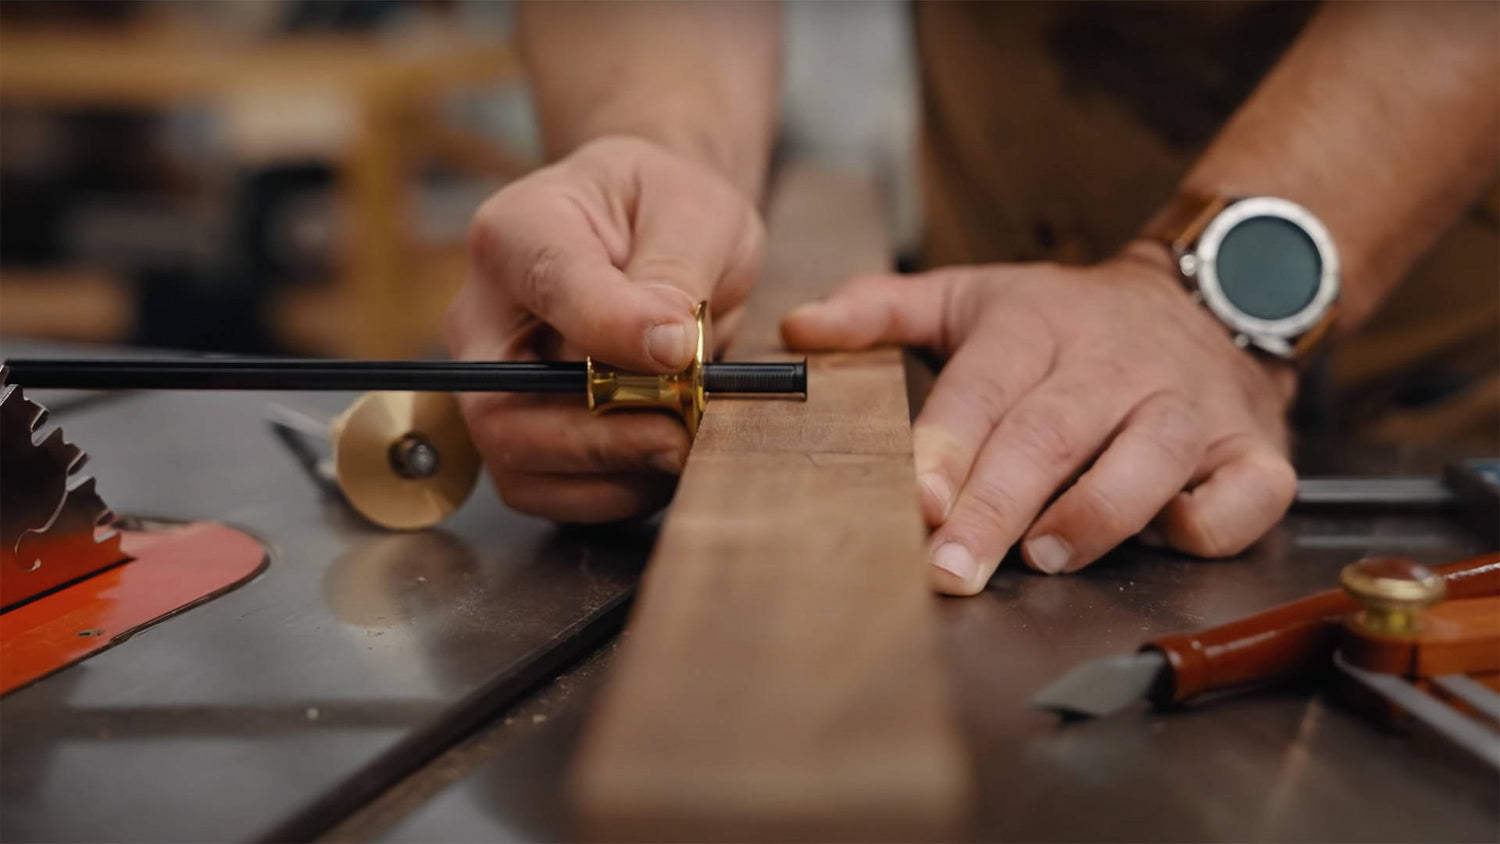
MARKING GAUGES
Marking gauges are ideal for marking lines parallel to an edge.
My favorite marking gauges are the wheel types. They’re sturdy and compact, and the bevel on the blade helps pull the fence into the edge of the workpiece.
An easy way to set the distance is with your square. Set the fence of the marking gauge against the end of the ruler, and adjust until the blade sits in the correct etch mark.
Another great thing about them is they can be used as a depth gauge.
If you’re cutting dovetails, set the fence on the board and let the blade drop to the surface below.
When you mark that line on another piece of wood, you know it’s the exact thickness of the first piece.
CENTER PUNCH OR AWL
When it comes to drilling accurate holes, center punches and awls are a massive help.
They create a physical reference for your drill bits to lock into so your holes are perfectly centered.
Plus, they provide a reference for your marking knife if you need to mark a line right through the middle of a hole.
ACCURACY ON A TABLE SAW
This may seem obvious to some, but was a game changer for me.
Every table saw blade has tooth set — meaning the teeth lean away from the body of the blade.
That means you can’t get an accurate cut by measuring to the body of the blade. You need to measure to the outermost tooth.
This is where a marking knife line again has an advantage.
First, find a tooth set towards your workpiece (not the waste side). This tooth marks the edge of your kerf, so you want its tip perfectly on your line.
Adjust your workpiece until this tooth clicks into your marking knife line. When you make your pass, you know it is right on the money.
For multiple cuts at the same length, set up your first cut then lock down a stop block.
TIP: USING YOUR FENCE AS A STOP BLOCK
Sometimes you need multiple pieces at the same length, but they’re too long to use with a stop block on your crosscut sled.
You can use your table saws fence as a stop — BUT you need to do it the right way.
What you don’t want is for the end of the workpiece to still be touching the fence as it passes through the blade. This can cause a kickback.
Instead, position your piece in the right position, butt a machinists block or piece of scrap against the end, then lock your fence up against that block.
Hold your workpiece steady, remove the block, then make the cut. Repeat this process for all your pieces.
It’s also helpful to have a “kerf strip” handy.
This is just a strip of wood that’s the exact thickness of your blade kerf (you can dial it into size with pieces of blue tape).
Use the kerf strip for setting up a finger joint jig — and even for cutting perfectly sized lap joints and grooves.
For a lap joint, set up your first piece of stock to cut one side of the groove. Sandwich the kerf strip between the end and your stop block, lock it down, and make a cut.
Then remove the kerf strip, and this time sandwich the second piece of stock between the piece you’re cutting and the stop block. Make another cut.
Clear the waste between those two cuts and you’ve got a groove that perfectly matches the width of the second piece.
ACCURACY WITH A ROUTER
If you need to cut a groove or mortise to a line, first set up an edge guide.
Rotate the router bit counterclockwise so it doesn’t mar your piece and look to see if it passes your marking knife line at any point. Adjust the edge guide until it’s right on the line, and you’re ready to cut.
Now let’s say you need to cut to an exact depth, like for inlaying hinges.
There’s an insanely easy and accurate way to do this with a plunge base.
Set the base on a surface and lower the bit so it touches the surface. That’s your zero stop.
Now place your hinge on the rotating stop, and release the stop pin. Lock it down so the hinge is sandwiched between.
When you plunge the router, it’ll be at the exact depth of the hinge.
You can also use this trick with pieces of wood and feeler gauges.
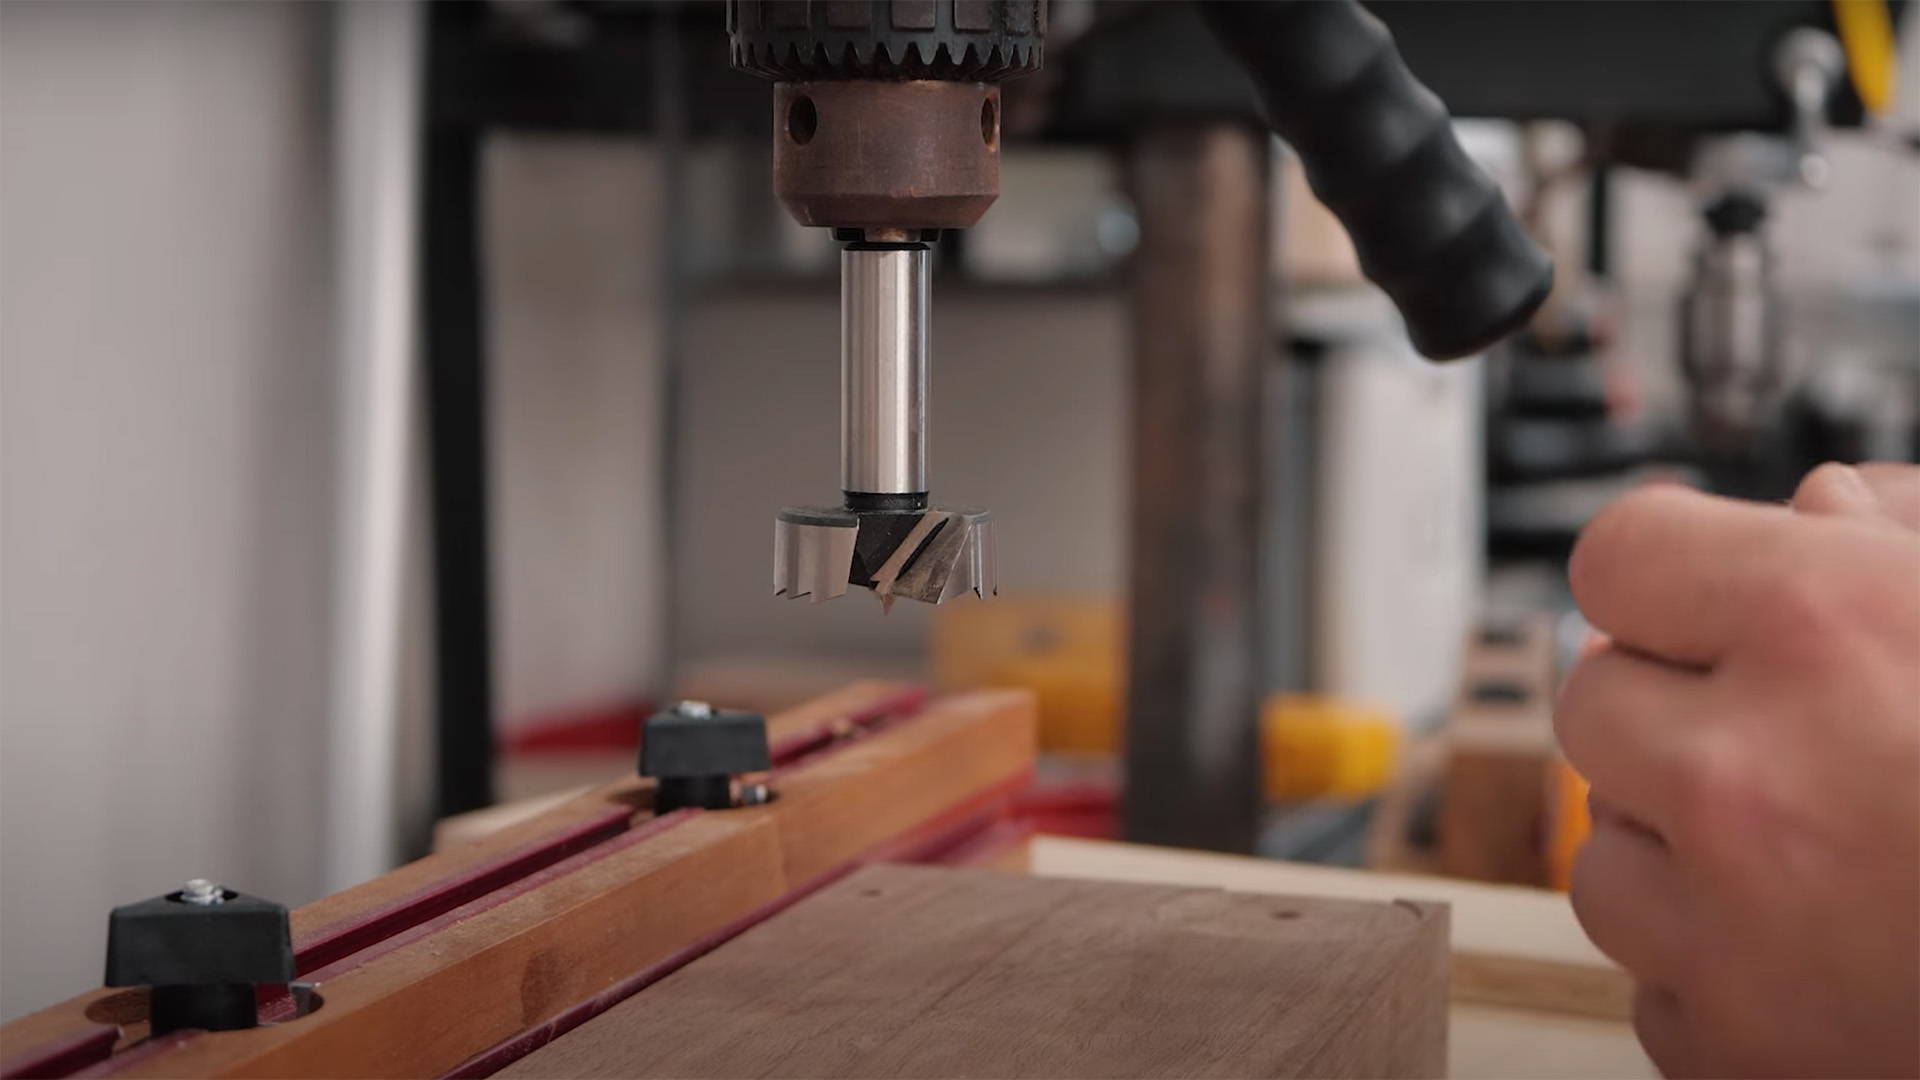
ACCURACY ON THE DRILL PRESS
This is where your center punch comes into play.
When you go to drill, set up your workpiece so the center punch hole is under the bit. It doesn’t need to be exact.
Slowly lower the bit and let the tip find the hole (minds out of the gutter). As it does, loosen your grip on the workpiece.
The tip of the bit will pull the workpiece perfectly into center as it starts to go through. Once it does, hold the workpiece steady again and drill your hole.
If you need identically placed holes in two separate boards (like for a moxon vise), here’s what to do.
Double stick tape the two pieces together so they’re perfectly lined up. Then use a long narrow bit to drill a hole through both pieces.
It doesn’t need to go all the way through the bottom piece — just a bit through the top.
Now you can use those holes as your centering points and know they’re in the exact same place.
ACCURACY ON THE BAND SAW
Band saws really are best used for rougher work — usually cleaned up later with other tools (especially through template routing).
But there is a jig you can make for cutting super close and consistently to a template (here’s a video on how to build it, as well as physical templates available for purchase).
ACCURACY WITH HAND TOOLS
Again, the most important thing is that your tools are sharp.
But honestly, getting great results with hand tools takes practice.
If you’re rough dimensioning lumber and the cut doesn’t matter, use a hand saw and practice your technique.
Jigs can also be super helpful — especially with magnets to help guide your tools (like my magnetic dovetail jig).
Read this for tips on better accuracy with hand saws, and this for mastering chisel technique.
MAKE THE CUT
Woodworking isn’t machining — and there definitely is a “close enough” factor at play.
But being able to reliably get more accurate cuts will make your time in the shop WAY more enjoyable.
And while becoming a true master takes mega-loads of practice, using the techniques and tips above can help you start getting more accurate cuts today.
Got any of your own tips for better accuracy? Share them in the comments below!
Follow us on Instagram @katzmosestools, on TikTok @katzmoseswoodworking, and check out my YouTube channel for more great woodworking content...
And as always, STAY SAFE IN THE SHOP!

6 comments
John Jensen
Hi Johnathan:
Very nicely done! I also fine ruler stops extremely useful for making repetitive marks exactly the same. Taylor Tools makes one to fit a six inch rule as well as for their twelve inch rule. Lee Valley sells a red one called Czech Ruler Stop.
https://www.leevalley.com/en-ca/shop/tools/hand-tools/marking-and-measuring/marking-accessories/67290-czeck-edge-ruler-stop
It will fit any ruler and is very handy a 24” ruler.
John Jensen from British Columbia
Aly
The tools mentioned above are so helpful for ease to do the work.
You can visit the link below:
https://www.woodworkersshoppe.com/
The tools mentioned above are so helpful for ease to do the work.
You can visit the link below:
https://www.woodworkersshoppe.com/
Paul Kamnikar
Agreed on so much here. For me, the high quality combination square and sharp tools ring true. I use Starrett squares and rules, and Saturday nights are spent enjoying music, drink, and sharpening tools I use in the shop and kitchen.
Agreed on so much here. For me, the high quality combination square and sharp tools ring true. I use Starrett squares and rules, and Saturday nights are spent enjoying music, drink, and sharpening tools I use in the shop and kitchen.
Harry
Good stuff. Thank, friend.
Good stuff. Thank, friend.
Eric Wilcox
Jonathan – thank you for this great compilation. Hey, do you have a video reference for that “kerf strip” technique for lap joints, etc.? I have read now a few time, but have trouble wrapping my head around how exactly to do it properly. Thanks!
Jonathan – thank you for this great compilation. Hey, do you have a video reference for that “kerf strip” technique for lap joints, etc.? I have read now a few time, but have trouble wrapping my head around how exactly to do it properly. Thanks!
Rob Hoglund
This is not a comment on this blog, but can you do a blog on how you know when it’s time to sharpen your saw blades, or when it’s time to replace router bis?
This is not a comment on this blog, but can you do a blog on how you know when it’s time to sharpen your saw blades, or when it’s time to replace router bis?